Create an Inbox with Call Type
-
OSS/BSS Answers
Access Control Security Hub Admin Audit B3Network Master Account Channel App Contract App Customer App Discount App Edge Server File Management Finance App Invoice App Number Management Payment Portal Settings Price List Product App Release V2 SMS Gateway Supplier App Support Center Support Hub Business Hub Sales Hub Finance Hub
- App Model - Organization Management
- App Model - Communication Apps Answers
- License Model - Organization Management
-
License Model - CPaaS Solution Answers
Phone System - Admin Guide Phone System - End-user Guide Mobile App Desktop App Web Phone Omni-Channel Auto Attendant - Admin Guide Developer Hub - Admin Guide Microsoft Teams Operator Connect - Admin Guide Microsoft Teams Direct Routing - Admin Guide Contact Center - Supervisor Guide Contact Center - Agent Guide SIP Trunk CPaaS - SIP Trunk Power SIP Trunk CPaaS Fax CPaaS Hotdesking Contact Campaign File Explorer Power Mobile App Files App Campaign App
- Telcoflow
- Integrations Answers
- Updated Regulations
- Ideas Portal
Table of Contents
Create an Inbox
Prerequisites
Owners and Admins having Permission for Phone System can access the Inbox Management tab
The organization must have at least 1 Contact Center license and it must be assigned to the Owner or Admin
Configuration

Set up General Settings of each Inbox
General Settings
Name: This is the name you set for your inbox. It can be edited as well
Priority: The priority of queues determines which call is assigned to agents if they have several incoming calls at the same time
Outbound caller ID: This optional field allows users to set a caller ID for outbound calls from this inbox. The caller ID is chosen from the organization auto attendant number list
Inbox extension: It is the code used for transferring calls among different queues
Wrap up time (seconds): Allocating a ‘wrap up’ period at the end of each call gives agents time to fill in surveys and record any important details about the call
SLA threshold (seconds): Calls answered within this threshold to fulfil the SLA
Abandoned threshold (seconds): This metric will help to distinguish if the caller hangs up after the threshold (That particular call will be identified as an Abandoned Call)

Manage Agents for each Inbox
Agent Management
Ring time per agent (seconds): Here you can set up the ring time for each agent. Default value is the same as set in Minimum Ring Time. Ring time per agent cannot be set less than the time set in Minimum Ring Time.
Ring mode: This determines the way of distributing incoming calls to a group of agents or extensions. Ring mode specifies the order in which the agents or extensions are alerted or rung when a call arrives
Round Robin (Circle Ring): Calls are distributed evenly among the team. The queue has multiple agents and incoming calls will route to them sequentially.
Just add agents in the order that you want them to ring. When a call comes in, each agent is rung in order, one after another. However, the last agent used is remembered. The next call received rings the next agent in the list.
Ring All (Simultaneous Ring): When a call comes in, all users in the Extension List ring simultaneously.
Proficiency Level: The incoming call will be assigned to the agent with the highest proficiency. For example: Agents 116, 150, and 110 have proficiency 1, 3, and 2, respectively. The incoming call will be assigned as this order 150 > 110 > 116.
Sticky Agent: When there is an incoming call to the Call Center, the first time, system will round-robin among the available agents to assign the call. The second time onwards, the call will be transferred to the last assigned agent. If after X number of times, the agent misses the call or is unavailable to answer, the system will round-robin among the available agents to assign the call. Moreover, if the caller does not want to wait, they have the option to leave a Voicemail or trigger a Callback.
Longest Idle (Uniform Ring): When a call comes in, the extension that has been unused for the longest period rings first, then the extension that has been idle second-longest rings, etc.
Longest Idle Logic
The longest idle is counted by the end time of the call.
For example:
● Agent 1 receives call at 7:00 and ends the call at 7:10
● Agent 2 receives call at 7:05 and ends the call at 7:08
● The next call comes in at 7:15
=> The call rings Agent 2 (idle time 7 minutes) not Agent 1 (idle time 5 minutes)
The longest idle is reset whenever the agent status changes from Available to any other status and start to count again when switches to Available, either by the agent (at Agent status) or by the supervisor (at CommHub > Users)
For example:
● Agent 1 switch from Busy to Available at 7:08
● Agent 2 switch from Away to Available at at 7:10
● The next call comes in at 7:15
=> The call rings Agent 1 (idle time 7 minutes) not Agent 2 (idle time 5 minutes)
Agent: Here you'll select the agents that you would like to assign to the queue. Only those agents will be displayed who are assigned the Contact Center license

Manage the display Popup of each Inbox
Popup Configuration
Screen Popup: You can enable the screen popup to display inbound call information
Answer Script: The system allows you to create scripts for guidance. Your agents can use these answer scripts while communicating with customers
Agent Form: In the Form Template, you can configure multiple options for Agents to tag and add notes to the call
Customize the Message Flow of each Inbox
Announcement Message
Initial Message: This is the message the caller will hear immediately, once they enter a queue and it will be played only one time
Marketing Message: Marketing message will be played after the initial message (if enabled). Otherwise, callers will hear this message first.
Music on hold: This is the music callers hear while in a queue, waiting for agents. If no file is uploaded, Music On Hold will play the default music set by the system.
Update Message: Update message will be played after the music on hold. This section also includes the digits entered by the user during announcement. For a unified flow and better user experience, callback and voicemail features are merged under “Update Message” settings (in both creating and editing view).
Offer Callback
Offer Voicemail

Offer Callback:
Callback feature allows a caller to choose to be called back rather than wait on hold in the queue.
Trigger Digit: Set up the digit to trigger the callback feature here and update the message at Announcement Message. Instruct the callers to press the predefined digit to request a callback if they want to (Max. 5 Digits)
Ask Caller's Contact Message: This message is played after the callers trigger a callback request (Max. limit 2000 characters)
Check for Number Validity: Check if the caller's input number is valid or not based on the predefined contact number format
Confirm Input Message: This message is played after the caller leaves their contact information
Confirm Input Digit: Add a digit to confirm that the contact is correct
Wrong Input Digit: Add a digit for callers to confirm that the contact is incorrect so they can input their correct contact number
Thank You Message: Played after the recipients confirm that the contact is correct
Hang Up Message: Played when the callers do not input a valid number within the allowed retry times
Language: You can choose a language for the messages
Callback Caller ID: Choose a caller ID for Callback calls
Callback Queue type: Choose a queue to handle Callback calls


Offer Voicemail:
Voicemail feature allows your callers to record a message and leave it in the system. Your agents can listen to this message at a later time and perform actions accordingly.
Trigger Digit: In this section, you can set up the digit to trigger a voicemail feature and update the message at Announcement Message. Instruct the callers to press the predefined digit to leave a voicemail if they want to
Message: Play a message to the callers
Language: Choose a language for the message

Setup Action for Queue Size
Inbox Size
This feature is used to define the Queue size of the Inbox and what action will be taken when reaching the maximum queue size. Select an action when the max queue size is reached:
Offer Callback
Offer Voicemail
Hang Up
Forward Call

Setup Action for Wait Time
Wait Time
This feature is used to define the maximum wait time for which a caller can be waiting in the queue. Select an action when the max wait time is reached:
Offer Callback
Offer Voicemail
Hang Up
Forward Call

On Hold Time
To enhance responsiveness during live calls, the system includes an automated alert notification feature that triggers when a call remains on hold beyond a predefined threshold. This alert is sent directly to the agent’s device, ensuring timely action.
The hold threshold can be set anywhere between 1 to 60 seconds. By default, the alert message states:
“The call reached on hold limit ({{threshold sent from call}}), please resume the call.” However, users have the option to customize the alert message content to better suit their tone or process.
How to configure on-hold notification
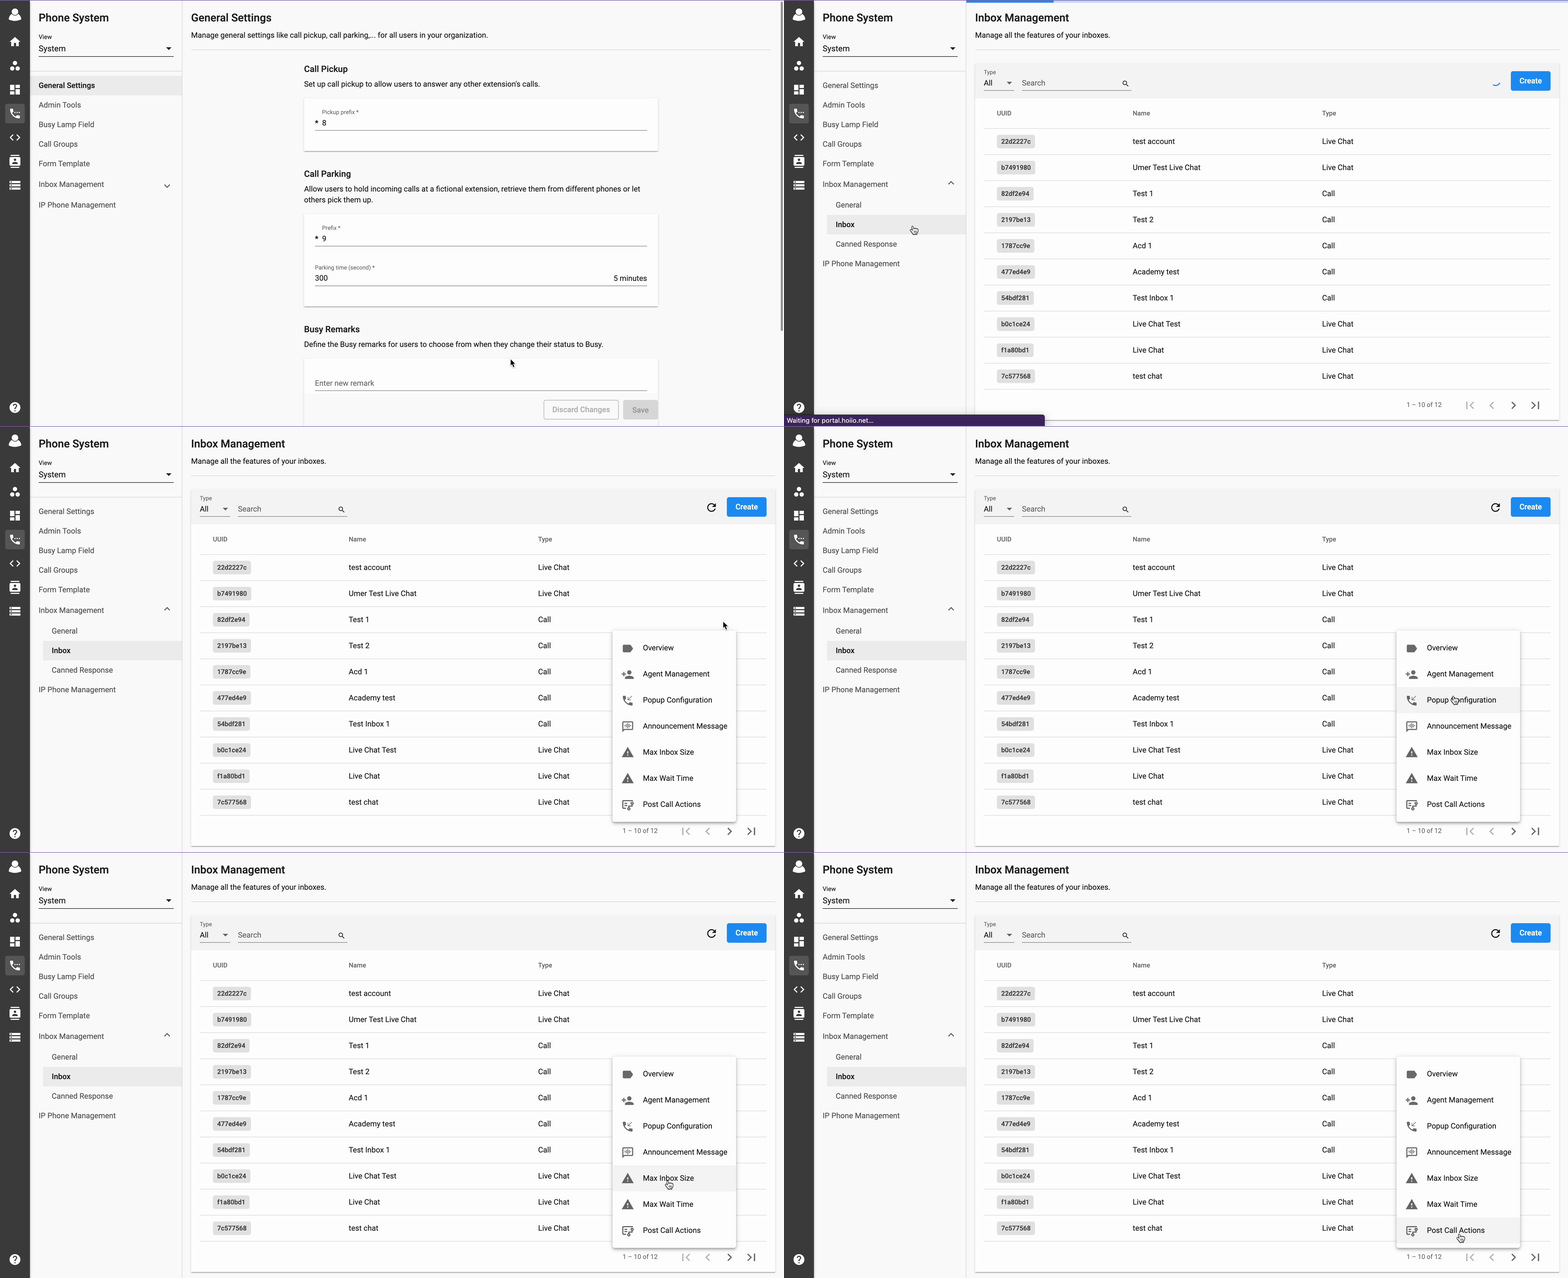
- Navigate to Phone System and open System.
- Go to Omnichannel and select Inbox.
- Pick an inbox that supports call type.
- Click the settings icon.
- Choose On-hold time.
- Activate the On-hold time feature.
- Enter the desired hold duration.
- Set the action to “Send on-hold message”, allowing the user to customize the alert message content.
- Click Save to apply the changes.

Post Call Actions
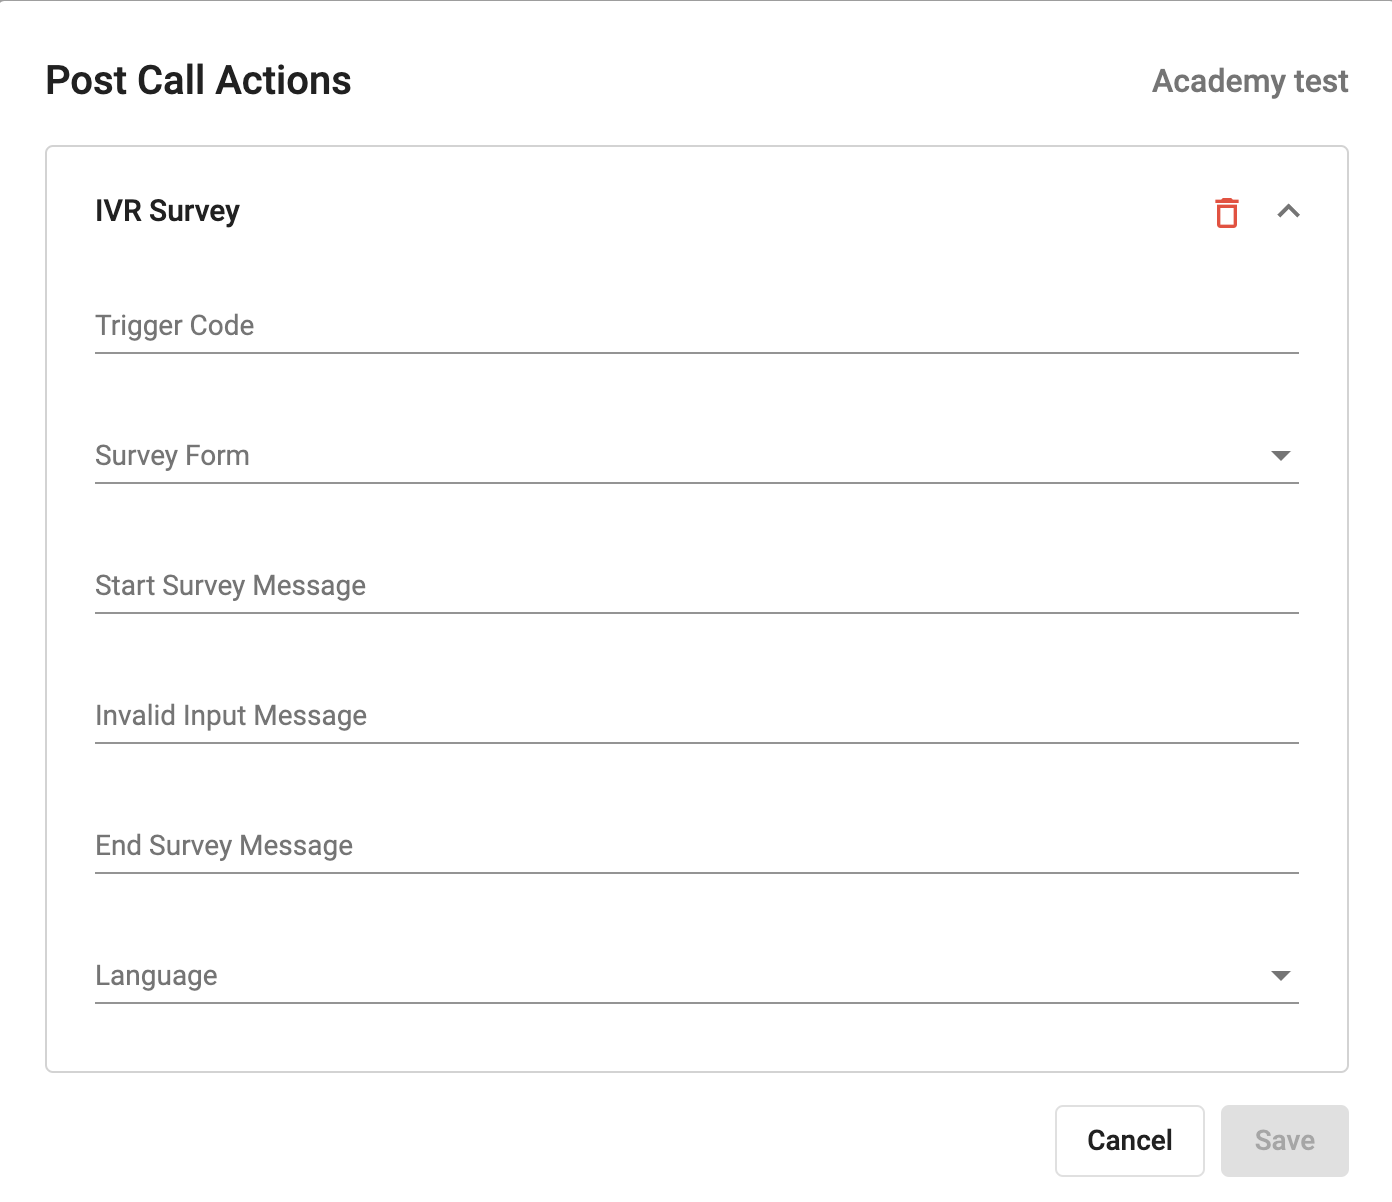
- IVR Survey
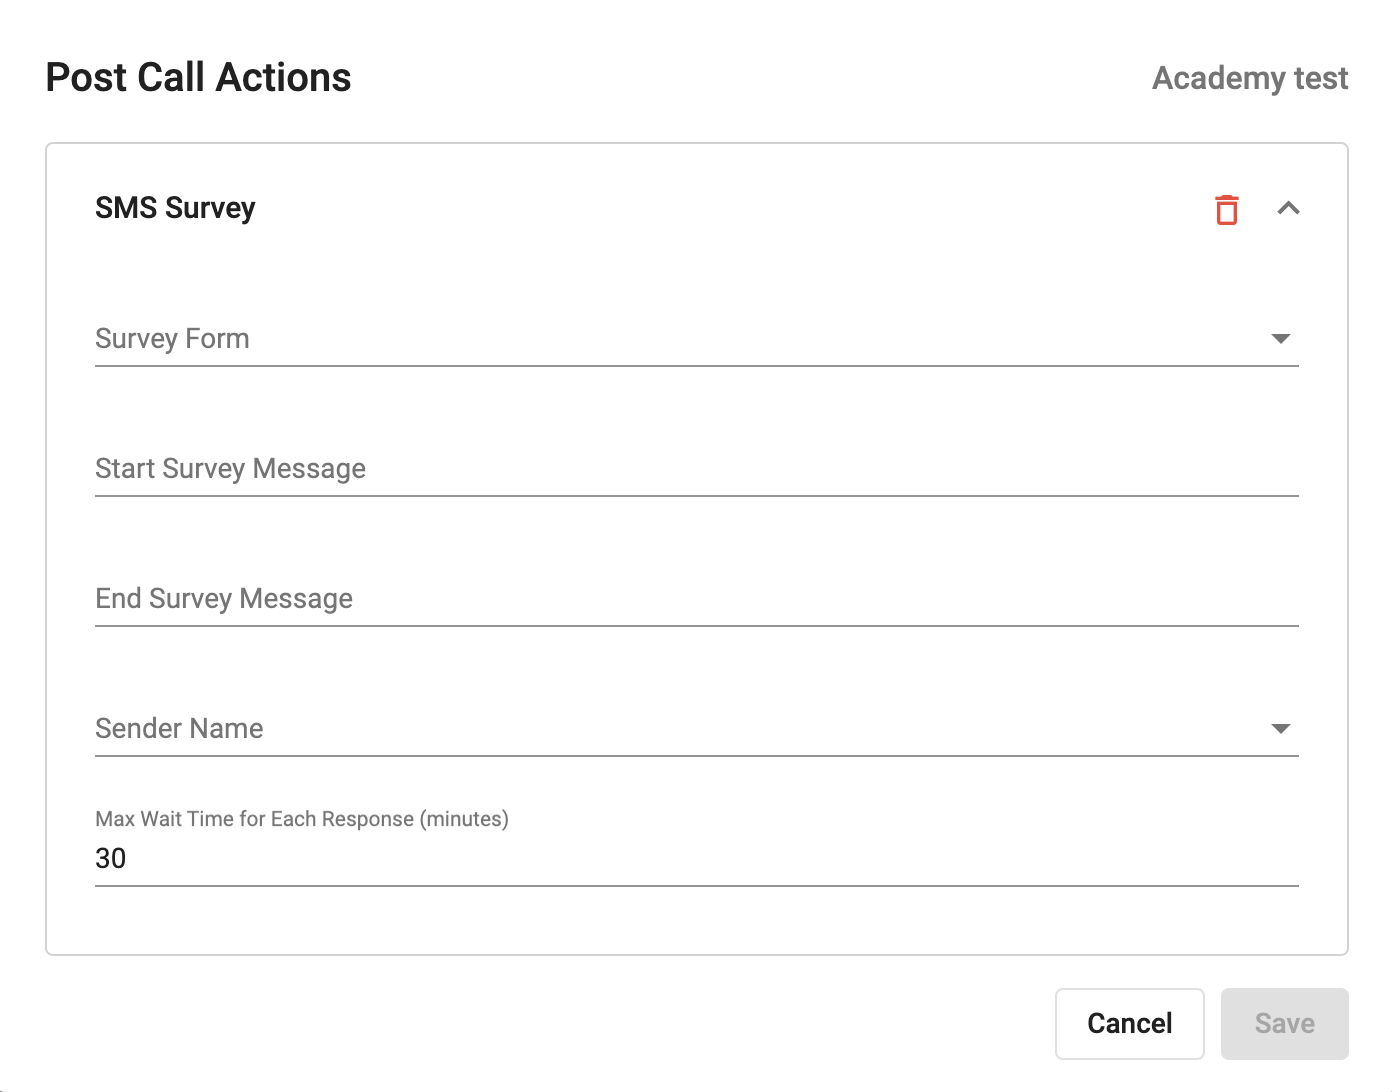
- SMS Survey

IVR Survey
Allows you to trigger an IVR post-call survey played to your callers
Trigger Code: This is the pre-set code/digit which the caller inputs to start playing the post-call survey
Survey Form: Choose a created Survey Template
Start Survey Message: This is the first message that will be played to the callers
Invalid Input Message: Only played if the callers input an invalid answer after three times
End Survey Message: Only played if the callers input a valid answer
Language: Choose a language for the TTS (Text-to-speech) feature

SMS Survey
Allows you to send an SMS survey to your callers after the call ends.
Survey Form: In the Survey Template, you can configure multiple options for customers to answer. You'll need to select the survey template of your choice
Start Survey Message: This is the first message sent to the callers
End Survey Message: This message will be sent only if the caller inputs a valid answer
Sender Name: Choose a sender name from the list
Max Wait Time for Each Response (minutes): This is the maximum time system will accept the caller's answers. After this time, all caller's answers will no longer be recorded and sent to your system

Delete an Inbox
Users can delete an inbox with call type.
If the queue is being used in an active version of the Auto Attendant flow, then a pop-up warning message will appear on the screen that the queue is being used (in which flow and block)
Users will not be allowed to delete the queue

Users will only be allowed to delete the queue if it is NOT being used in any active version of the Auto Attendant flow

Note:
Users can delete the queue if it is being used in the draft version of the Auto Attendant flow
View/Edit Contact Center Settings
- Users can view/edit the Contact Center settings after creation
