Team Chat - Channel

Written by B3Networks Academy
Updated at May 18th, 2026
-
OSS/BSS Answers
Access Control Security Hub Admin Audit B3Network Master Account Channel App Contract App Customer App Discount App Edge Server File Management Finance App Invoice App Number Management Payment Portal Settings Price List Product App Release V2 SMS Gateway Supplier App Support Center Support Hub Business Hub Sales Hub Finance Hub
- App Model - Organization Management
- App Model - Communication Apps Answers
- License Model - Organization Management
-
License Model - CPaaS Solution Answers
Phone System - Admin Guide Phone System - End-user Guide Mobile App Desktop App Web Phone Omni-Channel Auto Attendant - Admin Guide Developer Hub - Admin Guide Microsoft Teams Operator Connect - Admin Guide Microsoft Teams Direct Routing - Admin Guide Contact Center - Supervisor Guide Contact Center - Agent Guide SIP Trunk CPaaS - SIP Trunk Power SIP Trunk CPaaS Fax CPaaS Hotdesking Contact Campaign File Explorer Power Mobile App Files App Campaign App
- Telcoflow
- Integrations Answers
- Updated Regulations
- Ideas Portal
Table of Contents
Overview
Channels are chat rooms:
- Users can name chat rooms based on anything, including a project, a topic, or a team. And users can make them public or private as well.
- There are 2 types of Channel:
Public channels
- Permission: Everyone in the organization can join the channel.
- Purpose: For open discussions (e.g. company-wide announcements)
- Represented Icon: A pound (#)
Private channels
- Permission: Only selected people can join.
- Purpose: For private conversations with groups of teammates (e.g. Sales, Customer Service, etc.)
- Represented Icon: A lock (🔓 )

Note
The notification for each type of channel message distinguishes whether it is a message from a private channel or public channel.

Configuration
1. Create a Channel
- Click the (+) button on the sidebar / Ctrl + K
- Click Create Channel
- Toggle on/off for private/public channel
- Fill in channel info
- Invite members
- Create channel
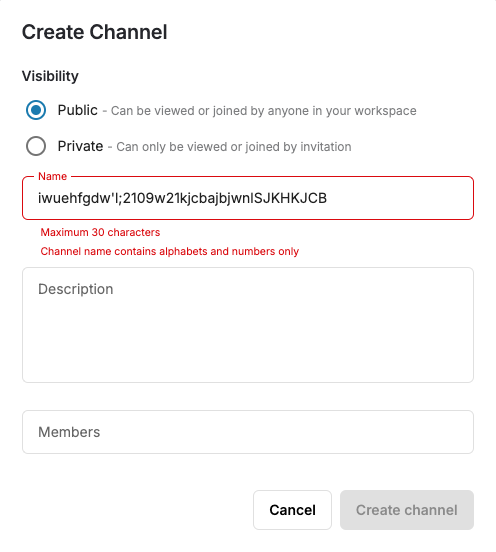
Note:
- Names can’t be longer than 30 characters.
- Channel name can only contain alphabets and numbers.
- Only the owner is permitted to modify the channel name and description, whether the channel is public or private.

2. Leave / Archive a Channel
- Members of a channel can leave it by viewing the channel details > Leave

- The Creator of a channel can archive it by viewing the channel details > Archive
Note
User removed from a private channel will be navigated to Discover page.

User removed from a public channel can choose to join the channel

Orphaned Channel Ownership
If User A (owner of channel Test ownership) is disabled, the channel becomes orphaned. The system will display the ex-owner’s correct status, and the remaining owner/admin in the channel can claim ownership.

3. Invite people to a Channel
Option 1:
Viewing the channel details > Add members > Choose members > Invite
Option 2:
At the chatbox, type @username to invite them to join the channel
-
If users are already in the channel, typing @username will help notify them of the messages.

4. Search shared files within a Channel
View the channel details > Files > Download

Note
Non-members will not be allowed to view or download any files or images shared in the channel.
- Applies to both files and images
- Applies to attachments with or without captions
- Captions associated with the attachments should also be hidden from non-members
5. Search messages in a Channel
- View the channel details > click on the (🔍) icon
- Enter the keywords > Search

6. Pin messages in Channel
- Go to a particular Channel
- Place your cursor over the message you wish to pin
- Click on the 3-elipsis (⋮) icon and click “Pin message”
- Users can pin up to 5 messages.
- If they attempt to pin a 6th message, a confirmation popup will appear, prompting them to confirm the action.

Note
A user who is not a member of a channel can still view the channel’s pinned messages but can not unpin them
7. Pin a Channel
- Go to a particular Channel
- Select the Star icon (☆) next to the channel name to pin the channel on the sidebar for quick searching.

8. Browse a Channel
- Click the (+) button on the sidebar / Ctrl + K
- Key in team member’s name or channel name at Search (Start with @ to search people and # to search channel only)

Note
The sidebar supports right-click actions for conversations. This is applied for direct message, channel, newsfeed.

9. Bookmark a message
Users can also chose to bookmark any message sent in a channel. To bookmark any message, click on the three dots and select “Bookmark” option from the given options. These messages can be later viewed in the “Bookmarks” tab.

Under the bookmarks tab, users can view all bookmarked messages. For any bookmarked message, it will show the option to to “Show in chat” and the user will be directed to the original location of the message in the chat history.

10. Turn Notifications On or Off
Users can manage notifications at the channel level by muting or unmuting a channel.
Steps:
- Open the Unified Workspace.
- Select a team chat channel.
- In the top-right corner, click the Mute / Unmute icon.
- Select Mute to stop receiving notifications, or Unmute to enable notifications again.

NOTES
- Users can mute or unmute notifications for individual channels.
- Notifications are enabled by default.
- Messages sent to a muted channel are still delivered and marked as unread.
- Muted channels do not trigger system notifications.
- This behavior is consistent across web, mobile, and desktop platforms.
11. Discussion Feature
Discussions let you create focused conversation threads from specific messages in a channel. This helps keep conversations organized, reduce clutter in the main channel, and make it easier to follow related topics.
How to Create a Discussion
- Open the Unified Workspace.
- Select a team chat channel from your list.
- Hover over the message you want to discuss and click the Create Discussion icon.
- Enter a Name: This field is mandatory; while the system provides an auto-filled name, it is fully editable.
- Add a Description (Optional): You can provide additional context using up to 1,000 characters.
- Click Create Discussion.
- The discussion will open in a split-view, allowing you to send messages and reply immediately.

Key Characteristics
- Discussions are created from messages within a channel.
- Each discussion belongs to a channel (there are no standalone discussions).
- All channel members can access discussions.
- Discussions can be viewed in split view or full view.
Lifecycle & Limits
- Discussions are automatically closed after 14 days of inactivity.
- Channel owners and discussion owners can close a discussion manually
- Closed discussions are read-only but still viewable.
- Each channel can have up to 10 active discussions.
- All members can edit the discussion name and description.
- You cannot leave a discussion individually. Leaving the channel removes access to all its discussions.
