Custom Action - Post Call Survey
Discover how implementing a custom post-call survey can help improve customer satisfaction and gather valuable feedback to enhance your customer service experience.
-
OSS/BSS Answers
Access Control Admin Audit B3Network Master Account Channel App Contract App Customer App Discount App Edge Server File Management Finance App Invoice App Number Management Payment Portal Settings Price List Product App Release V2 SMS Gateway Supplier App Support Center Support Hub Business Hub Sales Hub
- App Model - Organization Management
- App Model - Communication Apps Answers
- License Model - Organization Management
-
License Model - CPaaS Solution Answers
Phone System - Admin Guide Phone System - End-user Guide Mobile App Desktop App Web Phone Auto Attendant - Admin Guide Developer Hub - Admin Guide Microsoft Teams Operator Connect - Admin Guide Microsoft Teams Direct Routing - Admin Guide Contact Center - Supervisor Guide Contact Center - Agent Guide Omni-Channel SIP Trunk CPaaS - SIP Trunk Power SIP Trunk CPaaS Fax Contact Dashboard Campaign File Explorer
- Telcoflow
- Integrations Answers
- Updated Regulations
- Ideas Portal
Table of Contents
Introduction
Post Call Survey allows the system to send an SMS to the callers to gather their feedback after their calls to your Call Center finish.
This feature provides a tool for the Call Center to understand the satisfaction of customer service as well as to enhance agents' effectiveness.
Licensing Requirement
Licensing requirement to use the Post Call Survey Action is:
- Developer Hub Base license
Configuration
To configure a Post call Survey, follow the below steps:
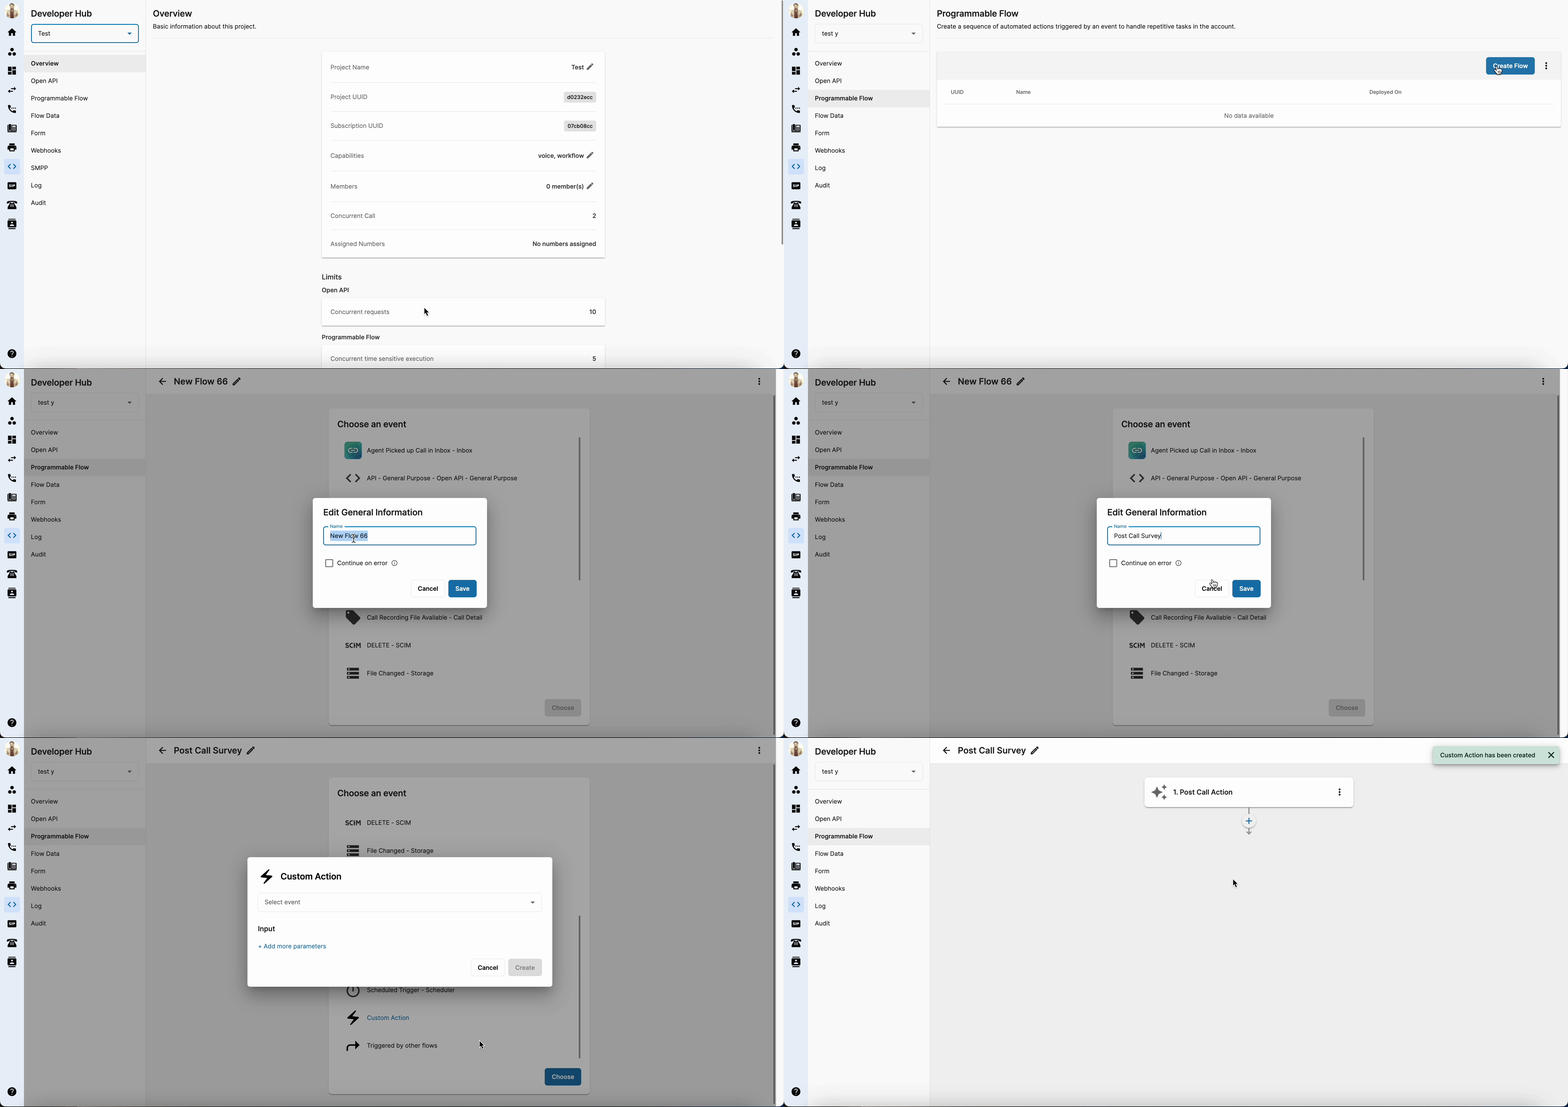
- Click on Developer Hub. You can either choose a project that wants to set up the post call survey or create a new project.
- On the Developer Hub, choose Programmable Flow.
- On this, you can choose to Create a new flow or Edit an existing flow.
- You can also change the flow name by clicking the pencil icon on the top left of the flow.
- After clicking Create Flow, scroll down and choose Custom Action and click choose. A pop up will appear, select Post Call Action and click Create.
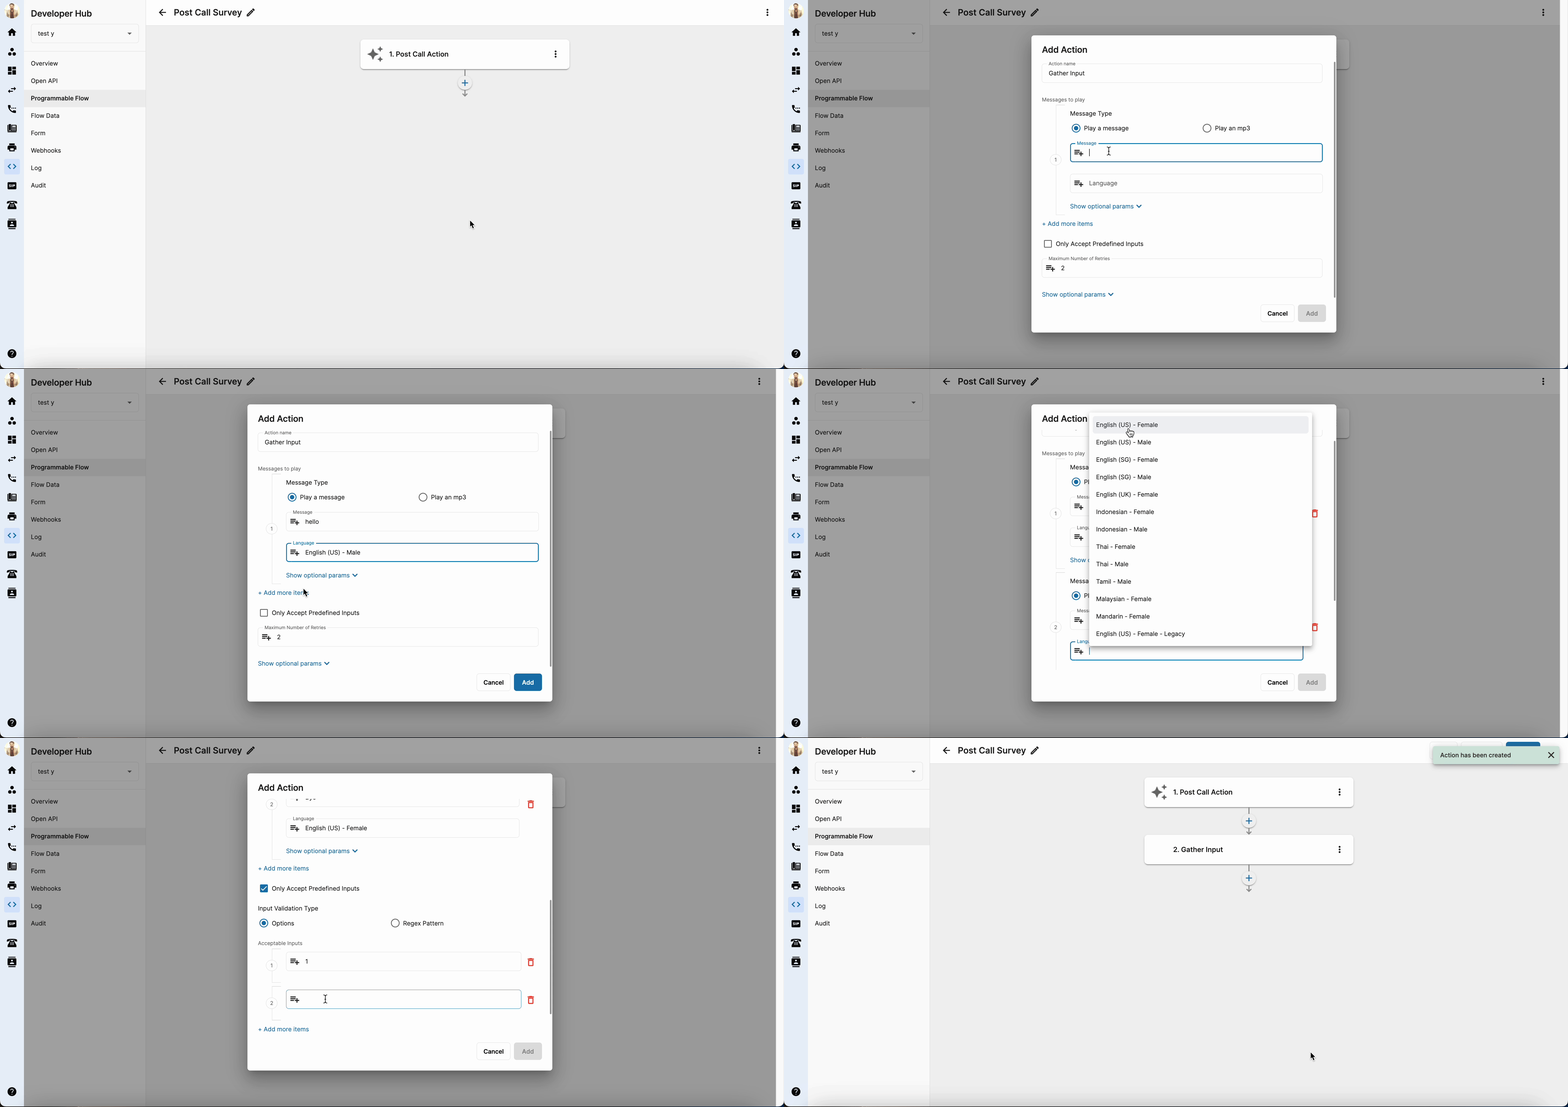
- To add new block to the flow, click (+)
- For post call survey, add a block called "Gather Input”.
- New pop up will show up. You can change the block name by editing the Action Name.
- Message to Play is to choose which message will play after the call is ended. You can choose between Play a Message or Play an mp3.
- Tick the Only Accept Predefined Input. On Input Validation Type, choose Options. New options will show called “Acceptable Inputs”. This option is to determine what digit needs to push on the survey.
- You can add more acceptable inputs by clicking on +Add more items.
- Maximum Number of Retries is to determine how many times the survey will continue before the call automatically ends.
- After this block is set up, click Add.
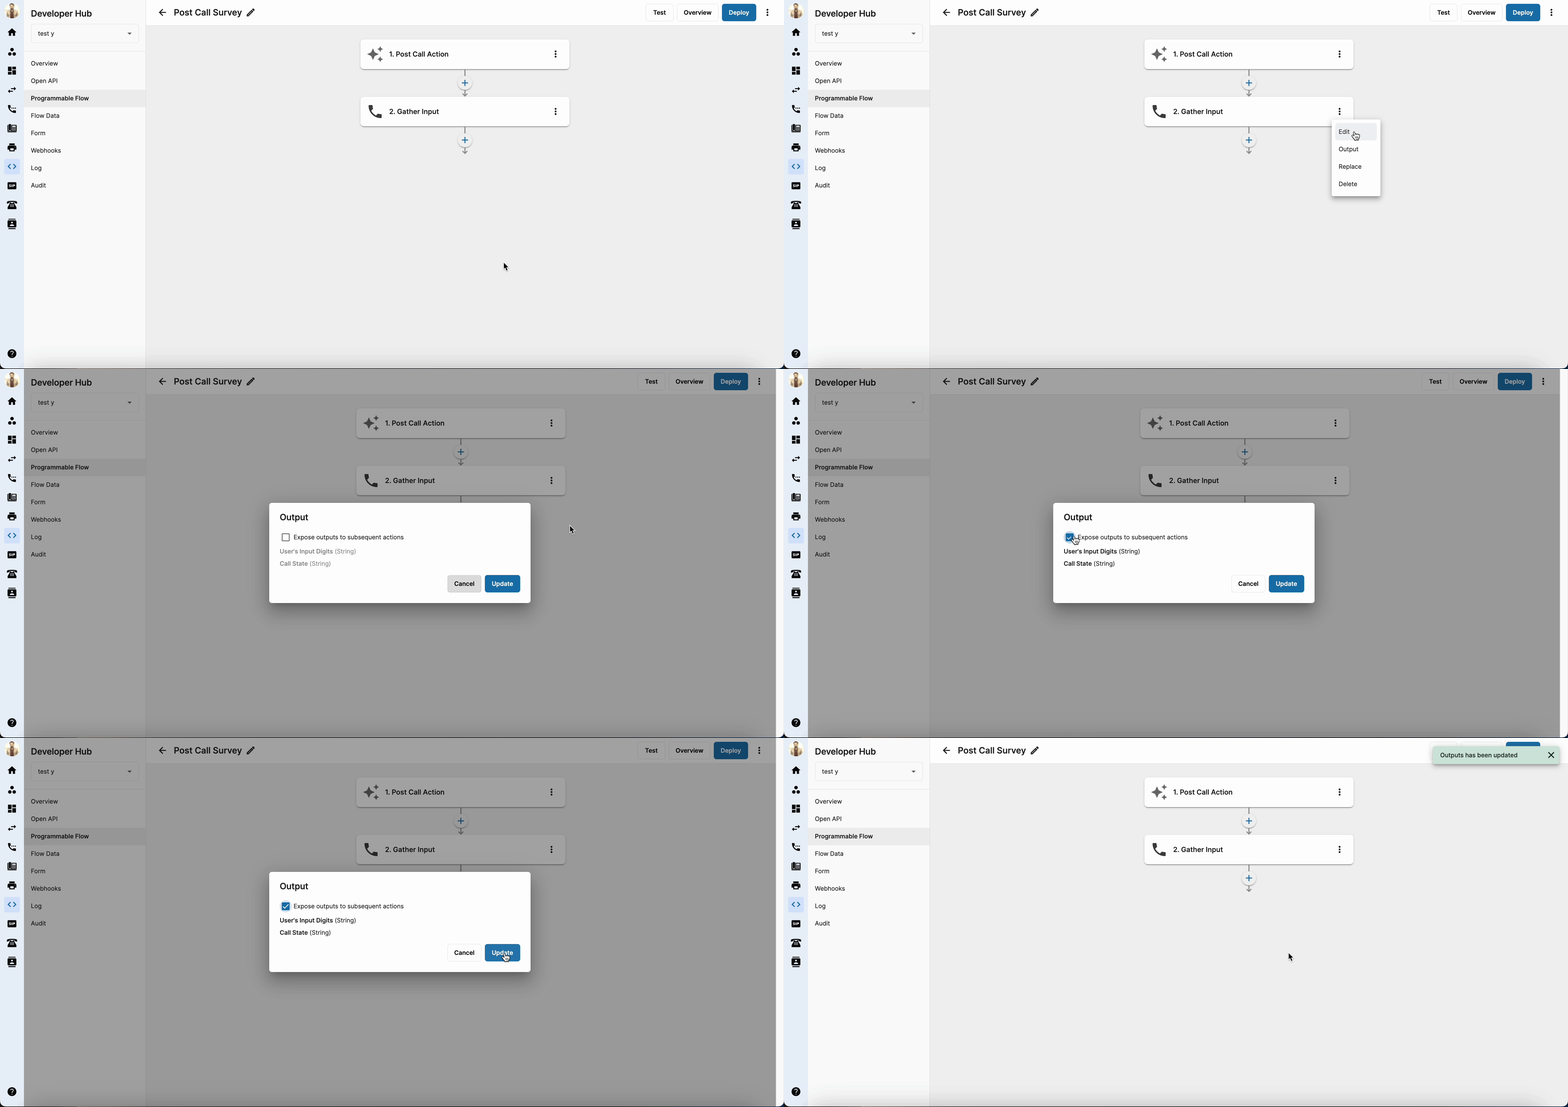
- After the Gather Input block is set up, click on the three dots on the right side and choose Output.
- Tick on the Expose Outputs to Subsequent Actions to make sure this block can be used in another block.
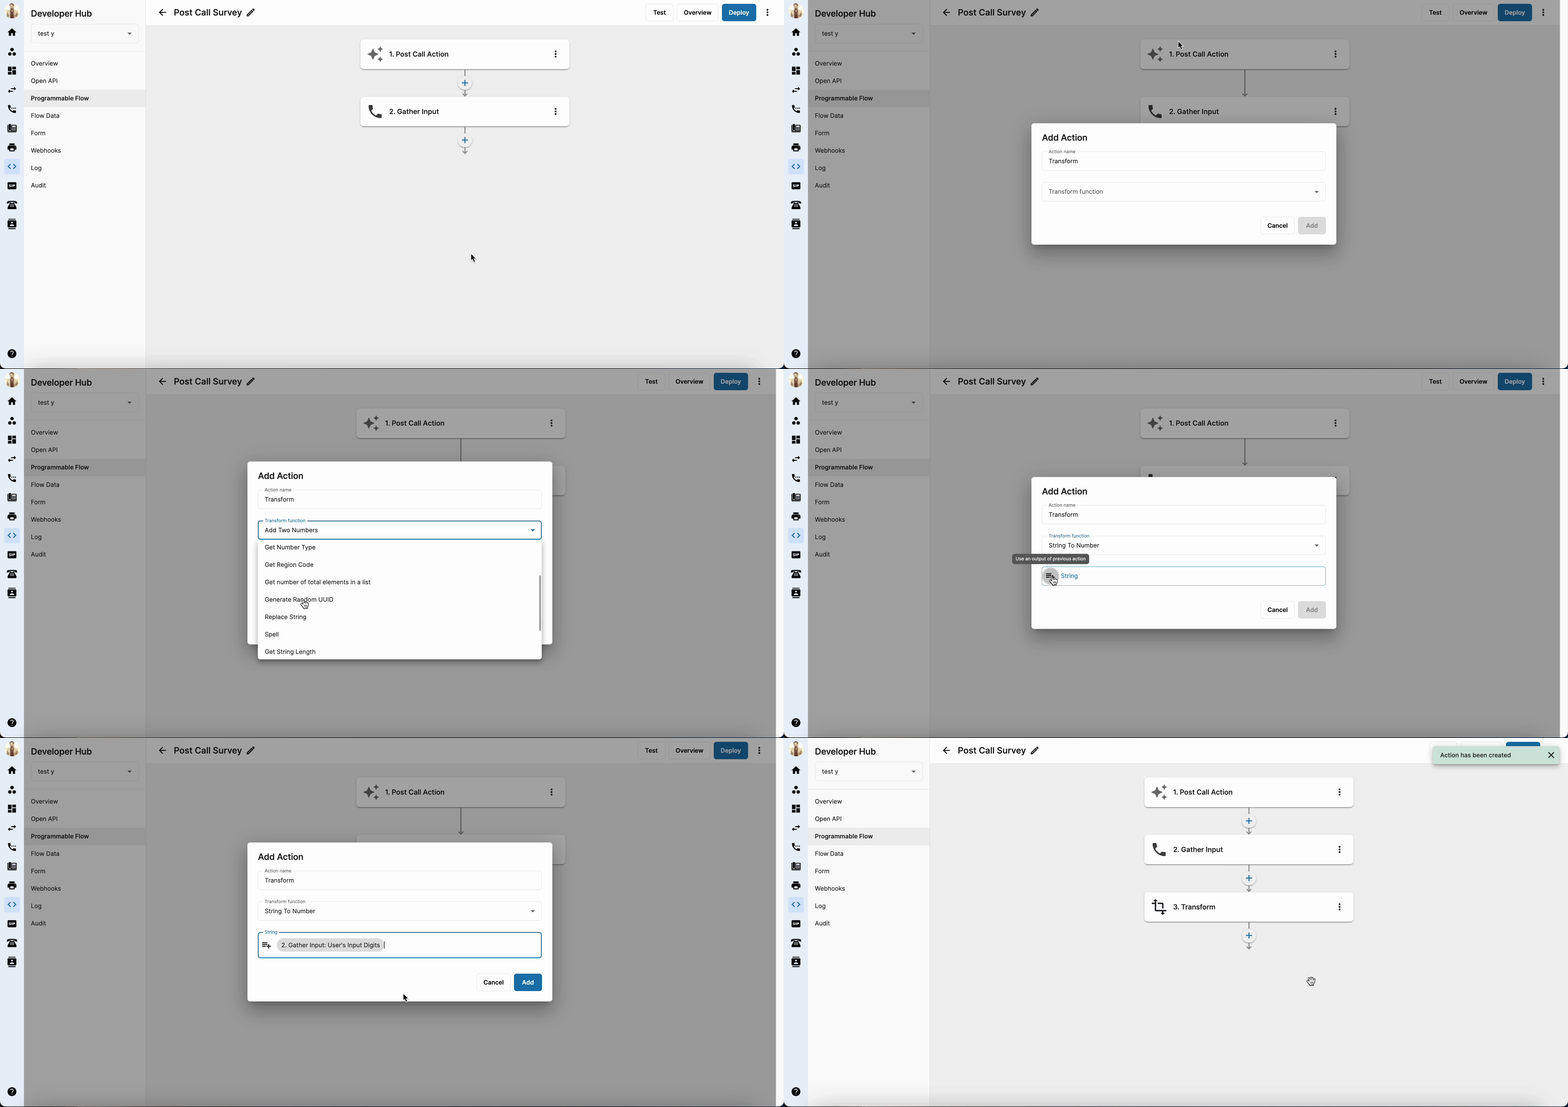
- Next step is to add a block called “Transform”. Click (+) and choose Transform.
- Inside the transform block, click on the arrow on the right side and choose String To Number.
- On String, click + on the left, choose Gather input and choose User`s Input Digits. After that, click Add.
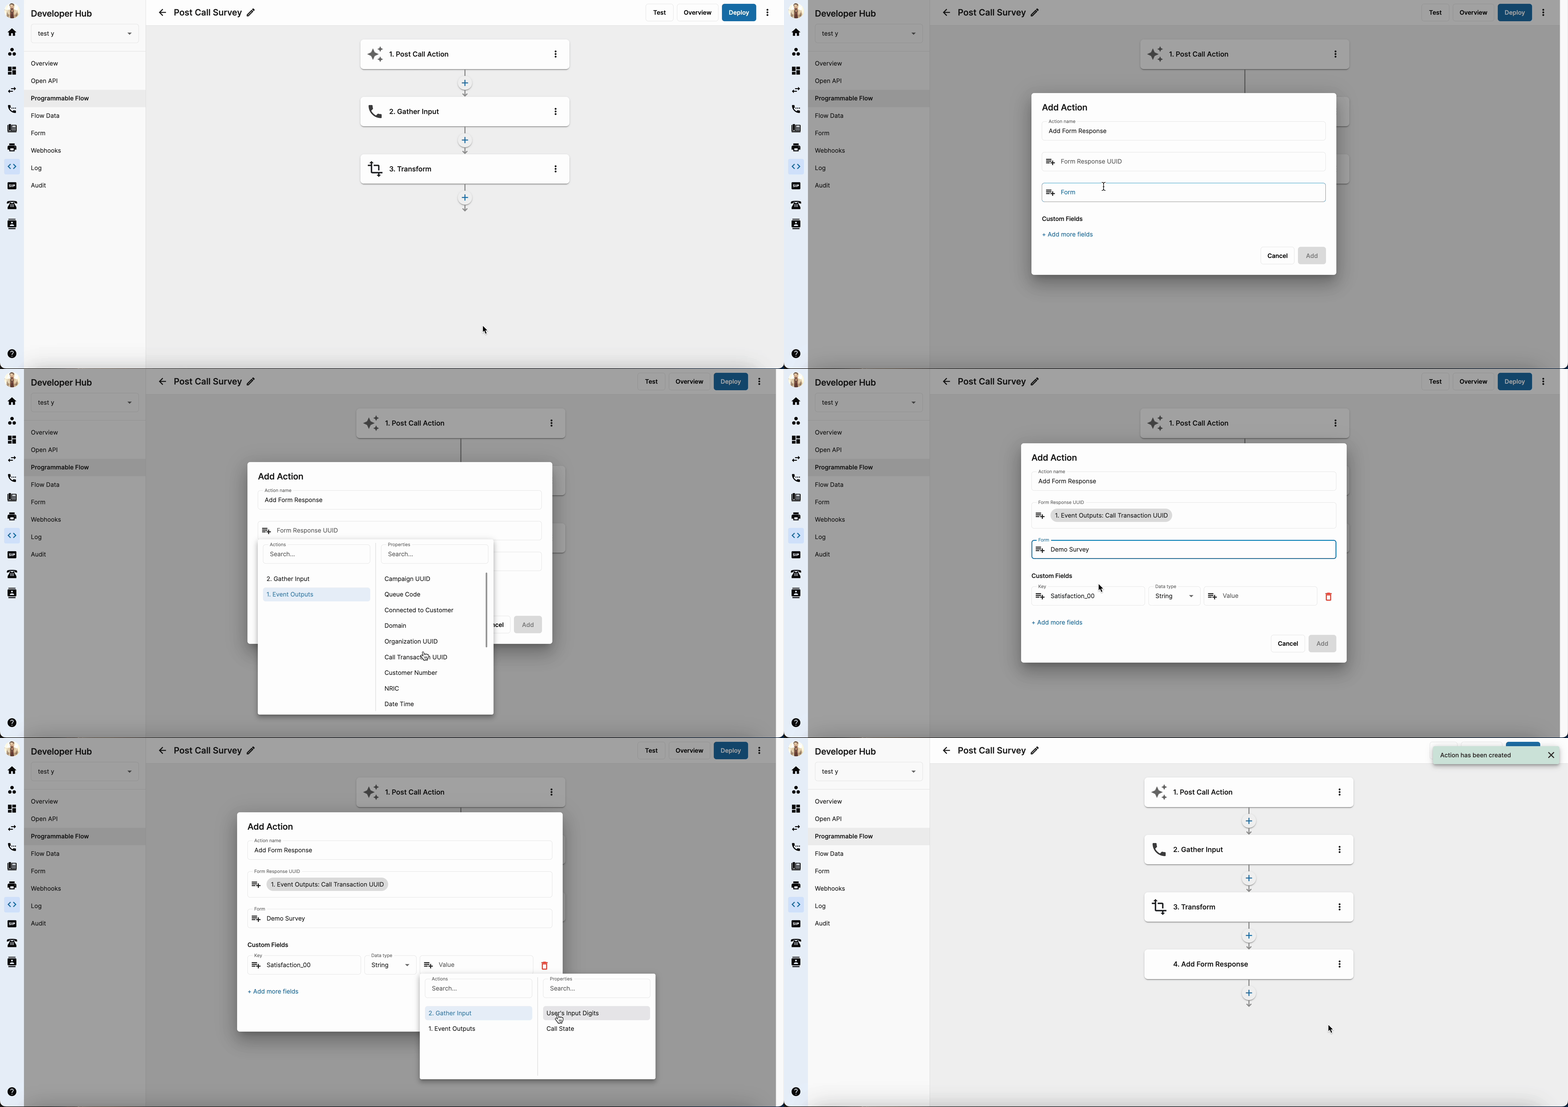
- Next step is to add a block called “Add Form Response”. click (+) and choose Add Form Response.
- On Form response UUID field, click (+) on the left side, choose Event Outputs and choose Call Transaction UUID.
- Next on the Form field, choose the form that has already been created on the Form menu on the Developer Hub.
- On the Custom Field, on Value, click (+), choose Gather Input and choose User`s Input Digits.
- After all fields are done, click Add.
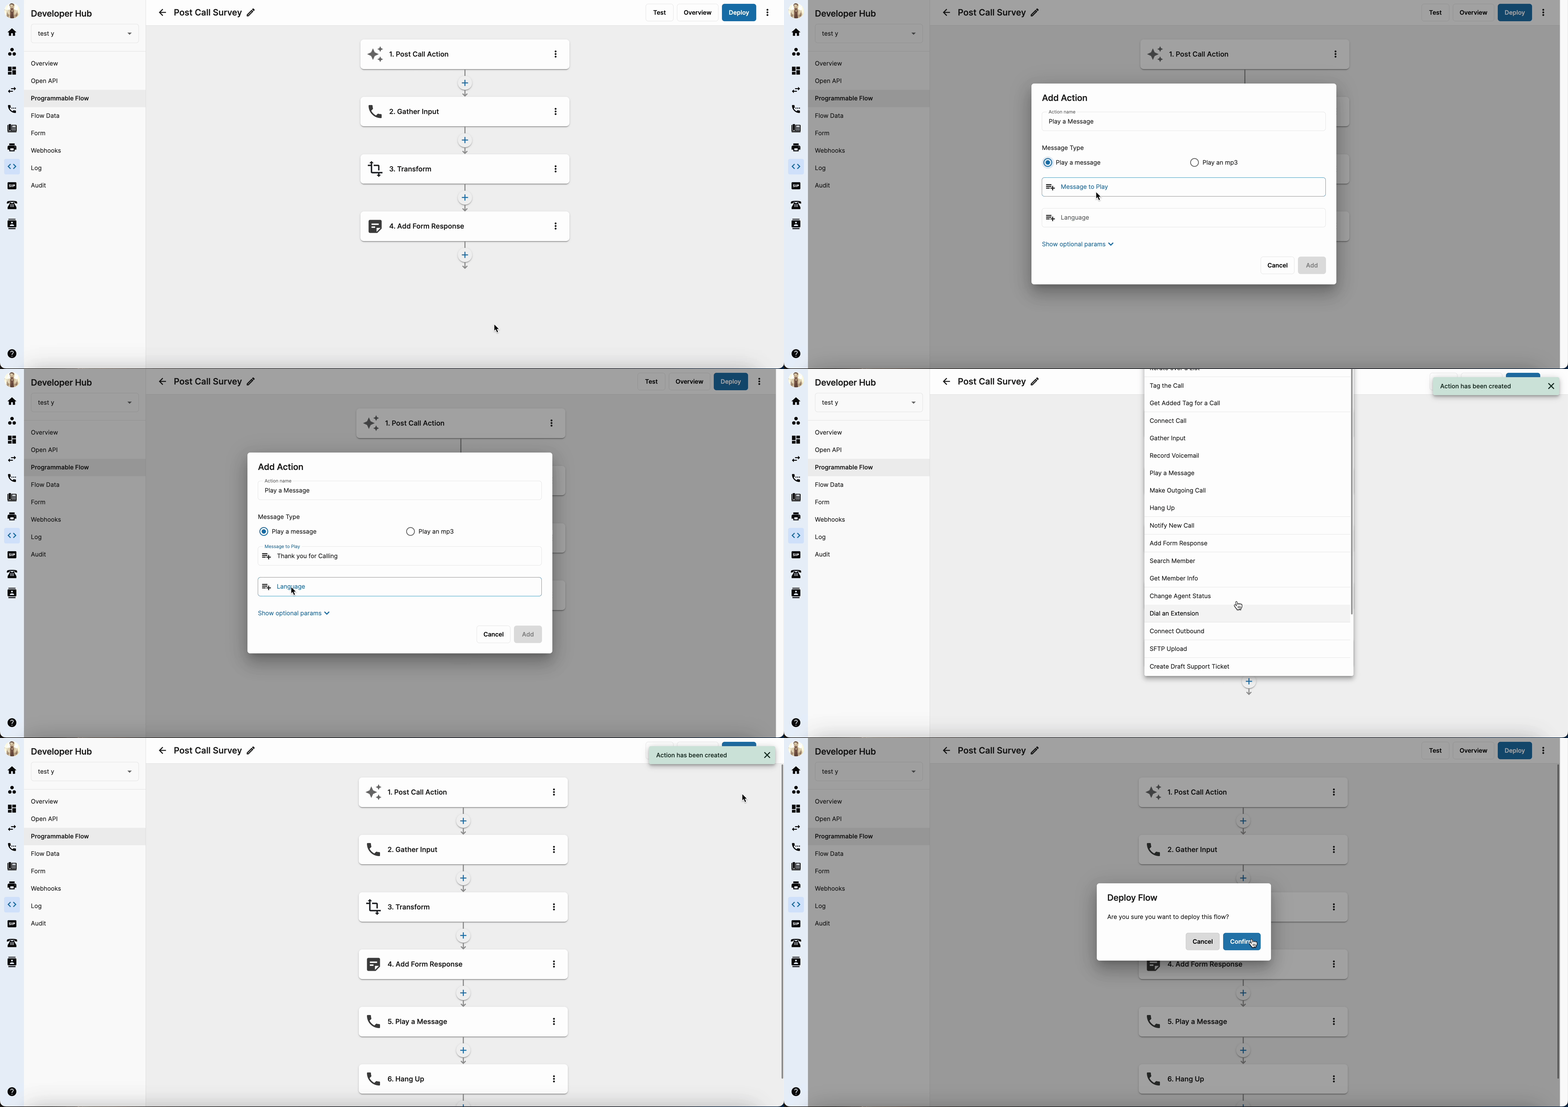
- Next step is to add a block called “Play A Message”. click (+) and choose “Play A Message”.
- On this block, you can choose between Play a message or Play an mp3.
- This block's function is to uttering the closing sentence after the survey is filled by the customer.
- After choose, click Add.
- Last step is to add a block called “Hang up”. Click (+) and choose Hang up..
- This block’s function is to hang up the call when the survey is finished.
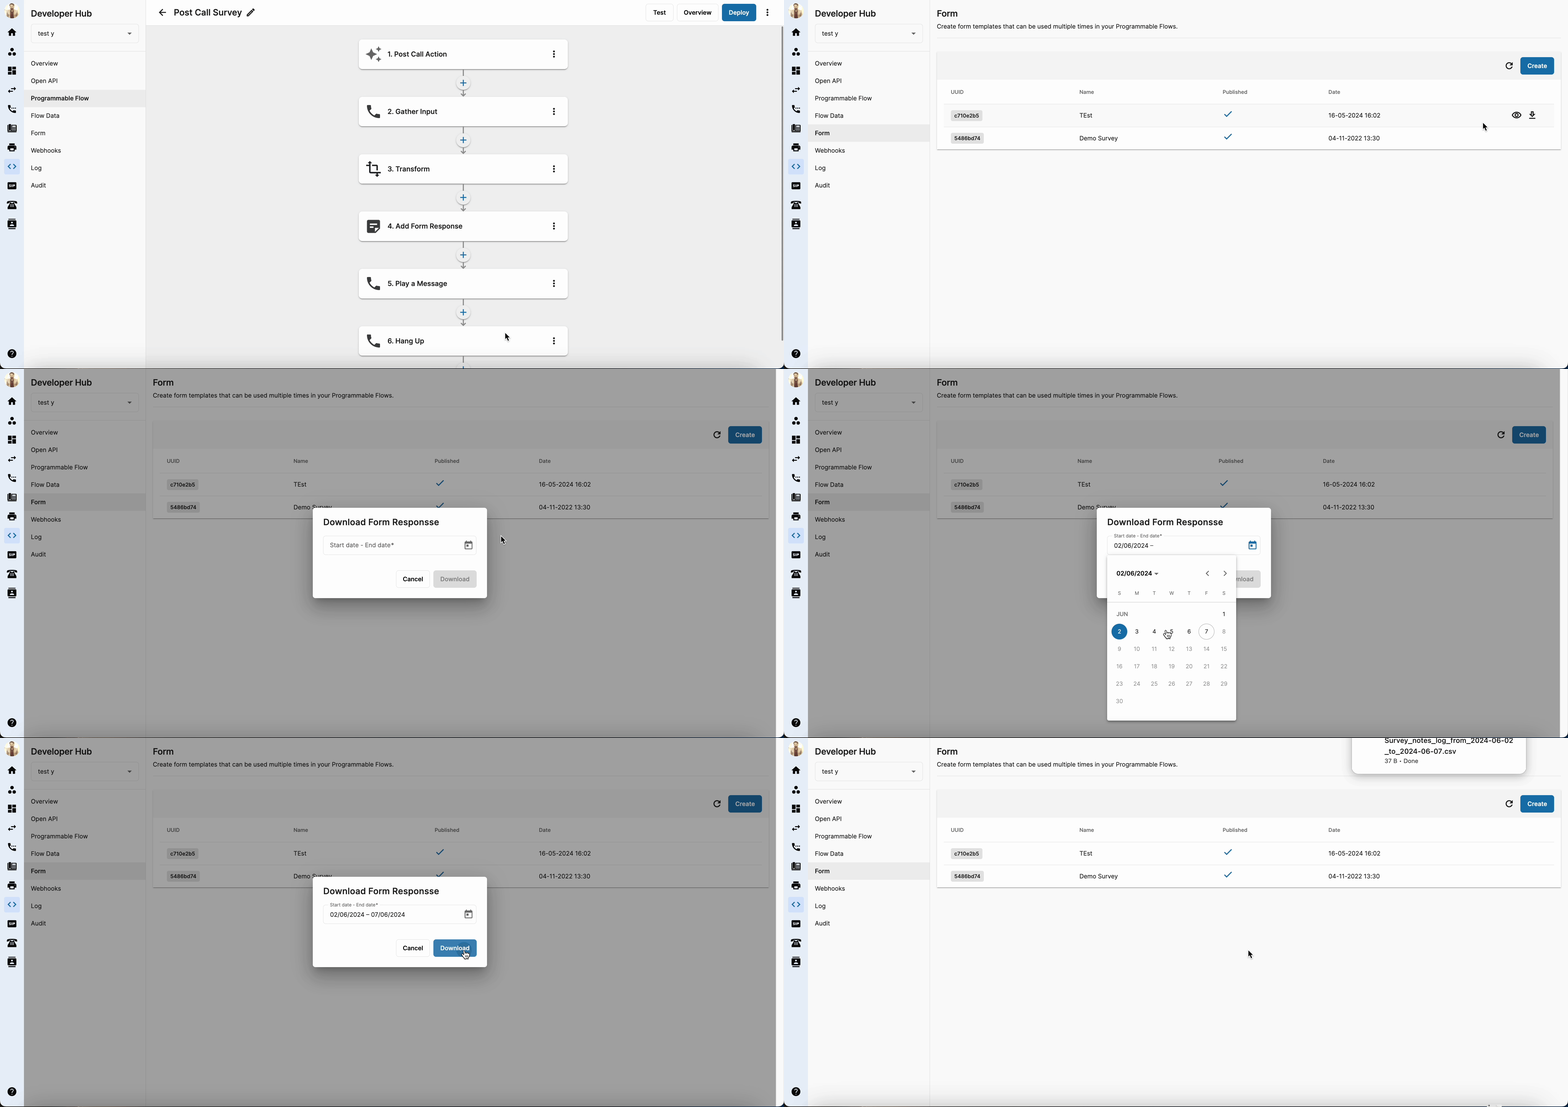
- After finish to setup the post call survey flow, click on Deploy and choose Confirm.
Collect Survey Log
- To collect the survey log, go to Developer Hub and select Form. On the form menu, click Download on the right side of the selected form.
- Select the Date that customer need to download the survey then click Download.
