Team Chat - Channel
-
OSS/BSS Answers
Access Control Security Hub Admin Audit B3Network Master Account Channel App Contract App Customer App Discount App Edge Server File Management Finance App Invoice App Number Management Payment Portal Settings Price List Product App Release V2 SMS Gateway Supplier App Support Center Support Hub Business Hub Sales Hub Finance Hub
- App Model - Organization Management
- App Model - Communication Apps Answers
- License Model - Organization Management
-
License Model - CPaaS Solution Answers
Phone System - Admin Guide Phone System - End-user Guide Mobile App Desktop App Web Phone Omni-Channel Auto Attendant - Admin Guide Developer Hub - Admin Guide Microsoft Teams Operator Connect - Admin Guide Microsoft Teams Direct Routing - Admin Guide Contact Center - Supervisor Guide Contact Center - Agent Guide SIP Trunk CPaaS - SIP Trunk Power SIP Trunk CPaaS Fax CPaaS Hotdesking Contact Campaign File Explorer Power Mobile App Files App Campaign App
- Telcoflow
- Integrations Answers
- Updated Regulations
- Ideas Portal
Table of Contents
Overview
Channels are chat rooms:
- Users can name chat rooms based on anything, including a project, a topic, or a team. And users can make them public or private as well.
- There are 2 types of Channel:
Public channels
- Permission: Everyone in the organization can join the channel.
- Purpose: For open discussions (e.g. company-wide announcements)
- Represented Icon: A pound (#)
Private channels
- Permission: Only selected people can join.
- Purpose: For private conversations with groups of teammates (e.g. Sales, Customer Service, etc.)
- Represented Icon: A lock (🔓 )
Configuration
1. Create a Channel
- Click on the (☰) icon > click on the (🔍) icon
- Create Channel > Choose Members > Next
- Toggle on/off for private/public channel > fill in channel name* > Create
Note:
Names must be without spaces or periods, and can’t be longer than 50 characters.

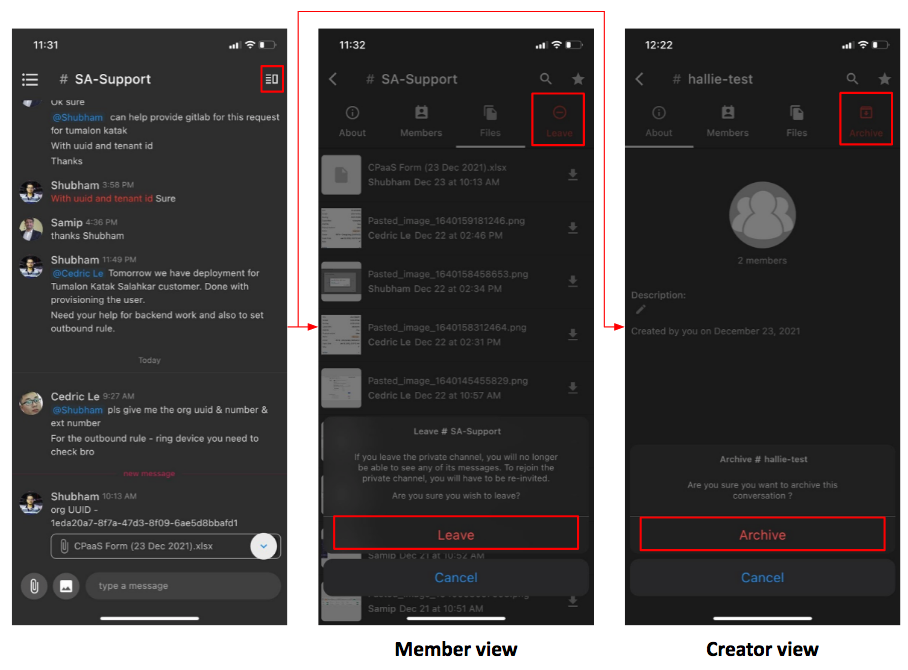
2. Leave / Archive a Channel
- Members of a channel can leave it by clicking on the ( ☰ ) icon > Leave
- The Creator of a channel can archive it by clicking on the ( ☰ ) icon > Archive

3. Invite people to a Channel
Option 1:
Click on the ( ☰ ) icon > Members > Add members > Choose members > invite
Option 2:
At the chatbox, type @username to invite them to join the channel
- If users are already in the channel, typing @username will help notify them of the messages.

4. Search shared files within a Channel
Click on the ( ☰ ) icon > Files > Download

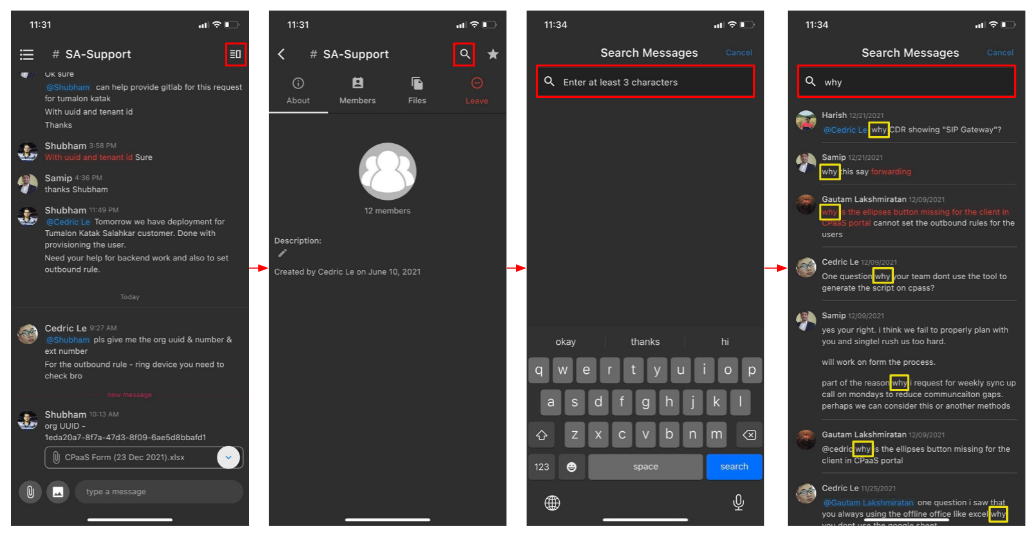
5. Search messages in a Channel
- Click on the ( ☰ ) icon > click on the (🔍) icon
- Enter the keywords > Search

6. Pin a Channel
Go to a particular Channel, click on the ( ☰ ) icon
Select a Star icon ( ☆ ) in the top right corner to pin the channel on the sidebar for quick searching.

7. Browse a Channel
- Click on the (☰) icon > click on the (🔍) icon
- Key in the channel's name at the Search bar.
- Start with # to search.
