NewRock VOIP Gateway
-
OSS/BSS Answers
Access Control Security Hub Admin Audit B3Network Master Account Channel App Contract App Customer App Discount App Edge Server File Management Finance App Invoice App Number Management Payment Portal Settings Price List Product App Release V2 SMS Gateway Supplier App Support Center Support Hub Business Hub Sales Hub Finance Hub
- App Model - Organization Management
- App Model - Communication Apps Answers
- License Model - Organization Management
-
License Model - CPaaS Solution Answers
Phone System - Admin Guide Phone System - End-user Guide Mobile App Desktop App Web Phone Omni-Channel Auto Attendant - Admin Guide Developer Hub - Admin Guide Microsoft Teams Operator Connect - Admin Guide Microsoft Teams Direct Routing - Admin Guide Contact Center - Supervisor Guide Contact Center - Agent Guide SIP Trunk CPaaS - SIP Trunk Power SIP Trunk CPaaS Fax CPaaS Hotdesking Contact Campaign File Explorer Power Mobile App Files App Campaign App
- Telcoflow
- Integrations Answers
- Updated Regulations
- Ideas Portal
Table of Contents
What is a VoIP Gateway?
A VoIP gateway is a device that uses Internet Protocols to transmit and receive voice communications.
A VoIP Gateway is used to convert voice and fax calls, in real-time, between the traditional network (PSTN) and an IP network. Traffic coming in from the traditional network (PSTN) is fed through a VoIP gateway and converted to digital packets and sent to the IP network.
How to Use a VoIP Gateway?
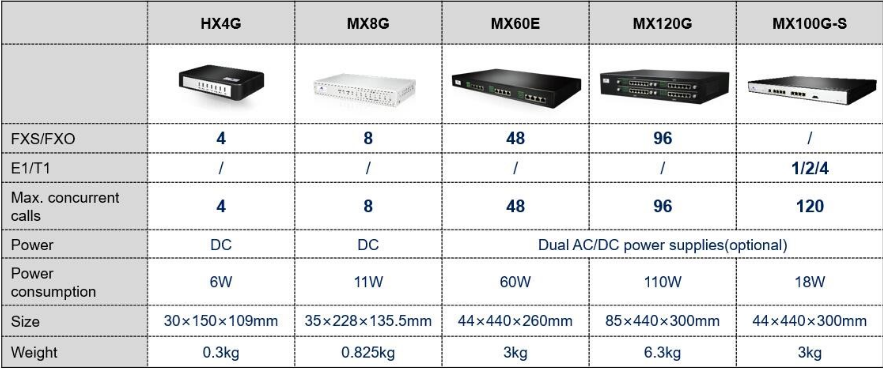
VoIP gateways have been designed with different purposes, basically come in two types: Analog and Digital.
Analog gateways
- Connect the VoIP phone system to the Analog Phones (Traditional)
- Connect the VoIP phone system to the traditional telephone networks (PSTN).
Digital gateways
- Connect a VoIP phone system to The Digital voice lines
- Connect a PABX phone system (traditional) to an VoIP network.
How to access the web configuration?
- HX4E/MX8A/HX4G/MX8G Gateways start DHCP service by default, and automatically obtain an IP address on the LAN; you can use the factory-default gateway IP address if it is unable to be obtained (e.g. when connected directly with a computer).
- By default, the MX60E/MX120G uses a static IP address.

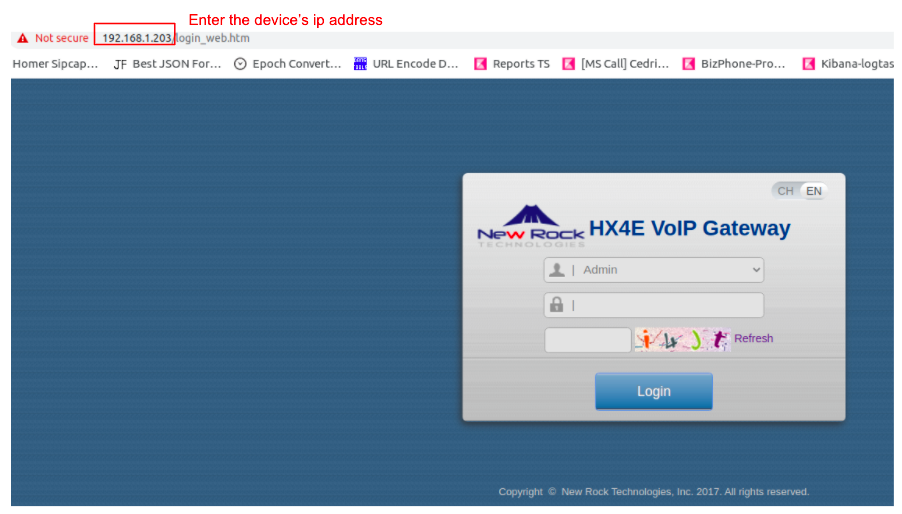
Enter the gateway IP address and verification code (case-insensitive) in the browser address bar (e.g. 192.168.1.203). You can enter the gateway configuration login interface by entering a password on the login interface:
- User = Admin
- Passwords = hx4
- Random code = i4Jt
-
Finish = Login
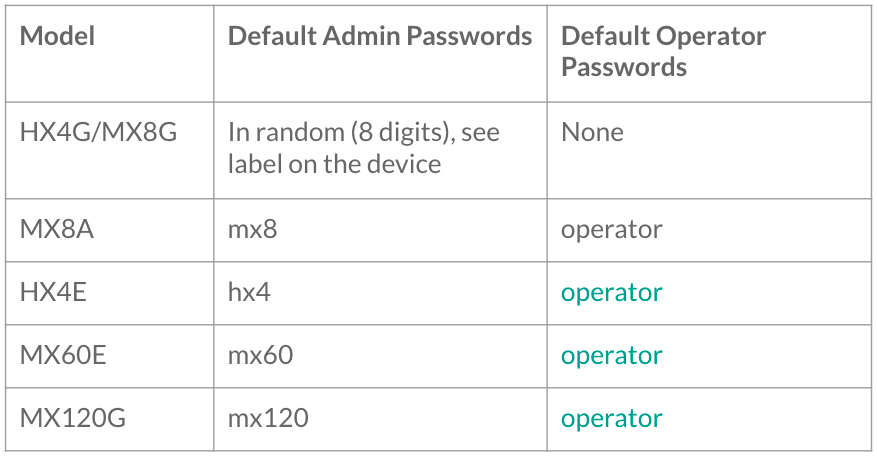
- The administrator is allowed to browse and modify any configuration parameter and modify login passwords. After login, "Admin” is displayed on the upper left corner of the interface.
- The operator is allowed to browse a subset of the configuration parameters. After login, "Operator” is displayed on the upper left corner of the interface.
Setup Guidelines
1. Basic Configuration - Network
After login, click Basic >Network to open the configuration interface.
Example:
2. Basic Configuration - SIP
**Use Cases:
- The B3’s customers want to keep using their PSTN number.
- The User from a traditional PBX wants to connect with B3’s extension.
**Solutions:
- Customer is able to continue using their existing traditional PBX investments while adding new extensions in Cloud PBX to support mobility, call center and other business use cases.
- Both the traditional PBX and Cloud extensions can inter-operate and call each other seamlessly via extension numbers with no call charges.
- Calls from Cloud to the traditional PBX will show the exact caller ID.
Calls from the traditional PBX to Cloud can only show 1 caller ID.
**Configuration:
1. Trunk Configuration - Phone Number:
After login, click Trunk > Phone number to open the configuration interface.
Example: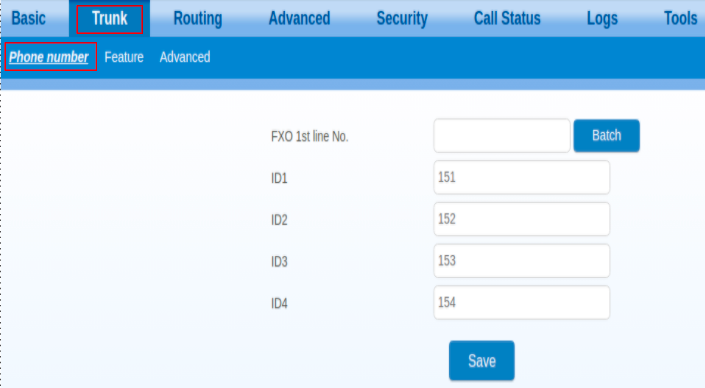
2. Trunk Configuration - Feature
After login, click Trunk > Feature to open the configuration interface.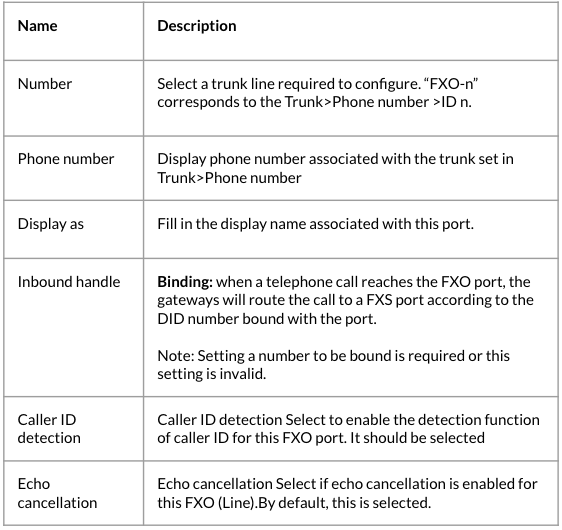
Example:

3. Routing Configuration - Digit map
- After login, click Routing > Digit Map to open the dialing rules interface. Should be used by default.
- Dialing rules are used to effectively detect completed received number sequences that are ready to be sent in order to reduce the connection time of telephone calls.

Example: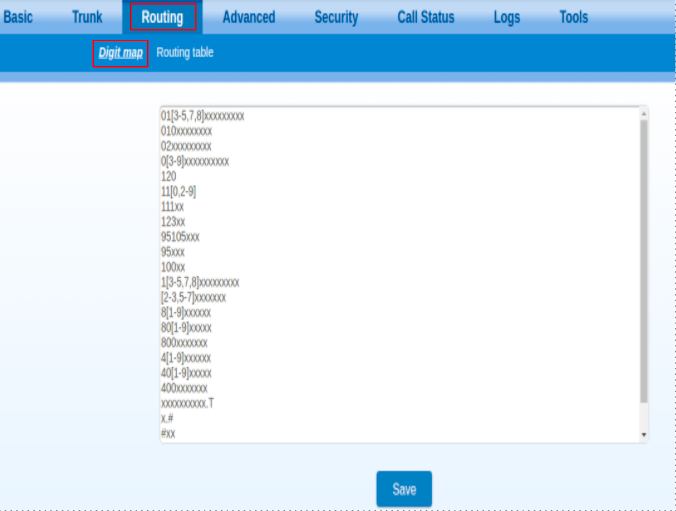
4. Routing Configuration - Routing table
After login, click Routing > Routing Table to open the configuration interface
Format of routing rules:
This means that calls from IP side with Calling Party Number 151,152,153,154 are routed to FXO1, FXO2, FXO3, FXO4.
All calls from FXO are routed to IP (Cloud PBX):
- CPN must be the traditional PBX Extension Number.
- Each CPN / Extension Number must be mapped to 1 FXO Port.
- Calling Party Number = Caller Number
- Called Party Number = Destination Number

5. Advanced Configuration - SIP Setting
After login, click Advanced > SIP to open this interface.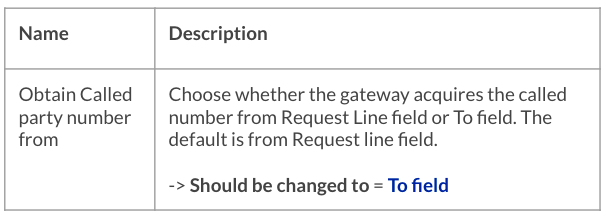
NOTE: The other configuration should be used by default
Example: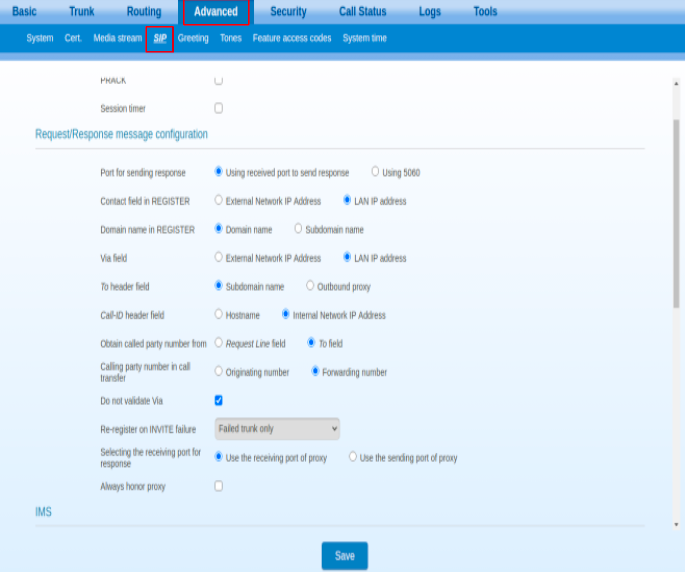
3.1 Configure FXO - VOIP Gateway
**Use Cases:
When customers have many Analog phones and they don't want to leave them
**Solutions:
- Customer is able to continue using their existing traditional Analog phone while adding new extensions in Cloud PBX to support mobility, call center and other business use cases.
- Both the traditional Analog Phone extensions and Cloud extensions can inter-operate and call each other seamlessly via extension numbers with no call charges.
- Calls from Cloud to the traditional Analog phone will show the exact caller ID.
- Calls from the traditional analog phone to Cloud will show the exact caller ID.

**Configuration:
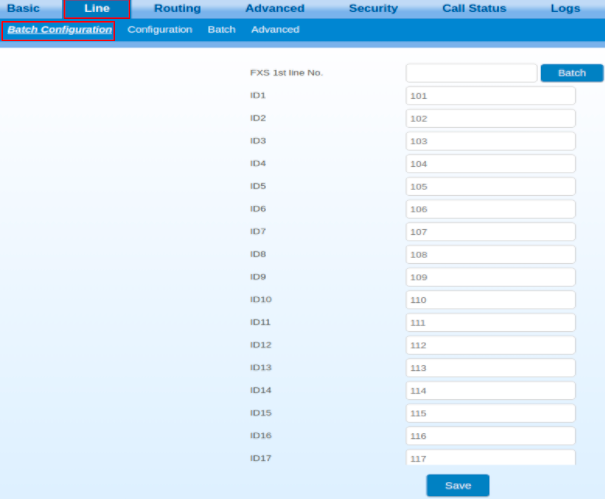
1. Line Configuration - Batch Configuration
After login, click Line > Batch Configuration (Phone number) to open the configuration interface.
Example:
2. Line Configuration - Configuration
After login, click Line > Configuration to open the configuration interface.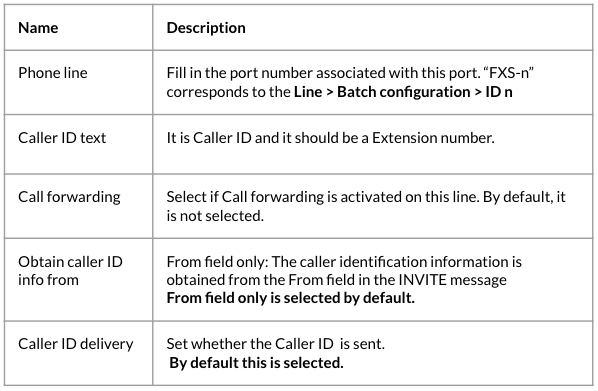
Example: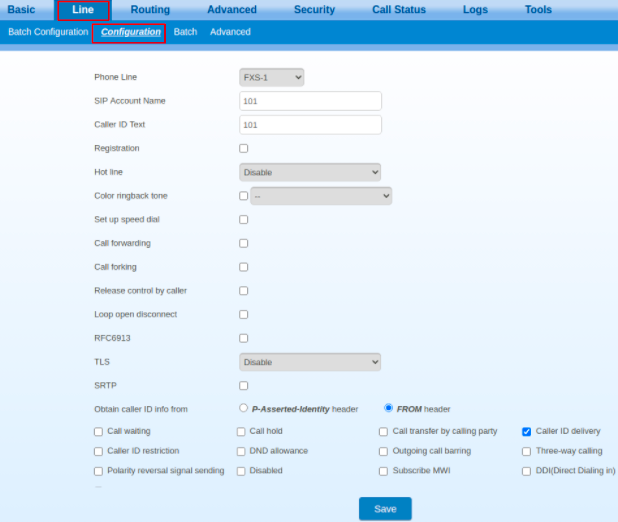
3. Line Configuration - Batch
After login, click Line > Batch to open the configuration interface.
Step 1: Click the icon, the following interface is shown > Choose batch configured features > OK
Step 2: Click Save
4. Routing Configuration - Digit map
After login, click Routing > Digit Map to open the dialing rules interface. Should be used by default.
Dialing rules are used to effectively detect completed received number sequences that are ready to be sent in order to reduce the connection time of telephone calls. 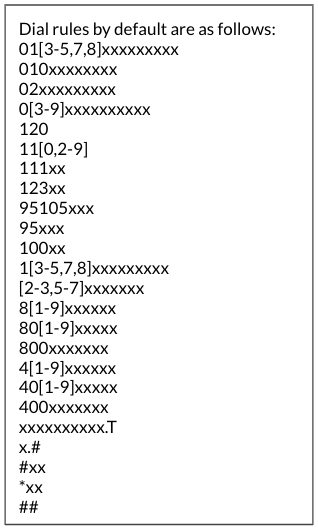
Example: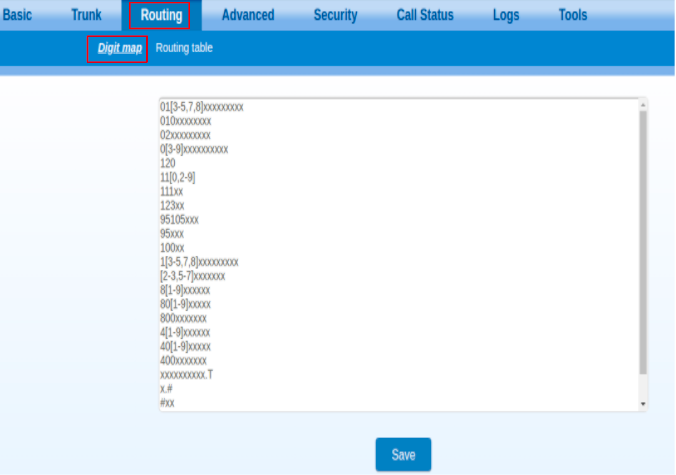
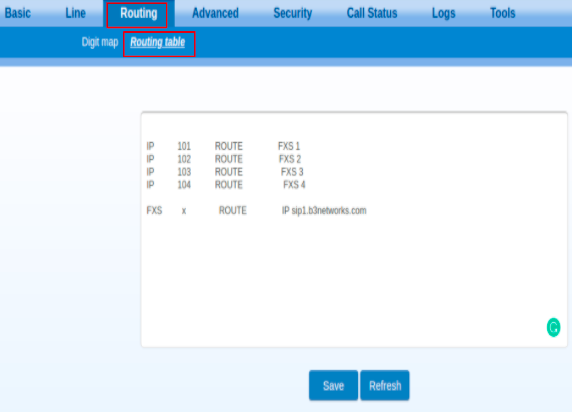
5. Routing Configuration - Routing Table
After login, click Routing > Routing Table to open the configuration interface
Format of routing rules:
This means that calls from the IP side with Called Party Number 101,102,103,104 are routed to FXS1, FXS2, FXS3, FXS4
All the call from the FXS port are routed to IP sip1.b3networks.com (Cloud PBX)
- Called Party Number must be the traditional PBX Extension Number.
- Each Called Party Number / Extension Number must be mapped to 1 FXS Port.
- Calling Party Number = Caller Number
- Called Party Number = Destination Number
4. Security Configuration - Access
After login, click Security > Access to open the configuration interface.
Example: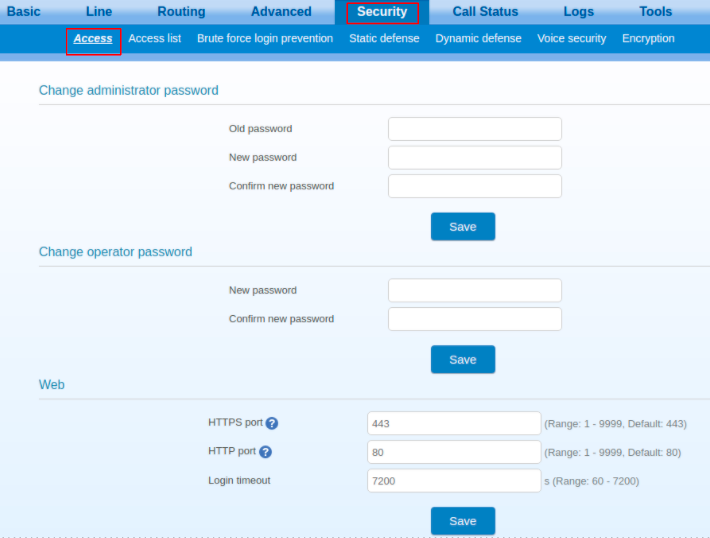
5. Logs - Call Message
This is where you can trace the call log.
Critical runtime information of gateways can be obtained in this interface, including:
- Information regarding login interface (including IP address and permissions of the user)
- SIP registration status
- Call-related signaling and media (RTP) information
After login, click Logs > Call Message: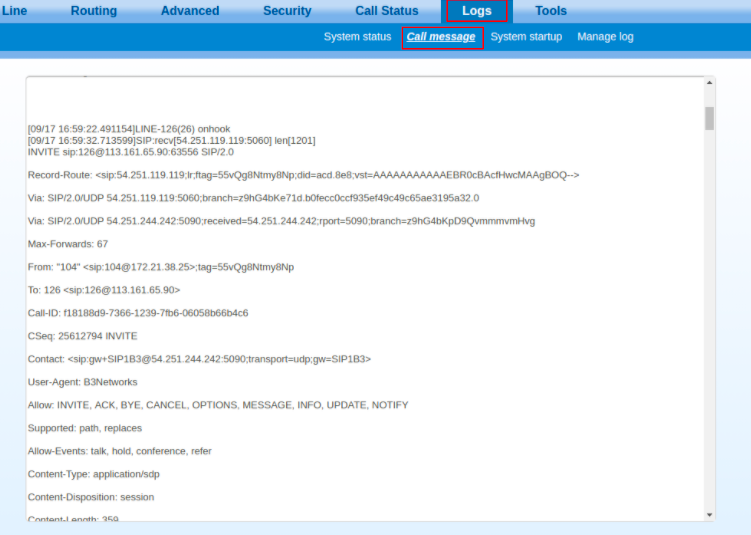
6. Tools Configuration - Configuration Management
After login, click Tools > Configuration Management to open the configuration interface.

7. Tools Configuration - Software Upgrade
After login, click Tools > Configuration Management to open the configuration interface.
The device supports two upgrading methods: upgrading by .img file or upgrading by tar.gz file:
- Step 1: Click Tools > Software upgrade > Choose file to choose.
- Step 2: Click Backup to save the current configuration.
- Step 3: Click Upgrade and follow the upgrade instructions.
Note: Please contact the supplier to obtain the latest firmware release file.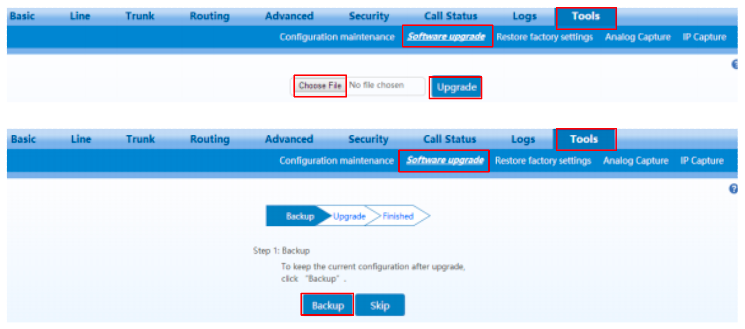
8. Tools Configuration - IP Capture
After login, click Tools > IP capture to open this interface.
You are allowed to capture up to three IP voice data files, each with up to 2M bytes. The capture is stored in the downloaded file under. 