Outbound Call Policies

Written by B3Networks Academy
Updated at May 19th, 2026
-
OSS/BSS Answers
Access Control Security Hub Admin Audit B3Network Master Account Channel App Contract App Customer App Discount App Edge Server File Management Finance App Invoice App Number Management Payment Portal Settings Price List Product App Release V2 SMS Gateway Supplier App Support Center Support Hub Business Hub Sales Hub Finance Hub
- App Model - Organization Management
- App Model - Communication Apps Answers
- License Model - Organization Management
-
License Model - CPaaS Solution Answers
Phone System - Admin Guide Phone System - End-user Guide Mobile App Desktop App Web Phone Omni-Channel Auto Attendant - Admin Guide Developer Hub - Admin Guide Microsoft Teams Operator Connect - Admin Guide Microsoft Teams Direct Routing - Admin Guide Contact Center - Supervisor Guide Contact Center - Agent Guide SIP Trunk CPaaS - SIP Trunk Power SIP Trunk CPaaS Fax CPaaS Hotdesking Contact Campaign File Explorer Power Mobile App Files App Campaign App
- Telcoflow
- Integrations Answers
- Updated Regulations
- Ideas Portal
Table of Contents
Create a Customized Outbound Call Policies
Step 1: Create the Policy
- Go to Phone System- System- Outbound call policies and click the Custom policies tab.
- Click Add on the right side of the screen.
- Type a name for your policy (e.g.,
Test) and click Create.
Step 2: Import Dialing Rules
- In the window that pops up, make sure you are on the Dial plans tab and click Import.
- Click the Select country dropdown and choose a country (e.g., Singapore).
- Check the boxes next to the rules you want to use.
- Click Import.
Step 3: Save and Close
- Review your rules in the list.
- Click Close in the bottom right corner to finish. Your new policy is now ready.

Countries Whitelist:
Countries Whitelist is the list of countries that users are allowed to call to. By default, there are 20 countries in the whitelist, if you need to call the countries that are outside of this list, please follow to steps below to add more countries:
Bulk Adding Whitelisted Countries
- Open your outbound call rule and click the Country whitelist tab.
- Click the blue Add button.
- Click the Select country dropdown.
- Check Select non-whitelisted countries to select all available destinations at once.
- Click Add.
Clearing the Whitelist
- On the Country whitelist tab, click the Remove all button next to the search bar.
- A confirmation box will appear. Click Confirm to wipe the list clean.
Adding a Specific Area with a Passcode
- If you want to whitelist a specific region and require users to enter a passcode to complete the call:
- Click the blue Add button.
- Use the search bar in the dropdown to find and select a country (e.g., Singapore).
- Check the Passcode required box.
- Toggle the Specific area switch to ON.
- Fill in the required fields:
-
Area code: Enter the local area code (e.g.,
1234). -
Location name: Give the region a name (e.g.,
HHH).
-
Area code: Enter the local area code (e.g.,
- Click Add.
Saving Your Progress
- Review your updated list on the dashboard.
- Click Close in the bottom right corner when you are finished.

Organization Link:
This place is used for setting up the Prefix to call to other connected Organizations.
To set up the prefix for a connected Organization, please follow the steps below:
- Open your outbound call rule and click the Organization Link tab.
- Select:
- Organization
-
Prefix
- You can add rules for multiple accounts at the same time.
- Click Add button. You can also update the rule by clicking on the Pencil icon and delete the rule by clicking the Bin icon.

Note
- The Prefix is per direction per connection
- Limit 5 digits
- Make sure that the Prefix does not conflict with the Dial Plan
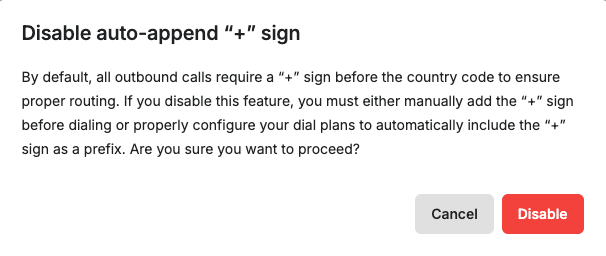
A toggle button allows users to enable or disable the automatic appending of the “+” sign when making outbound calls. The toggle can be turned ON or OFF accordingly.
- Toggle ON – The system automatically appends the “+” sign, eliminating the need for users to enter it manually.

- Toggle OFF – The system displays a warning toast before being disabled, requiring users to manually dial the “+” sign when making outbound calls.
Create a Default Rule
Besides setting a particular Outbound Call Policies for each team, you can set a default Outbound Call Policy in this section for the Phone System Users within the organization, who have not been assigned a customised Outbound Call Policies.
To do so, please follow the steps below:
- Go to Phone System- System- Outbound call policies.
- Click the Default Policy tab
- Click Add to make a new dial plan and Import to add default rules by country.
- Click Disable default policy button to disable the default policy. You can also enable them by clicking Enable default policy button.
- Add the required fields:
- Dial Plans
- Countries Whitelist

Note:
Disabling the Default Rule: If you don't need the global default rule, you can toggle it off. The system will then strictly use the custom outbound call rules assigned to each user. (Note: When the default rule is disabled, the main rules table will be greyed out).
Country Lists: The countries available in your Dial Plan and Country Whitelist dropdowns are managed and populated based on your settings in the Business Hub > Portal Configuration.

Edit/Delete an existing outbound call policy
Edit
- Select the Outbound Call Policies tab
- Navigate to either Default Policy or Custom Policies tab
- Click the Pencil icon on the particular rule you wish to edit
- You can edit the Rule Name by clicking on the Pencil icon in front of the name ( for Custom Policies)
- You can also edit an existing plan by clicking on the Pencil icon
Delete
- Select the Outbound Call Policies tab
- Navigate to either Default Policy or Custom Policies tab
- Click the Trash icon on the particular rule you wish to delete

Assign Outbound Call Policy to Users
Once the rule is created, you can assign it to your users from the Admin Tools page.