Answer an Incoming Call

Written by B3Networks Academy
Updated at January 13th, 2025
-
OSS/BSS Answers
Access Control Security Hub Admin Audit B3Network Master Account Channel App Contract App Customer App Discount App Edge Server File Management Finance App Invoice App Number Management Payment Portal Settings Price List Product App Release V2 SMS Gateway Supplier App Support Center Support Hub Business Hub Sales Hub Finance Hub
- App Model - Organization Management
- App Model - Communication Apps Answers
- License Model - Organization Management
-
License Model - CPaaS Solution Answers
Phone System - Admin Guide Phone System - End-user Guide Mobile App Desktop App Web Phone Omni-Channel Auto Attendant - Admin Guide Developer Hub - Admin Guide Microsoft Teams Operator Connect - Admin Guide Microsoft Teams Direct Routing - Admin Guide Contact Center - Supervisor Guide Contact Center - Agent Guide SIP Trunk CPaaS - SIP Trunk Power SIP Trunk CPaaS Fax CPaaS Hotdesking Contact Campaign File Explorer Power Mobile App Files App Campaign App
- Telcoflow
- Integrations Answers
- Updated Regulations
- Ideas Portal
Table of Contents
Upon logging in to the portal with Web Phone enabled, you are now able to start making and receiving calls.
1. Pick up a call
- When there is an incoming call, a window will pop up at the bottom right corner of your screen showing the caller number.
- Press:
- Green button to accept the call.
- Red button to reject the call.
- The caller's name and number are now displayed sequentially for direct incoming calls.
- If the caller name matches the caller ID, they are merged into a single row for a cleaner view.
- A "Call Recording" label will be shown if the call recording feature is enabled by your license.

- For internal calls to an extension, you can now see who the call is directed to.

2. Talking and ACW
During the Talking state, you will see an “End Call” button and for ACW (After Call Work) state, you will see an “ End ACW” button.
- If you click “End ACW” without submitting a note, the system will automatically save whatever you entered in the note.
- ACW will apply for both Contact Center - Incoming Call, Callback Call, Campaign call pop up.
- ACW can only be ended when:
- Clicking “End ACW”
- Clicking “Finish” button on popup
- Making a new call (outbound call)
- Hitting time out
Note:
Color of Talking/ACW will change according to the user status:
- Available - Green
- Busy - Red
- Away - Yellow
- Offline - Grey
When the user state is Free/Dialing

When the user state is Talking

When the user state is ACW

3. Show Caller ID when Forwarding
On user’s device, they will see the details below when receiving a diverted call.
Scenario 1: Forward to Internal Extensions
- Ignore the current Caller ID when forwarding (Internal): Caller Number or Ext Key
- Show the Caller ID for the Forwardee as follows:
-
From:
- Internal Call: Caller Extension Key
- External Call: Caller Number
- To: Forwarder Extension Key
Scenario 2: Forward to External Numbers
- Based on the setting of the forwarder extension
-
Show the Caller ID for the Forwardee as follows when settings as Caller Number
- From: Caller Number
- To: Forwardee Extension Key
-
Show the Caller ID for the Forwardee as follows when settings as Assigned Caller ID
- From: Assigned Caller ID
- To: Forwardee Extension Key
Use Case
- A calls B
- B forwards to C
- B is always an Internal Extension
- C picks up the call via IP Phone

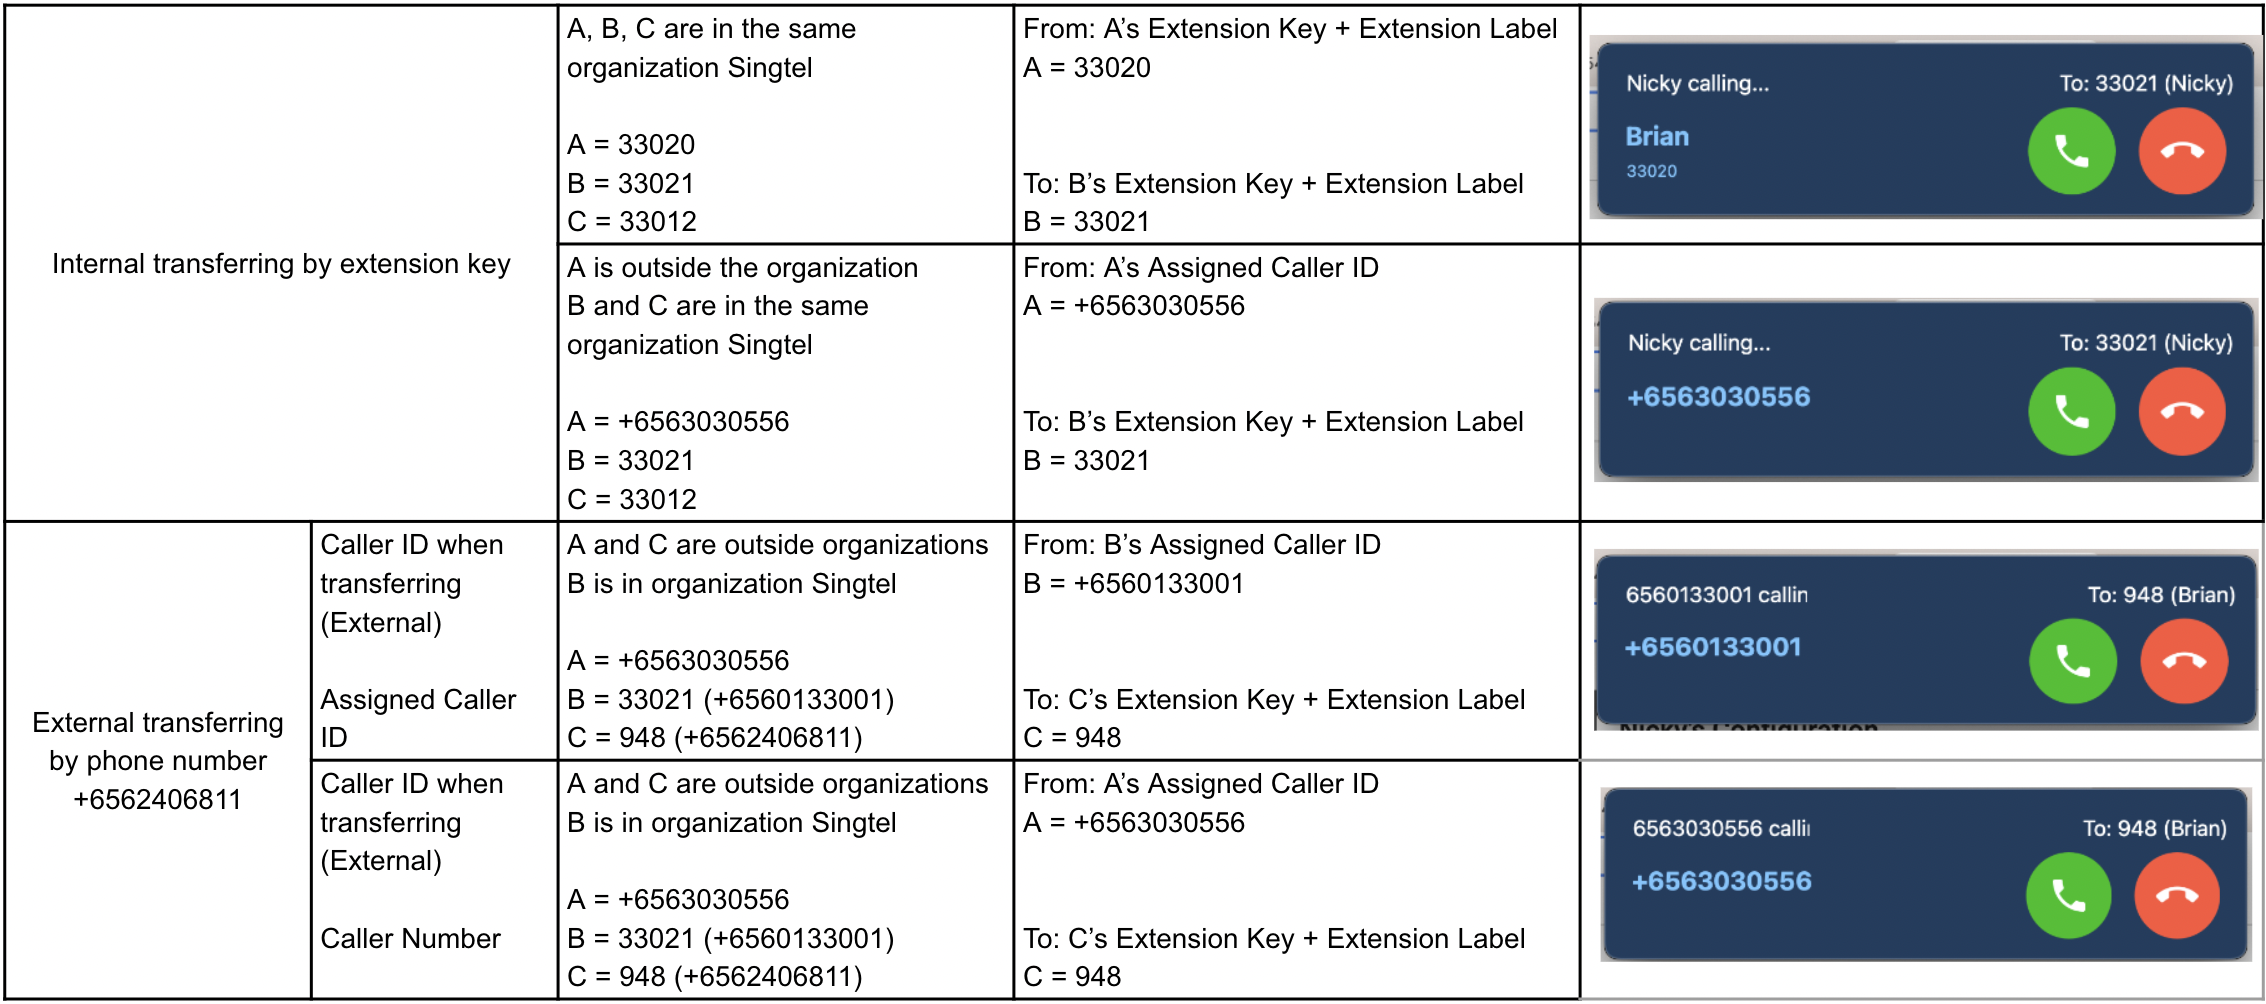
4. Show Caller ID when Transferring
On user’s device, they will see the details below when receiving a diverted call.
Case 1: If Caller and Transferor are 2 different people
Scenario 1: Transfer to Internal Extension
-
Show the Caller ID for the Transferee as follows:
- From: Caller Extension Key
- To: Transferor Extension Key
Scenario 2: Transfer to External Number
- Based on the setting of the transferrer extension
-
Show the Caller ID for the Transferee as follows when settings as Caller Number:
- From: Caller Number
- To: Transferee's Extension Key
-
Show the Caller ID for the Transferee as follows when settings as Assigned Caller ID:
- From: Assigned Caller ID
- To: Transferee Extension Key
Use Case
- A calls B
- B Transfers to C
- C picks up the call via IP Phone
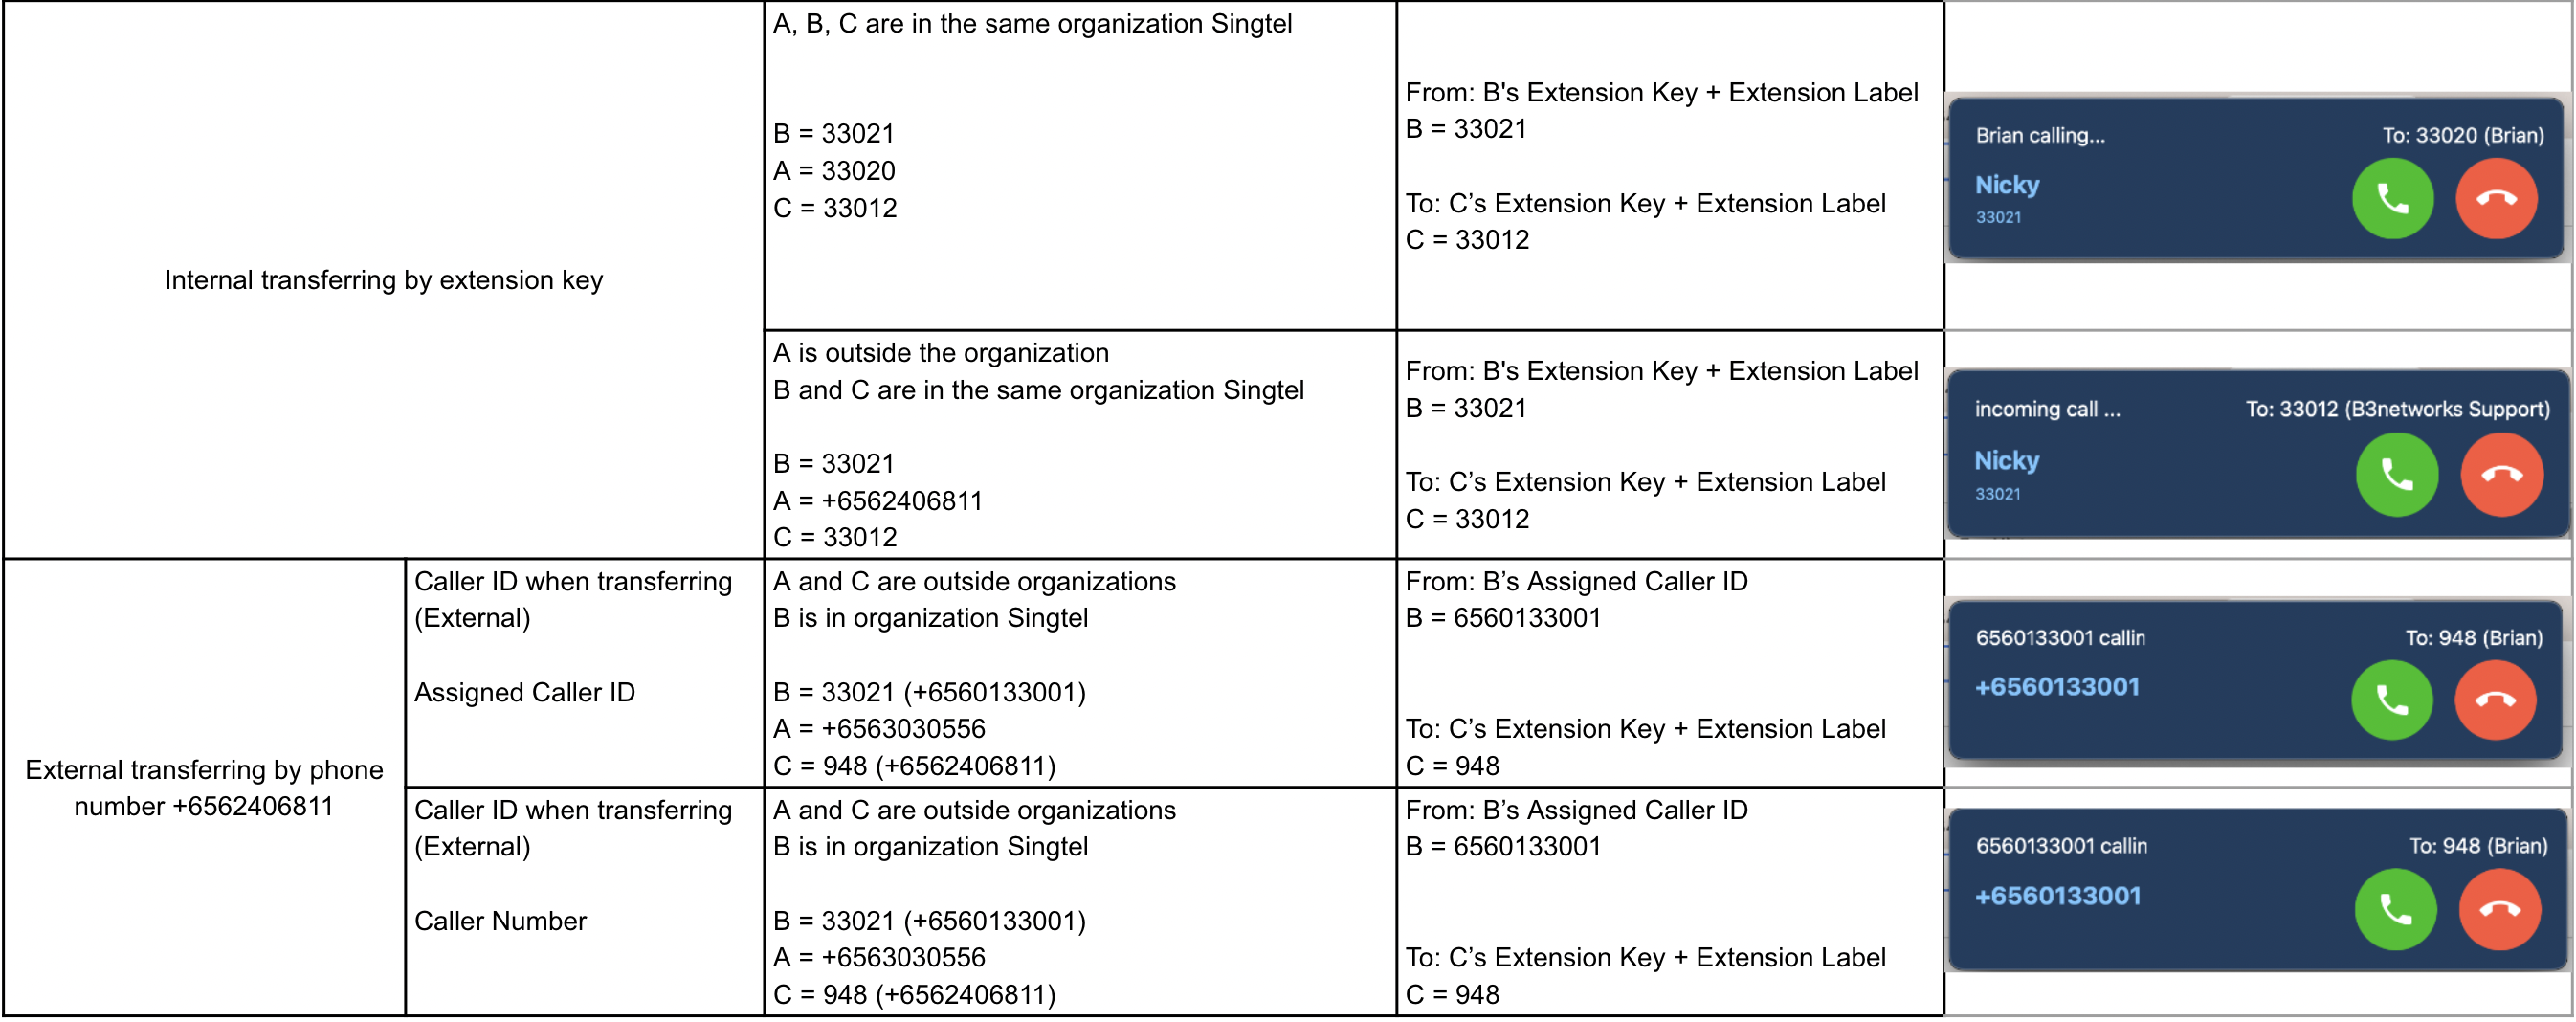
Case 2: If Caller and Transferor is the same person
Scenario 3: Transfer to Internal Extension
-
Show the Caller ID for the Transferee as follows:
- From: Caller Extension Key
- To: Transferee Extension Key
Scenario 4: Transfer to External Number
- Based on the setting of the transferrer extension
-
Show the Caller ID for the Transferee as follows when settings as Caller Number:
- From: Caller Number
- To: Transferee’s Extension Key
-
Show the Caller ID for the Transferee as follows when settings as Assigned Caller ID:
- From: Assigned Caller ID
- To: Transferee Extension Key
Use Case
- B calls A
- B transfers to C
- C picks up the call via IP Phone
5. Show Caller ID for a Forwarded/Transferred Call on an IP Phone
When users receive a forwarded/transferred call within their organization, the caller ID will be displayed on their IP Phones in the below stated manner.
Logic:
Internal Call Forwarding:
- A calls B (Ext 100)
- B forwards the call to C (Ext 200)
- C picks up the call via IP Phone (Ext 300)
- Display on IP Phone of C: <Caller name> + <Caller extension key> => A 100
Internal Call Transfer:
- A calls B (Ext 100)
- B transfers the call to C (Ext 200)
- C picks up the call via IP Phone (Ext 300)
- Display on IP Phone of C: <Caller name> + <Caller extension key> => A 100
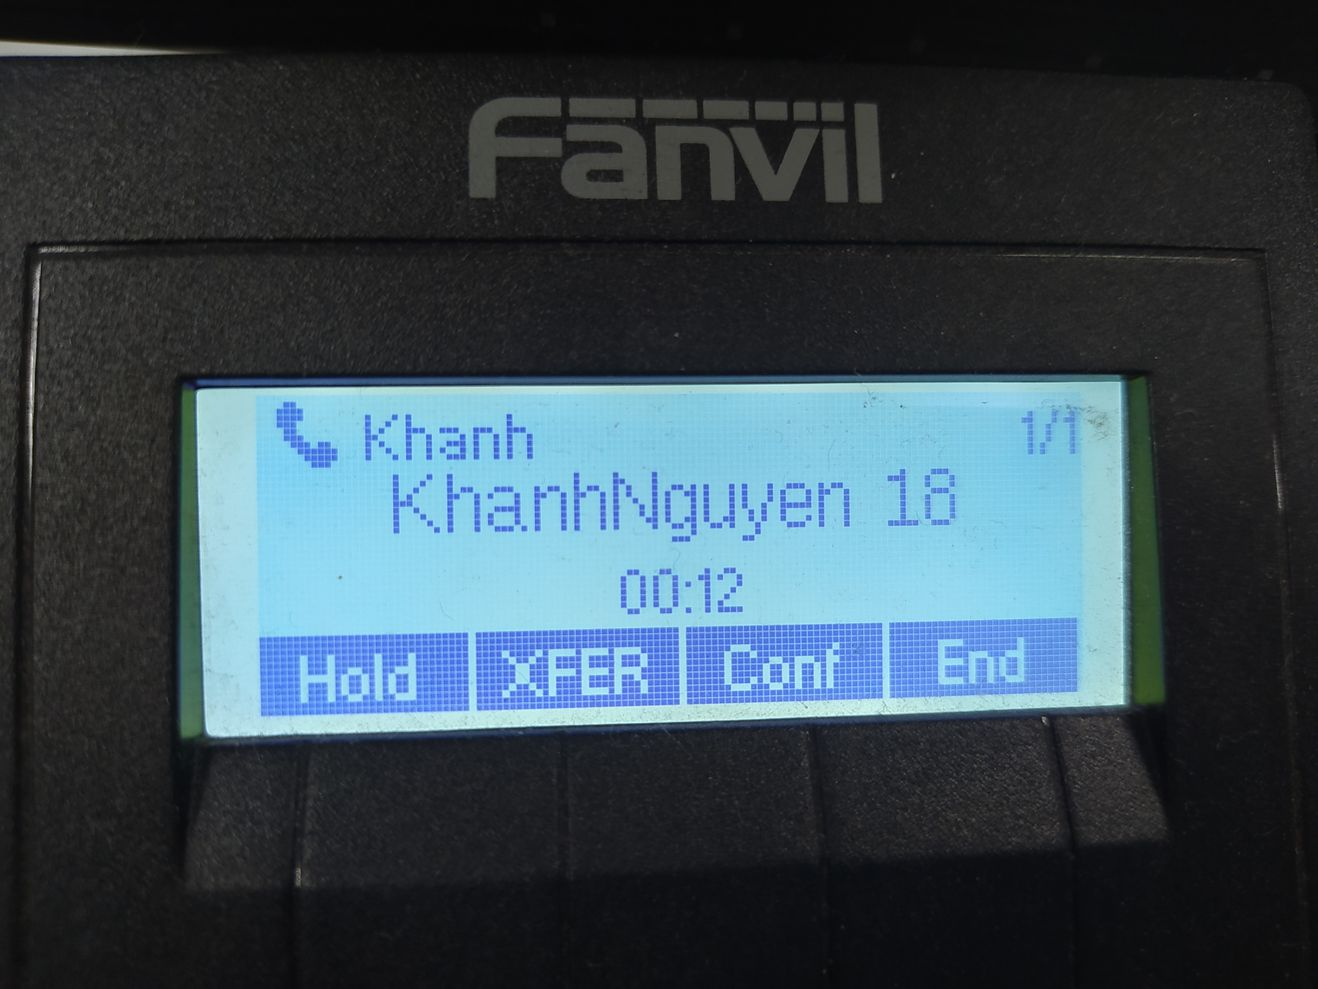
6. Finish a call

7. Missed Call
If you miss a call, you can go to Inbox tab and check the call history.
