CPaaS Hot desking Configuration

Written by B3Networks Academy
Updated at August 20th, 2025
-
OSS/BSS Answers
Access Control Security Hub Admin Audit B3Network Master Account Channel App Contract App Customer App Discount App Edge Server File Management Finance App Invoice App Number Management Payment Portal Settings Price List Product App Release V2 SMS Gateway Supplier App Support Center Support Hub Business Hub Sales Hub Finance Hub
- App Model - Organization Management
- App Model - Communication Apps Answers
- License Model - Organization Management
-
License Model - CPaaS Solution Answers
Phone System - Admin Guide Phone System - End-user Guide Mobile App Desktop App Web Phone Omni-Channel Auto Attendant - Admin Guide Developer Hub - Admin Guide Microsoft Teams Operator Connect - Admin Guide Microsoft Teams Direct Routing - Admin Guide Contact Center - Supervisor Guide Contact Center - Agent Guide SIP Trunk CPaaS - SIP Trunk Power SIP Trunk CPaaS Fax CPaaS Hotdesking Contact Campaign File Explorer Power Mobile App Files App Campaign App
- Telcoflow
- Integrations Answers
- Updated Regulations
- Ideas Portal
Table of Contents
Prerequisites
To configure Hot desking, you will need:
- Hot Desking (Base License)
- Phone System Extension

Configuration
User can access Hot desking by logging into their company portal:
- Go to Home page
- Click on Hot Desking icon placed on the left side of your portal screen.
- It has 2 views:
- System view
- Account view

System View
In System view, you have the tab for General Settings to set up the auto-logout time and IP Phone Management where you can provision and manage IP phones from supported manufacturers.
General Settings
The system enables you to configure the auto logout time for hot desking. You can turn the toggle on/off to enable this feature.
- Disabled: Never Logout
-
Enabled: Select one of the following options
- Log out after X (Days/Hours/Minutes/Seconds)
- Log out daily at [HH:MM]

How to configure auto logout duration
To configure the auto-logout duration, follow the steps below:
- Go to Hot Desking - View-System
- Select General settings
- Toggle on Auto logout
- Click on Edit
- Select an option
- Log out after
- Seconds
- Minutes
- Hour
- Days
- Log out daily at
- Log out after

Note
A login mechanism is implemented to ensure that the currently active user (User A) is automatically logged out when a different user (User B) logs in on the same device. This approach maintains secure and accurate session control.
Applicable Devices
- IP Phone devices
- PSTN devices (These are hardware tools or gateways used to connect traditional Public Switched Telephone Network systems with modern digital or VoIP networks.)
IP Phone Management
- You can filter by:
- All
- Assigned
- Unassigned
- You can also Search by MAC Address or Device Name
- Click on the Refresh button to refresh the list
- Click on the Firewall Info button to check the firewall configuration information
- You can provision IP Phones by clicking on the Provision button and choose any one of the following options:
- Auto Provision
- Bulk Provision
- Provision Mode

You will find information in the columns:
- MAC Address
- Device Name
- SIP Account it is assigned to
- Device Login Password
- Provision Count
Supported IP Phones Models
The supported IP Phones models are below:
- Yealink
- T43U
- T31P
- Fanvil
- X3U
Account View
In Account view, user can see following items:
- Overview
- Configuration
- Networking Info
- Security

Note
User will see the number of accounts here according to the number of Hot Desking licenses purchased for the organization.
When the subscription of the user expired, system displays a Warning Toast for user and disable the configuration, meaning the system will not allow users to edit the settings.

Overview Tab
In the Overview tab, following information is displayed:
- SIP label
- Editable (max 20 characters limit)
- Subscription UUID
- User can click to copy
- Authentication Mode
- Server location
- SIP Server
- CA certificate
- User can click to download the certificate in .pem format
- Members
- Upto 50 members can be assigned

Permission Management
Owner of the organization has rights to perform all action by default. Admins with Hot Desking Permission Group can perform all actions. Members with granted permission can perform actions according to the Table here:
Actions |
Admin with Permission Group |
Member with Identity and Access Management |
Access Hot Desking |
✅ |
✅ |
Access all resources |
✅ |
❌ |
Access a specific resource |
✅ |
✅ (Granted resource) |
See Overview tab |
✅ |
✅ |
Edit Label |
✅ |
❌ |
Get certificate |
✅ |
✅ |
Assign Members |
✅ |
❌ |
See Configuration tab |
✅ |
✅ |
Configure the settings |
✅ |
✅ |
See Networking Info tab |
✅ |
✅ |
See Security tab |
✅ |
❌ |
Add IP Whitelist |
✅ |
❌ |
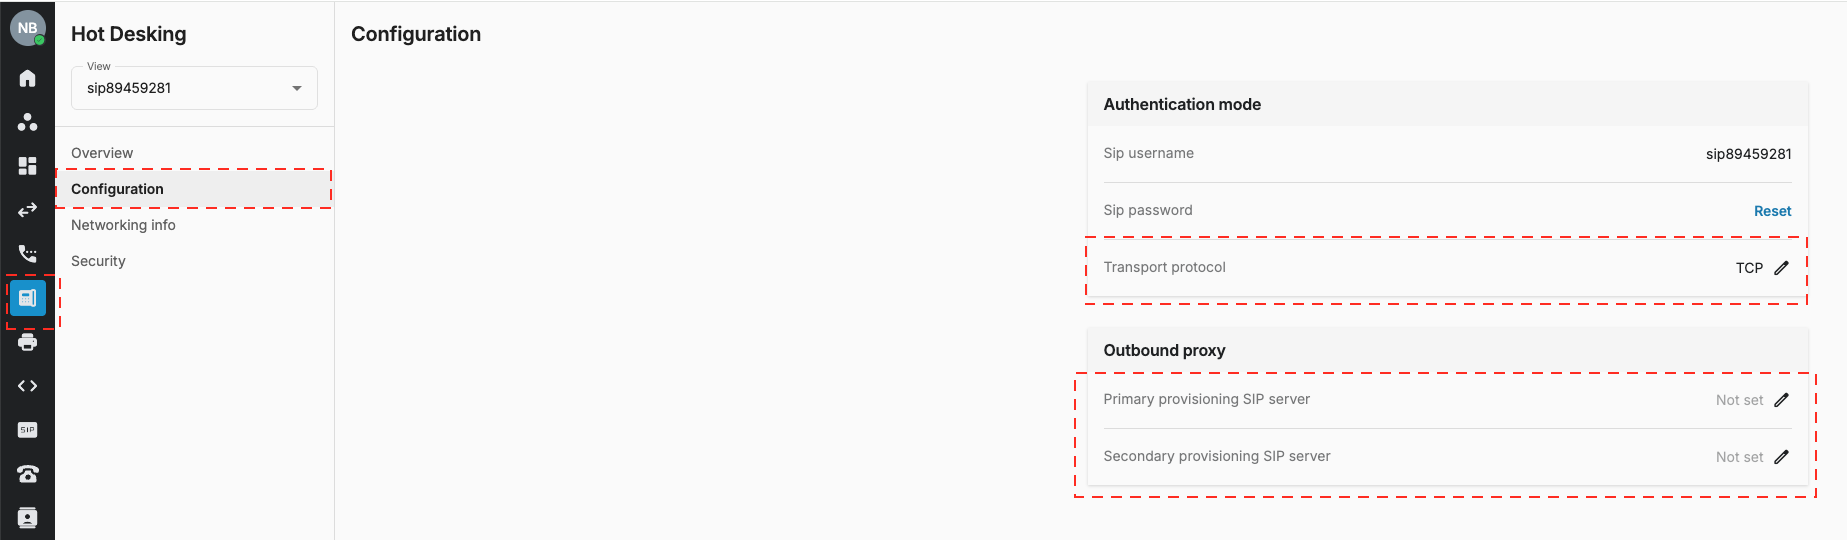
Configuration
The configuration tab give you the information:
- SIP Username
-
SIP Password: User can only reset the password if forgotten. While resetting, user will have the option to:
- Let system automatically generate a password, user can copy the password and save it in the system
- Create your own password

- Transport protocol
-
Outbound Proxy: We allow to configure the outbound proxy feature, allowing it to override the default SIP domain.
- The outbound proxy will override the SIP Server only when the server is Sipe.
- For other SIP servers, the system disregards the outbound proxy setting and retains the default SIP domain.
- This behavior does not affect current SIP accounts that don’t utilize the outbound proxy option.
How to configure outbound proxy and update protocol
- Go to Hot Desking
- Select a hot desking account
- Choose Configuration
- In Authentication mode, select Transport protocol
- In outbound proxy, click on edit and update Primary & Secondary provisioning SIP server
Networking Info
On this tab, user can see the following Networking Info:
- Codec
- SIP protocol
- SSL/TLS Protocol Method
- SIP Registration Period
- Audio Format
- DTMF

Security
In security tab, Users can add IP addresses of the IP Phones on which users need to use Hot desking feature.

Caller ID Requirement
When using Hot Desking, the system always applies the Caller ID configured for the logged-in extension, rather than assigning a random organization number.
Caller ID Setup
- Users can set their Caller ID via Mobile App, Desktop App, or Web Portal.
Login Flow
If Caller ID is set:
- Login completes successfully.
- User hears a confirmation message.
- Phone is registered and ready for use.
If Caller ID is not set:
- System blocks login after OTP verification.
- User hears: “Login failed. Please set the Caller ID before using Hot Desking.”
- Phone is not registered.