General Settings

Written by B3Networks Academy
Updated at December 12th, 2025
-
OSS/BSS Answers
Access Control Security Hub Admin Audit B3Network Master Account Channel App Contract App Customer App Discount App Edge Server File Management Finance App Invoice App Number Management Payment Portal Settings Price List Product App Release V2 SMS Gateway Supplier App Support Center Support Hub Business Hub Sales Hub Finance Hub
- App Model - Organization Management
- App Model - Communication Apps Answers
- License Model - Organization Management
-
License Model - CPaaS Solution Answers
Phone System - Admin Guide Phone System - End-user Guide Mobile App Desktop App Web Phone Omni-Channel Auto Attendant - Admin Guide Developer Hub - Admin Guide Microsoft Teams Operator Connect - Admin Guide Microsoft Teams Direct Routing - Admin Guide Contact Center - Supervisor Guide Contact Center - Agent Guide SIP Trunk CPaaS - SIP Trunk Power SIP Trunk CPaaS Fax CPaaS Hotdesking Contact Campaign File Explorer Power Mobile App Files App Campaign App
- Telcoflow
- Integrations Answers
- Updated Regulations
- Ideas Portal
Table of Contents
System Dialing Codes
Unlocking enhanced functionality for non-access portal users, our system dialing codes offer a streamlined method for configuring call forwarding and adjusting status settings through IP Phones
Requirement
- The user is assigned a Phone System extension with the IP Phone license
- The devices must already be registered (can receive and make outgoing calls normally)
Configuration
- Go to Phone System
- Change view to System
- Select General Settings
- Set up Dialing codes to perform advanced calling features.

Call Transfer
For Call transfer, there is default dialing code and it is not allowed to update the dialing code.
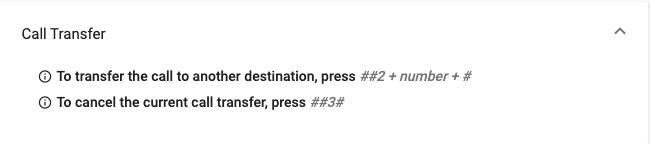
Example:
- If user #101 wants to transfer call to #102, the user will dial ##2102#
- If user #101 wnats to transfer call to DID +6598765432, the user will dial ##26598765432#
Call Inbox Selection and Caller ID
This feature allows Contact Center Agents to make outgoing calls on behalf of the assigned Inbox and the Contact Center Caller ID.
Caller ID is an identity number or Auto Attendant number that is assigned to the agent.
Make Outbound calls using dialing code on IP Phone devices
Make outbound calls using dialing code is applicable for Web phone, Mobile, Desktop and IP Phone.
Agents could view and select inboxes that they are assigned to.
Prerequisites to configure the dialing codes:
- Role
- Owner
- Admin with Phone System & Organization Setting in Permission Group
- Base License: Phone System
- Addons: Contact Center & device addons
How to set up dialling codes:
- Select Call Inbox Selection
- Input the Prefix
- Select Caller ID
- Input the Prefix
- Click save.

Note:
- User can input maximum 2 digits and the prefix cannot be duplicated with other system dialing codes.
- Default Prefix for Call Inbox Selection = 41
- Default prefix for Caller ID = 11
- All agents can use the dialing codes as long as:
- The have the required licenses
- They know the prefix set by the owner or admin (with permissions) of that organization
How to make a call
- Agent to select Call Inbox by dialing *Prefix + inbox code + #
→ System plays message “You have set the Inbox {Name} to make outgoing calls on behalf of” - Agent to select Caller ID by dialing *Prefix + callerID + #
→ System plays message “You have set the number {Phone Number} as Caller ID for outgoing calls” - Agent dial the destination number to make an outbound call.
Example:
Call Inbox Selection prefix = 45
Caller ID prefix = 55
→ On the IP Phone device:
- Dial *45645# to assign inbox
- Dial *556562406811# to choose callerID
- Dial destination number to make outbound call
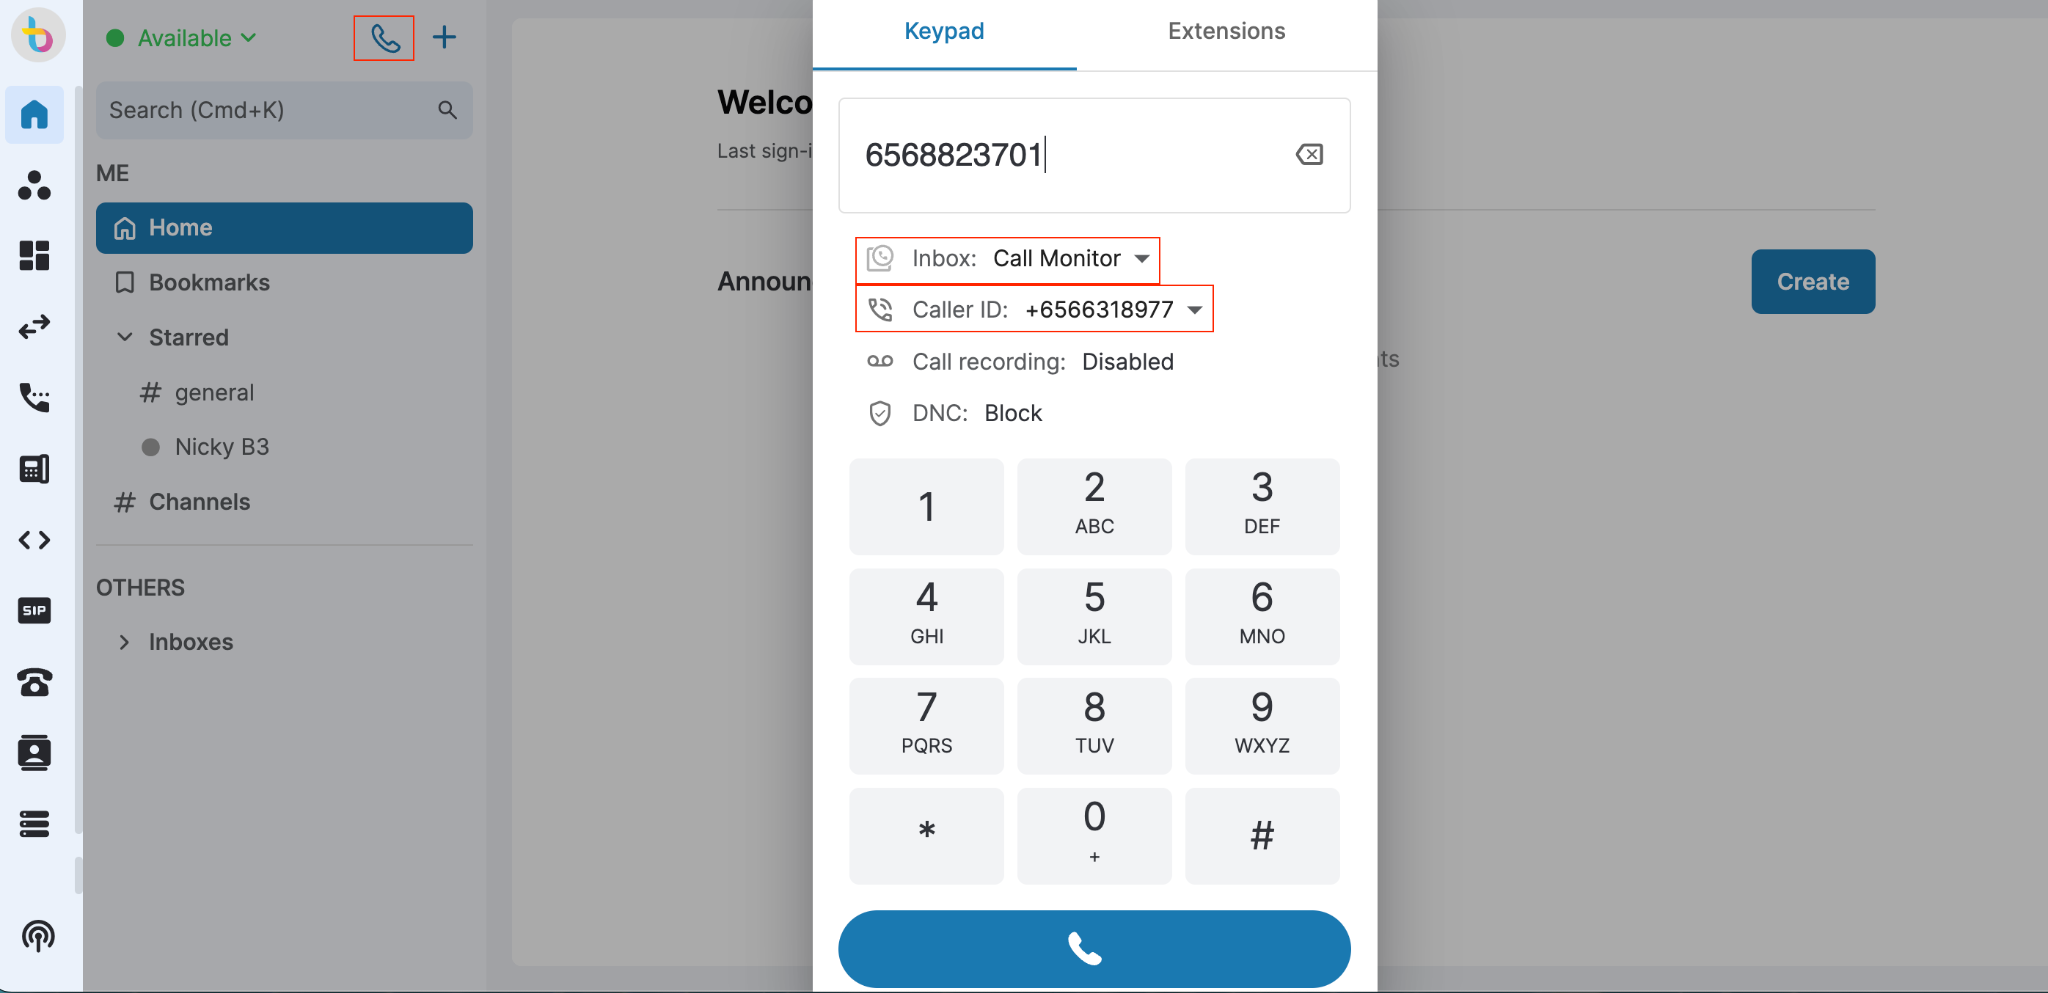
Make Outbound calls from Web Phone
Prerequisites
- Base License: Phone System
- Addons: Contact Center & Web phone
Go to Home
Select Call button
Input destination number
Select Inbox
Select Caller ID
Click call.
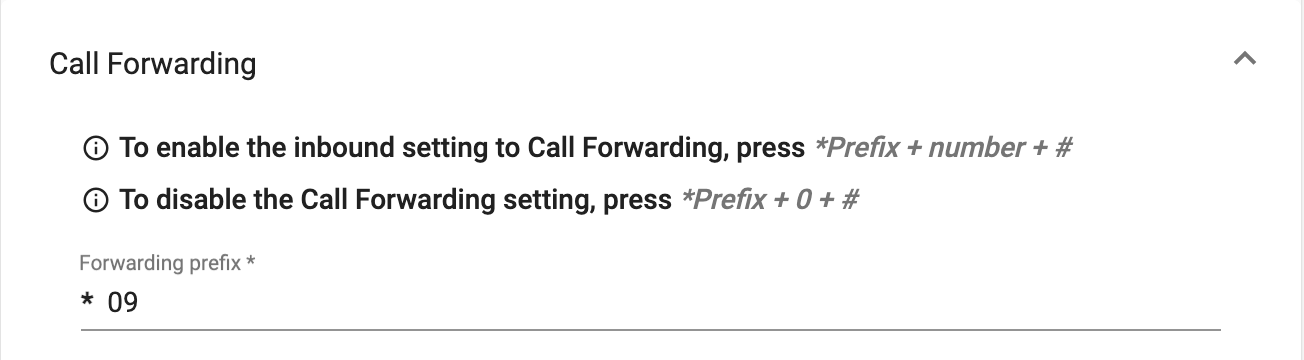
Call Forwarding
Enable Call Forwarding
*Prefix + number + #
- Number: It can be an Extension Key, Group Key, or DID Number
- The default of forwarding prefix is *5
- Purpose: Enable the Inbound Call Setting is Working Hours - Available - Call Forwarding to that specific Number
Constraints
- If the current user status is different from "Available," the system will automatically change it to “Working Hours - Available - Call Forwarding (Inbound Call Settings).”
- Only one number can be forwarded using this code. If the user has a forwarding list set up through the web or mobile app, it will be cleared and replaced by the newly entered number.
Example:
The user #101 wants to set up a forwarding call to DID number +6598765432. The forwarding prefix that admin will configure on the portal is 09. The user will dial *096598765432#.
Disable Call Forwarding
*Prefix + 0 + #
- Purpose: This code disables call forwarding and changes the user's inbound call settings.
- Workflow: When dialed, it will disable call forwarding to the previously specified number and change the user's inbound call setting to "Working Hours - Available - Ring Devices."
Example:
The user #101 wants to disable the forwarding call to DID number +6598765432. The forwarding prefix that admin will configure on the portal is 09. The user will dial *090#
Note:
This application is for
- Inbound Call - Working Hours Flow
- If setting in the Non-Working and Public Holiday periods, it doesn’t affect anything. The flow is still Non-Working and Public Holiday flow.
- If the users want to use the dialing code for mobile & desktop device, they should remove the # from syntax of dial code and press call button to apply
- *Prefix + number + call button
- *Prefix + 0 + call button
Call Parking
Call Park is a feature that allows users to:
- Place an incoming call on hold at a specific parking location (a fictional extension)
- Place an outgoing call on hold at a specific parking location once the call connects to callee.
- Pick up the call on a different phone.
- Let another person can pick it up on a different phone
To park a call, press ##2 + [*Parking Prefix] + [Channel Number] + #
To retrieve a call, press: *Parking Prefix + channel number + #
The digit limit for call parking is from 1 digit to 4 digits.
-
Example:
- The parking prefix is *99
- Ext 202 parks the call at Channel 1
- Ext 203 wants to retrieve the call, press *101#
- During the Parking time, the caller will hear the on-hold music.

To Park a Call
Press: ##2 + *Parking Prefix + Channel number + #
Example:
- The parking prefix is *10
- You want to park the call at Channel 1
- Press: ##2*101#
- During the Parking time, the caller (for incoming) or callee (for outgoing) will hear the on-hold music.
To Retrieve a Call
Press: *Parking Prefix + Channel number + Call
Example:
- The parking prefix is *10
- You parked the call at Channel 1
- Press: *101 + Call
Channel Number
- It is a fictional extension that allows you to park the call.
- The range will be from 1 to 99.
- The system allows you to park 99 calls at the same time. However, each channel only can handle 1 call at a time.
- If the user tried to park the caller in a busy room (which had another caller), then the system would play an announcement to the user: "This room is unavailable, please try another room."
Call Pick Up
Call pick-up is a feature that allows one user to answer any other extension's calls.
There are 2 types of Call Pickup:
To directly pick up the call of any extension
Press:
Pickup prefix + user key + #
Example:
- The pickup prefix is *10
- Pick up the call that is ringing at Ext 201, press *10201#
To pick up the call of another extension in the same group
Press:
- Pickup prefix + #
Example:
- The pickup prefix is *10
- Ext 202 & Ext 203 are in the same group
- Ext 202 wants to pick up the call ringing at Ext 201, press *10#
Call Monitor
Call Monitor is a feature that allows the Contact Center Supervisor to monitor the Contact Center calls without accessing the Web portal.
- Barge-In: Join the conversation between the Caller and the Agent
press *Prefix + 1 + extension key + #
For example, agent #100 is on the call with a customer and supervisor #200 wants to do the call monitoring. The prefix is set to default as *6. The supervisor should dial: *61100#
- Monitor: Listen to the conversation between the caller and the agent.
press *Prefix + 2 + extension key + #
For example, agent #100 is on the call with a customer and supervisor #200 wants to do the call monitoring. The prefix is set to default as *6. The supervisor should dial: *62100#
- Whisper: Talk to the agent only
press *Prefix + 3 + extension key + #
For example, agent #100 is on the call with a customer and supervisor #200 wants to do the call monitoring. The prefix is set to default as *6. The supervisor should dial: *63100#

Note:
- Default Prefix is *6 and can be changed by supervisor.
- Maximum 2 digits are allowed to set the Prefix.
- System does not allow duplicates with other dial codes.
- This is applied for the Contact Center Incoming Calls (Calls to AA → Contact Center Inbox → Assigned Agent)
- Only Supervisors can perform the above actions.
- If the agent performs the above actions, it will play a Warning Message "Sorry, this action is not permitted. Only supervisors can perform."
- Use Cases:
- A User is not a Supervisor trying to act.
- An Agent attempted to act.
- A Normal Bizphone/Phone System User tried to perform the action
- Only Contact Center calls will be monitored.
- If the supervisor wants to act with a normal call, it will play the warning message "Sorry, this action is not permitted. Only contact center calls can be monitored."
- Use Cases:
- The supervisor tried to monitor a normal call for a Contact Center Extension.
- Supervisor tried to monitor a normal Call of PS Extension.
- Supervisor dialed the wrong Extension Key
Status
Allows user to change status by dialing code.
- *Prefix + 1 + # Change Status to Available
- *Prefix + 2 + # Change Status to Busy
- *Prefix + 3 + # Change Status to Offline
- *Prefix + 4 + # Change Status to Away
These Prefix will change the current status to Available, Busy, or Offline and Away.
Once the status is changed, it will sync among the devices (Mobile, Desktop, and Portal).
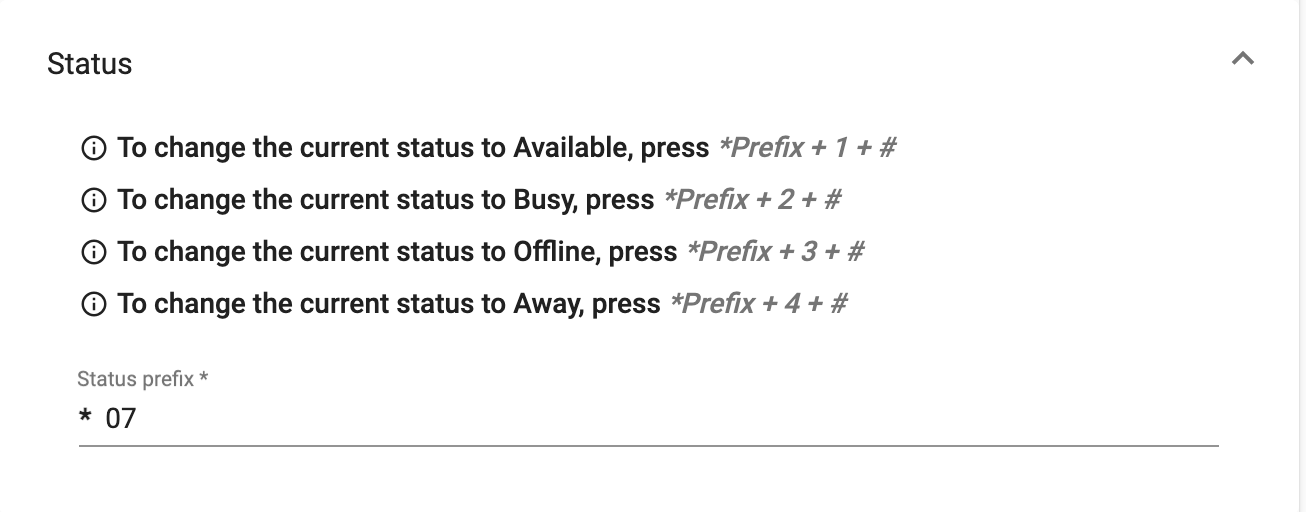
Example:
The prefix is 07, the user should dial:
- Available *071#
- Busy *072#
- Offline *073#
- Away *074#
Mobile & Desktop Devices
If the users want to use the dialing code for mobile & desktop device, they should remove the # from syntax of dial code and press call button to apply .
*Prefix + 1 + call button Change Status to Available
*Prefix + 2 + call button Change Status to Busy
*Prefix + 3 + call button Change Status to Offline
*Prefix + 4 + call button Change Status to Away
Busy Remarks
- This section allows you to define the Busy remark for Call Center Agents. By default, the system will have two main breaks - Toilet and Lunch breaks.
- You can add more remarks in this setting.
Please Note: Maximum character limit for Remarks is 30.

Note
The Busy Remark options will be displayed based on the User Type, but only when the extension is classified as a Phone System type.
