Integrated Instruction
-
OSS/BSS Answers
Access Control Security Hub Admin Audit B3Network Master Account Channel App Contract App Customer App Discount App Edge Server File Management Finance App Invoice App Number Management Payment Portal Settings Price List Product App Release V2 SMS Gateway Supplier App Support Center Support Hub Business Hub Sales Hub Finance Hub
- App Model - Organization Management
- App Model - Communication Apps Answers
- License Model - Organization Management
-
License Model - CPaaS Solution Answers
Phone System - Admin Guide Phone System - End-user Guide Mobile App Desktop App Web Phone Omni-Channel Auto Attendant - Admin Guide Developer Hub - Admin Guide Microsoft Teams Operator Connect - Admin Guide Microsoft Teams Direct Routing - Admin Guide Contact Center - Supervisor Guide Contact Center - Agent Guide SIP Trunk CPaaS - SIP Trunk Power SIP Trunk CPaaS Fax CPaaS Hotdesking Contact Campaign File Explorer Power Mobile App Files App Campaign App
- Telcoflow
- Integrations Answers
- Updated Regulations
- Ideas Portal
Table of Contents
A. Pre-requisites:
- Global Admin access on your Office 365 tenant.
- Powershell environment installed before you can run the Powershell commands later in the guide.
- CPaaS Bizphone
- MS Teams License
- Number
- Microsoft Teams Licenses:
Licenses for Domain Verification:
- Office 365 E1
- Office 365 E3
- Office 365 E5
- Microsoft E3
- Microsoft E5
- Microsoft F1
- Office 365 F3
- Office 365 O365
- Microsoft 365 A1
- Microsoft 365 A3 for faculty
- Microsoft 365 A3 for students
- Microsoft 365 A5 for faculty
- Microsoft 365 A5 for students
- Office 365 A5 for faculty
- Office 365 A5 for students
- Office 365 Education E1 for Faculty
- Office 365 Education E3 for Faculty
- Office 365 (Plan G1) for Government
- Office 365 (Plan G3) for Government
Licenses for End-user using Direct Routing:
- Common Area Phone
- Microsoft 365 Business Basic + Microsoft 365 Business Voice (without calling plan) add-on
- Microsoft 365 Business Standard + Microsoft 365 Business Voice (without calling plan) add-on
- Microsoft 365 Business Premium + Microsoft 365 Business Voice (without calling plan) add-on
- Microsoft E5
- Office 365 E5
- Office 365 A5 for faculty
- Office 365 A5 for students
- Microsoft 365 A5 for faculty
- Microsoft 365 A5 for students
- Microsoft E3 + Phone System License
- Microsoft F3 + Phone System License
- Microsoft 365 A1 + Phone System License
- Microsoft 365 A3 for faculty + Phone System License
- Microsoft 365 A3 for students + Phone System License
- Office 365 E1 + Phone System License
- Office 365 E3 + Phone System License
- Office 365 F3 + Phone System License
- Office 365 Education E1 for Faculty + Phone System License
- Office 365 Education E3 for Faculty + Phone System License
- Office 365 (Plan G1) for Government + Phone System License
- Office 365 (Plan G3) for Government + Phone System License
B. Integration Steps:
1. Give us Consent Privilege:
- Go to Bizphone > Setting > MS-Teams > Enable

- Popup to direct you to the Microsoft login portal
- Login Microsoft by your global admin account
- Grant access and give permission for B3networks to read and make changes to your office 365 account.
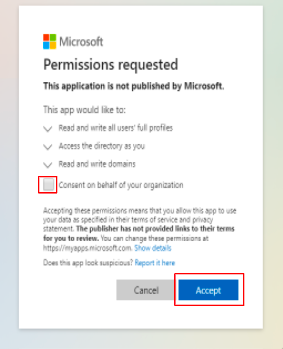
By doing this, we will have the access token to make the API Microsoft call and do the automation for setting up and verifying your domain in Microsoft (step 3), which normally must be done manually with many steps if you choose other competitors.
**Process if done manually:
- Add B3 Connector Domain (e.g: team7620626.sbc1.b3networks.com) to the domain manager in your MS Teams Global admin account.
- Verify the domain and provide the TXT record (e.g: MS=ms9800xxxx) to the carrier.
- Create a temporary user (domain-activation) to associate with the connector domain.
- Activate a temporary user by assigning an E1/E3/E5 license to that user.
- After 24 hours can revoke the license of the temporary account.
2. Verify B3 Connector Domain:
2. Verify B3 Connector Domain:
Go to Bizphone > Setting > MS-Teams > click Verify Domain
**Notes:
Make sure that you have an available license mentioned above so that the system can use it for domain verification.
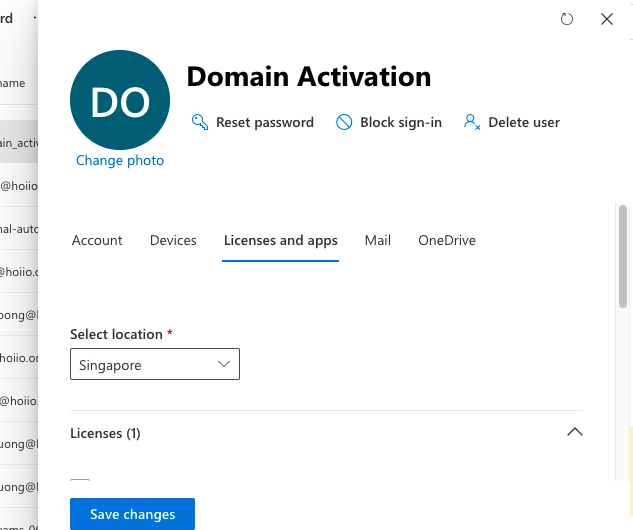
Once your domain is verified, the system will automatically create the user with name = domain-activation@<teamid>.sbc1.b3networks.com.
After 24 hours, you can log in to your Microsoft 365 global admin account > Users > Active users > Click on the account created by the system > Licenses and apps > revoke the license and assign it to other real users.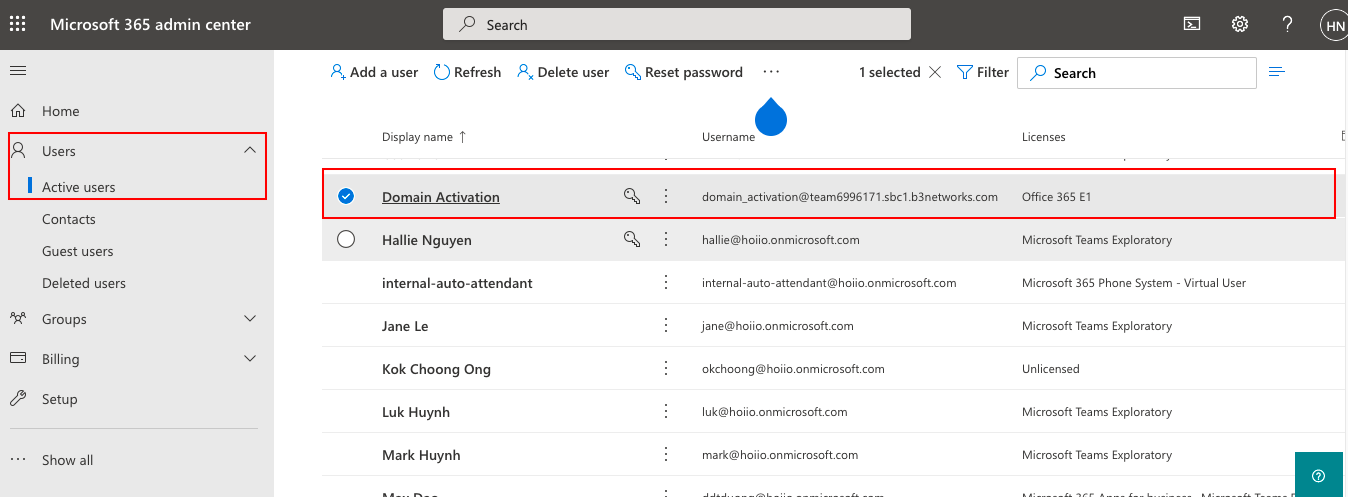
3. Assign License:
- Go to Setting > MS-Teams > select a license to assign > Assign license > Choose one of these options depending on which MS Teams license you have:
- Office 365 E1 - STANDARDPACK
- Office 365 E3 - ENTERPRISEPACK
- Office 365 E5 - ENTERPRISEPREMIUM
- Microsoft E3 - SPE_E3
- Microsoft E5 - SPE_E5
- Microsoft F1 - SPE_F1
- Office 365 F3 - DESKLESSPACK
- Office 365 O365_BUSINESS_PREMIUM
- Microsoft 365 A1 - M365EDU_A1
- Microsoft 365 A3 for faculty - M365EDU_A3_FACULTY
- Microsoft 365 A3 for students - M365EDU_A3_STUDENT
- Microsoft 365 A5 for faculty - M365EDU_A5_FACULTY
- Microsoft 365 A5 for students - M365EDU_A5_STUDENT
- Office 365 A5 for faculty - ENTERPRISEPREMIUM_FACULTY
- Office 365 A5 for students - ENTERPRISEPREMIUM_STUDENT
- Office 365 Education E1 for Faculty - STANDARDPACK_FACULTY
- Office 365 Education E3 for Faculty - ENTERPRISEPACK_EDULRG
- Office 365 (Plan G1) for Government - STANDARDPACK_GOV
- Office 365 (Plan G3) for Government - ENTERPRISEPACK_GOV

- Assign the extension to proper MS-Teams users:
Go to Setting > MS-Teams > Mass Configuration > Download sample file > fill in Microsoft accounts with appropriate CPaaS extensions/DDI Numbers > Upload CSV > Configure

- Generate the Powershell Script:
Go to Setting > MS-Teams > View Script > Copy script

4. Open the PowerShell to connect Microsoft Tenant by global administrator > Paste the generated PowerShell script to PowerShell:
NOTE: If you do not know about Powershell, click here to get the Powershell tutorial.
Below is the detailed PowerShell script:
- Start PowerShell as Administrator (or with Administrator Privileges):
Install-Module -Name MicrosoftTeams -RequiredVersion 2.3.1
Import-Module MicrosoftTeams -RequiredVersion 2.3.1
$credential = Get-Credential
Connect-MicrosoftTeams -Credential $credential - Add the first user to the trunk:
Set-CsUser -identity "<A's Username>" -EnterpriseVoiceEnabled $true -HostedVoicemail $true -OnPremlineURI tel:+<Number 1> - Configure Microsoft 365 tenant to enable direct routing:
Set-CsOnlinePstnUsage -Identity Global -Usage @{Add="B3"}
New-CsOnlineVoiceRoute -Identity "B3" -NumberPattern ".*" -OnlinePstnGatewayList "<B3 Connector Domain>" -Priority 1 -OnlinePstnUsages "B3"
New-CsOnlineVoiceRoutingPolicy -Identity "B3" -OnlinePstnUsages “B3” - Assign Voice Routing Policy to users:
Grant-CsTeamsCallingPolicy -PolicyName AllowCalling -Identity ""<A's Username>""
Grant-CsOnlineVoiceRoutingPolicy -Identity <A's Username> -PolicyName B3 - Add the rest of the users to the trunk:
Set-CsUser -identity "<B's Username>" -EnterpriseVoiceEnabled $true -HostedVoicemail $true -OnPremlineURI tel:+<Number 2>
Grant-CsTeamsCallingPolicy -PolicyName AllowCalling -Identity "<B's Username>"
Grant-CsOnlineVoiceRoutingPolicy -Identity <B's Username> -PolicyName B3
Set-CsUser -identity "<C's Username>" -EnterpriseVoiceEnabled $true
-HostedVoicemail $true -OnPremlineURI tel:+<Number 3>
Grant-CsTeamsCallingPolicy -PolicyName AllowCalling -Identity "<C's Username>"
Grant-CsOnlineVoiceRoutingPolicy -Identity <C's Username> -PolicyName B3
- Script for Resource accounts (assign a number to Resource account used for Auto-attendants or Call Queues):
Set-CsOnlineApplicationInstance -Identity <Resource Username> -OnpremPhoneNumber +<Number 4>
Grant-CsTeamsCallingPolicy -PolicyName AllowCalling -Identity "<Resource Username>"
Grant-CsOnlineVoiceRoutingPolicy -Identity "<Resource Username>" -PolicyName B3
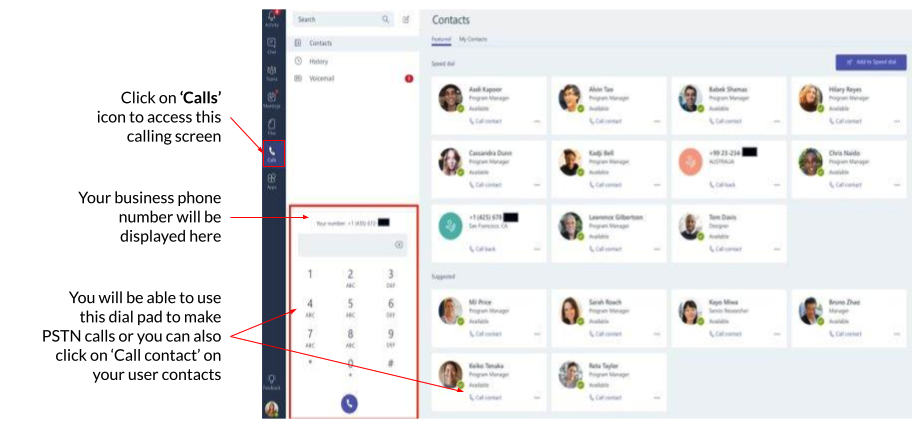
5. Open the Microsoft Teams Desktop application or Mobile application > Enjoy your call:
