Device Management - IP Phone

Written by B3Networks Academy
Updated at June 9th, 2026
-
OSS/BSS Answers
Access Control Security Hub Admin Audit B3Network Master Account Channel App Contract App Customer App Discount App Edge Server File Management Finance App Invoice App Number Management Payment Portal Settings Price List Product App Release V2 SMS Gateway Supplier App Support Center Support Hub Business Hub Sales Hub Finance Hub
- App Model - Organization Management
- App Model - Communication Apps Answers
- License Model - Organization Management
-
License Model - CPaaS Solution Answers
Phone System - Admin Guide Phone System - End-user Guide Mobile App Desktop App Web Phone Omni-Channel Auto Attendant - Admin Guide Developer Hub - Admin Guide Microsoft Teams Operator Connect - Admin Guide Microsoft Teams Direct Routing - Admin Guide Contact Center - Supervisor Guide Contact Center - Agent Guide SIP Trunk CPaaS - SIP Trunk Power SIP Trunk CPaaS Fax CPaaS Hotdesking Contact Campaign File Explorer Power Mobile App Files App Campaign App
- Telcoflow
- Integrations Answers
- Updated Regulations
- Ideas Portal
Table of Contents
Device Management tab is where you can automatically connect IP devices to your users who have IP Phone Licenses so that they can receive incoming calls and make outgoing calls on VOIP Devices.
- Provisioning system can associate multiple SIP Accounts with a single Extension.
- System allows the provisioning of multiple SIP Accounts on a single IP Phone MAC Address.
- system allows the provisioning of multiple Extensions on a single IP Phone MAC Address
- End-users can manage provisioned IP Phone devices through self-service.
- Admin will import 1 MAC Address on the portal (Phone System)
- 1 MAC Address can be assigned to:
- 1 Extension with different SIP Accounts
- Multiple Extension with different SIP Accounts
Note: One MAC Address can map maximum of 6 Extensions.
- Go to Phone System
- Change the view to System
- Select Devices Management
- Click on Import device to import MAC Address
-
Select the Filter By to view the status of the MAC provisioning
- All
- Assigned
- Unassigned
-
Select Provision to provision the unassigned MAC addresses. There are three options available for provisioning.
- Auto Provision
- Bulk Provision
-
Provision Mode
- Domain Name (FQDN)
- Public IP Address
- Select a MAC address, or select All to include MAC addresses across all pages, and then perform one of the following actions:
- Export
- Reset provision counter
- Remove IP phone
- Select three dot icon beside the provision button to perform one of the following actions:
- Export
- Custom Template
- View Firewall Information

Bulk Apply Custom Template
The Bulk Apply Custom Template feature allows administrators to apply a custom configuration template to multiple IP phones simultaneously. This eliminates the need to configure each device individually, significantly reducing provisioning time.
- Two Methods: Upload a single configuration template and apply it via Manual Selection (input fields) or CSV Upload (MAC address list).
- Validation: The system automatically validates MAC address formats, device existence, and organization membership before applying any configuration.
- Resilient Processing: If a specific device validation fails, only that device is marked as failed—the rest of the bulk job will continue processing uninterrupted.
- Job Reports: A downloadable report is available upon job completion to track the success/failure status of each MAC address.
Step 1: Initiate the Bulk Job
- Log in to the portal and navigate to Phone System, then select System from the menu.
- Go to Device Management, then click on the Settings tab.
- Select Custom Template, then click the Bulk Settings button.
-
Upload your custom template file:
-
Supported format:
.cfg - Limit: Only 1 configuration file can be uploaded per job.
-
Supported format:
- Click Next to proceed to device selection.

Step 2: Choose Your Device Selection Method
You can target your devices using one of the two options below:
Option A: Manual Selection
- Use this if you want to manually pick specific MAC addresses directly in the portal.
- Select the MAC addresses from the input fields.
- Note: Only MAC addresses assigned to users within the current organization are listed.
- Constraint: Maximum of 100 MAC addresses per bulk job.
Option B: CSV Upload
- Use this if you have a large batch of devices pre-compiled in a spreadsheet.
- Prepare and upload a CSV file containing your list of target MAC addresses.
-
Constraint: Maximum of 1,000 MAC addresses per bulk job.
- Note: If your uploaded file exceeds this limit, an error message will display: "The entry has exceeded the maximum number of MAC addresses allowed per request (1000)."
- Once your devices are selected or uploaded, click Apply to run the job.

Tracking Job Status & Reports
After completing a job, you can view a full summary of the operations.
- Access the Report page by clicking View Report inside the Bulk Apply Custom Template section.
- Use the Date range dropdown filters to filter reports by job creation date.
- Click the Download button next to a specific job entry to download and view its detailed validation and execution report.After Provision select three dot icon in front of your selected MAC address to setup basic information including:

Device settings
User can set device name and device login password here.

Basic Settings
An engine template is a base configuration file used by a provisioning server to dynamically create unique, device-specific configuration files for IP phones. When an IP phone boots, it downloads and applies this customized file, which contains its unique settings like SIP credentials and server details. There are two engine template options available for basic settings:
- Default
- Freemarker


How to select engine template:
- Go to Phone System → System → Device Management.
- Import the MAC address of the phone(s).
- Click Provision → this uses the Default engine template by default.
- To update basic settings for a specific device:
- Select the MAC address.
- Click Basic Setting.
- Choose which engine to use: Default or FreeMarker.
- The system lets you download a sample engine template (Default or FreeMarker), customize it, and reupload.
Note
- If you just need to insert values like SIP username, password, timezone → use Default template.
- If you want advanced logic → use FreeMarker template.
Manage Users
Assign the user to MAC Address. Maximum 6 users per MAC address can be added, once the number of users reached the limit, the system wont let you select another user.

Reset Provision Counter
This action resets counter and let the IP Phone of selected MAC address perform the Factory Reset function.
Remove IP Phone
This operation deletes the IP phone device (selected MAC address) permanently. After that, user must need to unprovision the device manually.

Provision
1. Auto-provision
A. Zero-touch
We support zero-touch auto-provisioning for the following brands. If you are using one of those devices, please take the following steps to connect SIP with the devices.
Step 1: Check Supported Brands
- Fanvil Model List Supported
Brand |
Model |
Status |
|---|---|---|
Fanvil |
X1 |
Supported |
Fanvil |
X3S |
Supported |
Fanvil |
X3SG |
Supported |
Fanvil |
X3SL |
Supported |
Fanvil |
X3SP |
Supported |
Fanvil |
X3SW |
Supported |
Fanvil |
X3U |
Supported |
Fanvil |
X3UP |
Supported |
Fanvil |
X4 |
Supported |
Fanvil |
X5S |
Supported |
Fanvil |
X5U |
Supported |
Fanvil |
X6 |
Supported |
Fanvil |
X7 |
Supported |
Fanvil |
V61G |
Supported |
Fanvil |
V61W |
Supported |
Fanvil |
V67 |
Supported |
Fanvil |
W611W |
Supported |
Fanvil |
X1 |
Supported |
Fanvil |
X21 |
Supported |
Fanvil |
X30 |
Supported |
- Yealink Model List Supported
Brand |
Model |
Status |
|---|---|---|
Yealink |
CP920 |
Supported |
Yealink |
CP925 |
Supported |
Yealink |
CP966 |
Supported |
Yealink |
CP965 |
Supported |
Yealink |
T20P |
Supported |
Yealink |
T21P |
Supported |
Yealink |
T23G |
Supported |
Yealink |
T23P |
Supported |
Yealink |
T31G |
Supported |
Yealink |
T31P |
Supported |
Yealink |
T40P |
Supported |
Yealink |
T41P |
Supported |
Yealink |
T42S |
Supported |
Yealink |
T42U |
Supported |
Yealink |
T43U |
Supported |
Yealink |
T48S |
Supported |
Yealink |
T48U |
Supported |
Yealink |
T53W |
Supported |
Yealink |
T56A |
Supported |
Yealink |
T58 |
Supported |
Yealink |
W52P |
Supported |
Yealink |
T31W |
Supported |
Yealink |
T33G |
Supported |
Yealink |
T34W |
Supported |
Yealink |
T40G |
Supported |
Yealink |
T46S |
Supported |
Yealink |
W60B |
Supported |
Step 2: Import IP phones’ MAC Addresses:
- Go to Phone System > View: System
- Go to Devices management > Click Import button
- Import MAC address of devices line by line > Click Import

Step 3: Assign Devices to Users
- Check Firewall Configuration
- There are 2 ways to assign a device for a User:
a. Auto assignment
- Go to Phone System > View: System
- Go to Devices management > Provision > Choose Auto provision (The system will randomly assign the devices to Users)
- Reboot the devices > start using

b. Manual assignment
- Go to Phone System > View: System
- Go to Devices management
- Click 3 dots symbol > Manage Users > Choose 1 extension > Click Save
- Set device login password (optional)
- Click Save
- Reboot the devices > start using

Device Login Password (optional)
After the IP Phone has been connected to our SIP, by default, you will have to use these login credentials (Username: admin - Password: <SIP password>) to log in to the device's web portal. However, to help the admins to remember the password easier, this feature allows you to set your own device's web portal login passwords if needed.

Firewall Configuration
In case your site has a firewall, make sure you have allowed our IP/Port before doing auto-provision.

Step 4: IP-Phone Graphic User Interface Configurations
Sangoma
1. Access the Sangoma Web interface:
- Obtain the handset IP address.
- Press the Menu button on the far right, select Status - Information.
- Note the IP address.
- Enter the IP address into your web browser. (Please note that the PC you use must be connected to the same network as your phone)
- Log in to the web interface
- The default username is admin and the default password is admin.
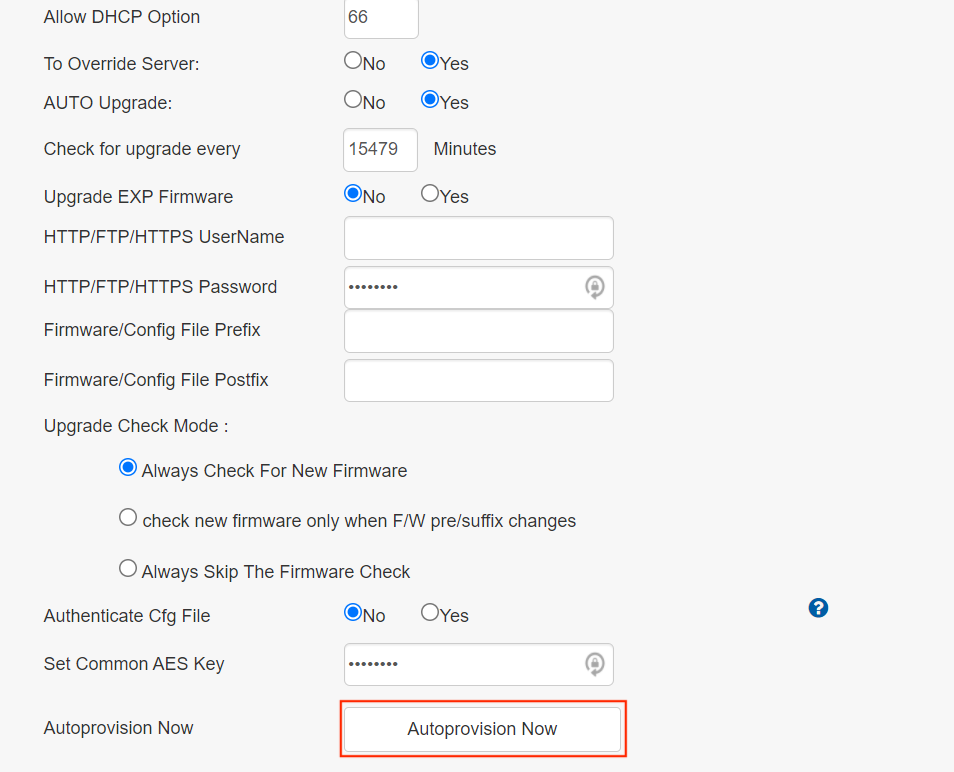
2. Provision
- At the Sangoma Web Interface, navigate to Management - Auto Provision.
- Enter your “https://provisioning.b3networks.com/provision/register/sangoma” in the section Config Server Path.
- Press Save Set and then Autoprovision Now.
- It will take up to 2 minutes and the device will reboot. The phone should now show the provisioned extension.


Yealink
1. Access the Yealink Web interface:
- Obtain the handset IP address.
- Press the Menu button on the far right, select Status.
- Note the IP address.
- Enter the IP address into your web browser.
- Please note that the PC you use must be connected to the same network as your phone.
- Log in to the web interface
- The default username is admin and the default password is admin.
2. Provision
- At the Yealink Web Interface, navigate to Settings - Auto Provision.
- Enter your “https://provisioning.b3networks.com/provision/register/yealink” in the section Server URL.
- Press Confirm and then Autoprovision Now.
- It will take up to 2 minutes and the device will reboot. The phone should now show the provisioned extension.


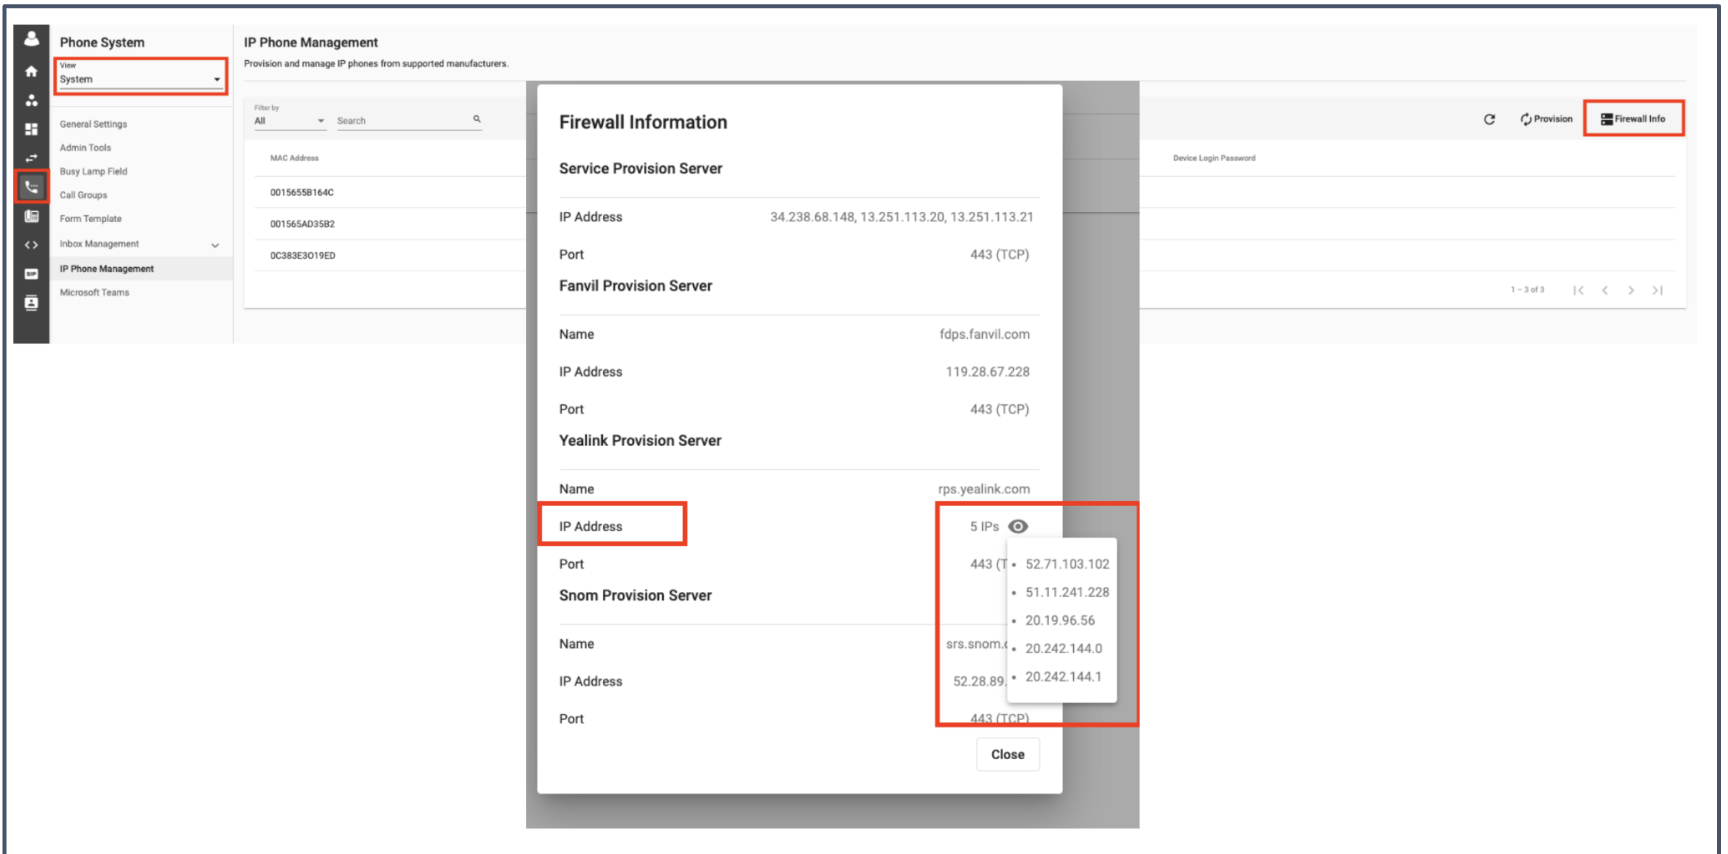
Update Yealink Firewall Details
Yealink has added new servers and requires users who use IP Phone Auto Provisioning to add new IP addresses to their firewall in order to use the service properly.

- Go to Phone System
- View - System
- Click on IP Phone Management
- Select Firewall Info
- Update Yealink Provision Server
2. Manual Provision
If the users do not use these supported brands, you can register their IP Phones manually.
Our system currently supports the following protocols:
- UDP
- TCP
- TLS
Our system will default use UDP & TCP (the most commonly used connection protocols for data travel on the Internet). However, if your device supports TLS to enable e-commerce transaction security on the Web, which requires encryption to protect customer personal data and authentication and integrity guarantees to ensure a safe transaction. You can choose the TLS option so that whenever you make/receive calls, it will encrypt the calls to secure the connection.
Provision UDP & TCP
To do so, please follow the steps below:
- Go to the Admin Tools tab.
- In the Activated Devices section, get SIP Credentials:
- SIP credentials
- Domain
- Password
- Go to your device's brand web portal, and fill in the above information to register.
Get SIP Credentials
- Go to Phone System, choose View: System
- Choose the Admin Tools tab
- In the Activated Devices section, get SIP Credentials.

Example: Register SIP credential on the Yealink IP Phone
- Line Active: Enabled
- Label: Anything you like to appear on the LCD of your phone
- Registered Name: SIP account we provide (e.g. sip1234567)
- User Name: SIP account we provide (same as Register Name)
- Password: SIP password we provide
- Server Host: SIP domain we provide

Provision TLS
To register SIP TLS for your IP devices, you will need the following details:
-
SIP Information:
- SIP credentials
- Domain
- Password
- SIP Transport: TLS
- Port: 5061 (Obligatory)
- SRTP: ON (Obligatory)
- TLS Version: 1.2 (Obligatory)
Once you have the required details, you can use it to register the CPaaS SIP on your device's Web Interface.
3. Bulk Provision
Bulk Provision only supports unassigned Mac Addresses.
- Select the Provision option.
- Select Bulk Provision
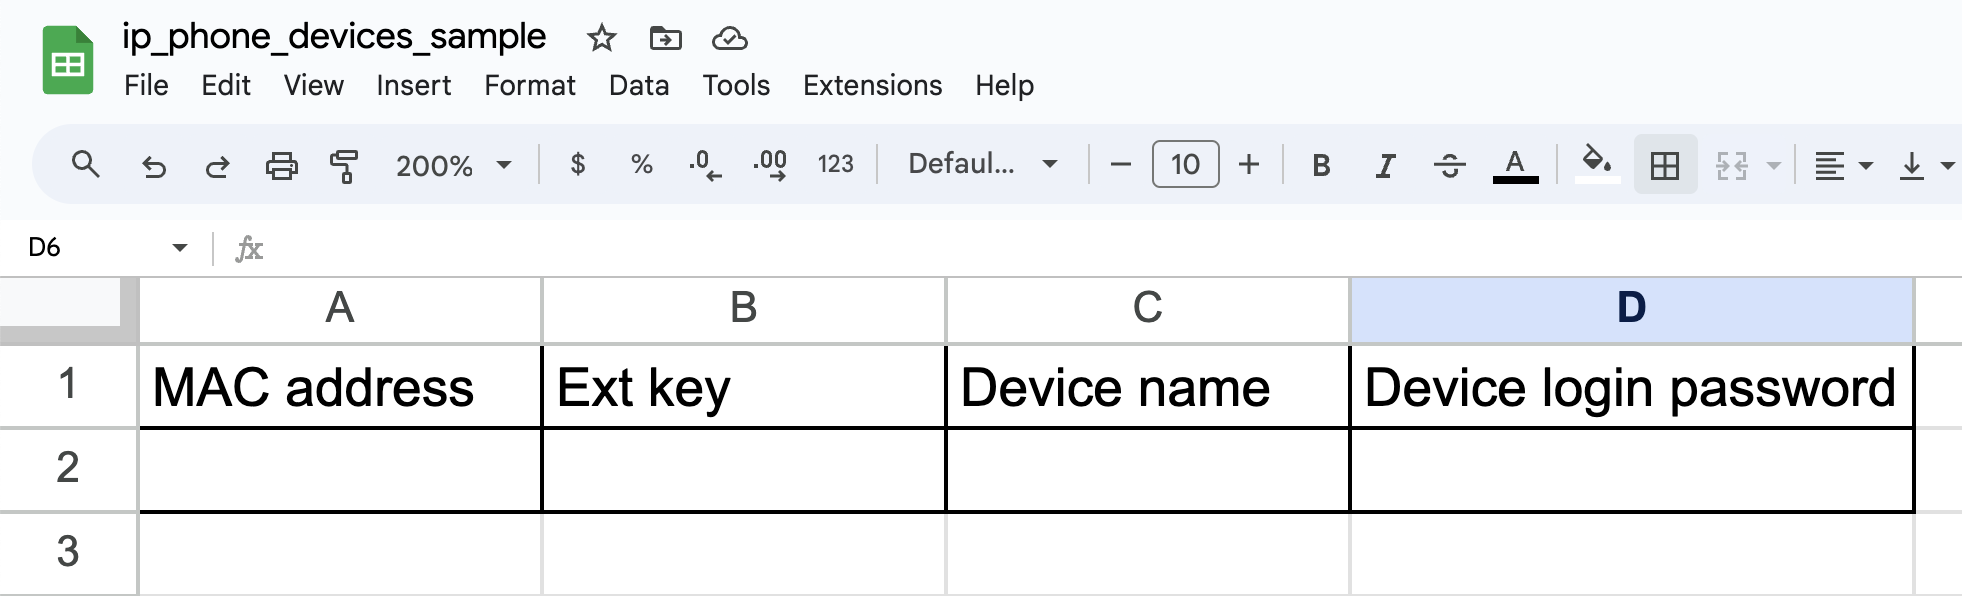
- Download the Sample file
- Create file according to the provided format in the sample file.
- Upload the file on the portal.
- Click Upload.

Uploaded file Requirements:
Following information is required for the Bulk Provisioning to be successfully executed.
- MAC Address
- Extension Key
- Device Name
- Device login password
4. Provision Mode
To configure provision mode, follow the steps below:
- Go to Phone System and click View System.
- Select IP Phone Management from the menu.
- Choose the Provision Mode setting.
- Select one of the following options: Domain Name (FQDN), or Public IP Address.
- Click Save to apply the changes.

A Section is added for selecting SIP Domain Format.
