Configure an Extension
-
OSS/BSS Answers
Access Control Security Hub Admin Audit B3Network Master Account Channel App Contract App Customer App Discount App Edge Server File Management Finance App Invoice App Number Management Payment Portal Settings Price List Product App Release V2 SMS Gateway Supplier App Support Center Support Hub Business Hub Sales Hub Finance Hub
- App Model - Organization Management
- App Model - Communication Apps Answers
- License Model - Organization Management
-
License Model - CPaaS Solution Answers
Phone System - Admin Guide Phone System - End-user Guide Mobile App Desktop App Web Phone Omni-Channel Auto Attendant - Admin Guide Developer Hub - Admin Guide Microsoft Teams Operator Connect - Admin Guide Microsoft Teams Direct Routing - Admin Guide Contact Center - Supervisor Guide Contact Center - Agent Guide SIP Trunk CPaaS - SIP Trunk Power SIP Trunk CPaaS Fax CPaaS Hotdesking Contact Campaign File Explorer Power Mobile App Files App Campaign App
- Telcoflow
- Integrations Answers
- Updated Regulations
- Ideas Portal
Table of Contents
Go to Bizphone App > Extensions > User > Click to select an extension: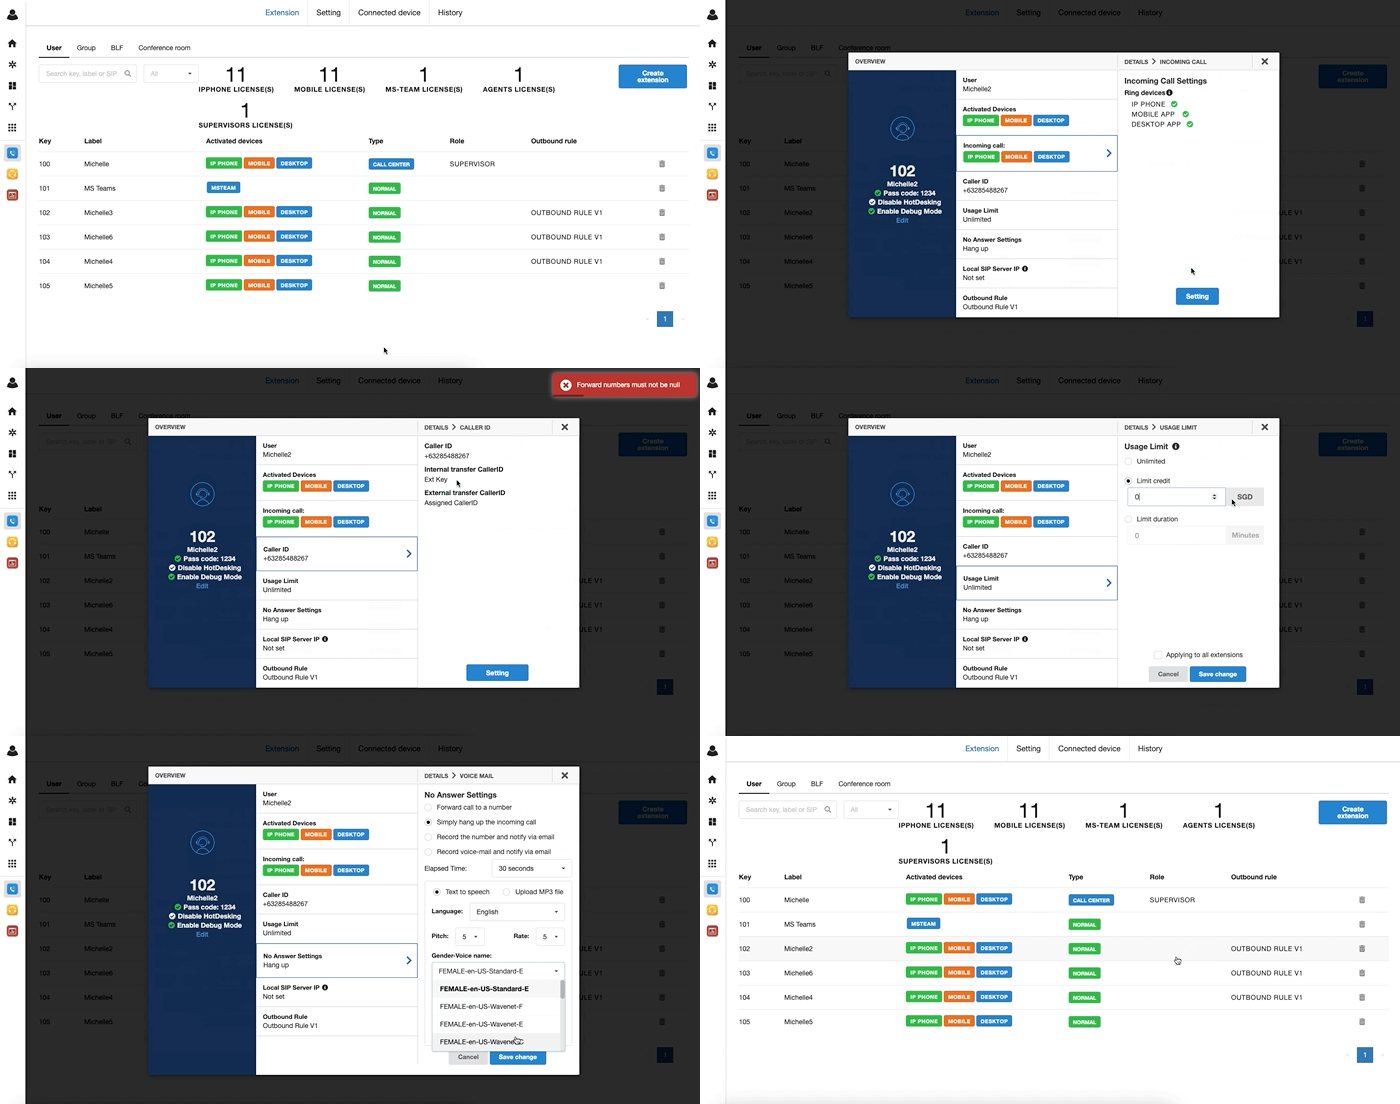
1. Basic information
1. Click Edit to change the settings
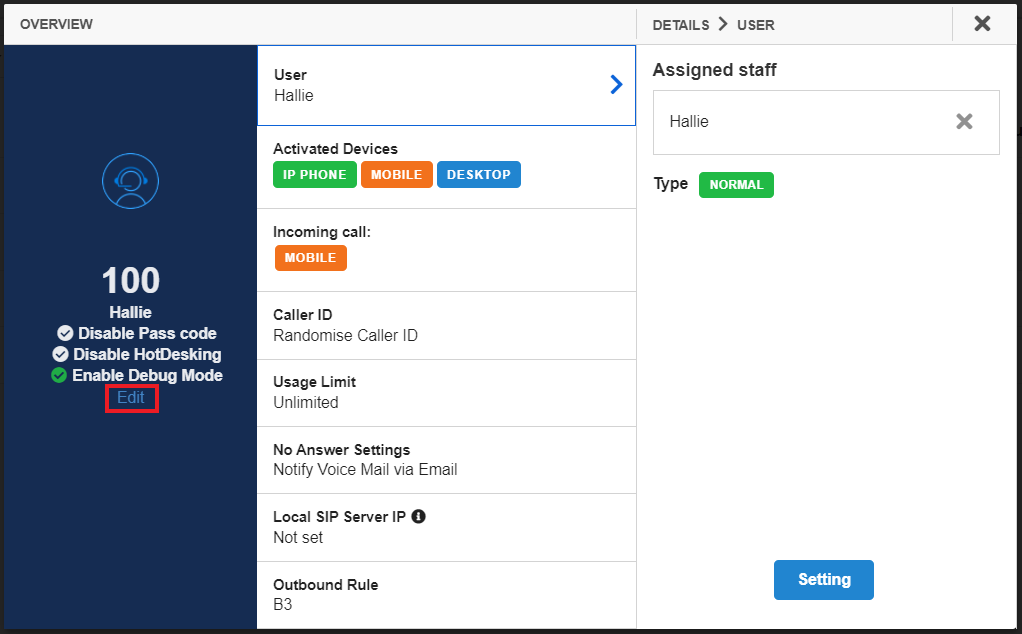
2. Edit the Info and Save change
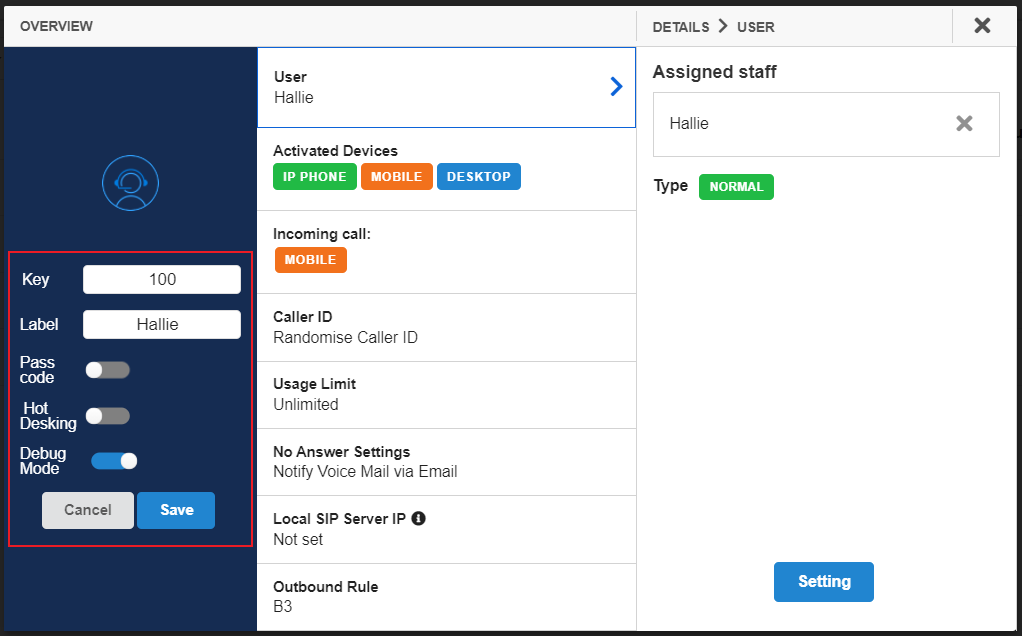
- Key: the extension number which is used for internal calls and configuration.
- Label: Name of the extension
-
Passcode: a chain of digits that users have to press when they call to a specific destination.
- Dial the number
- Enter the passcode after the prompt message.
- Call connected.
- Find out more about how passcode works with Outbound Rule.
- Hot Desking: click HERE for details.
- Debug mode: if this toggle is turned on, users using Mobile and Desktop App will be able to submit app logs whenever they face problems with our apps. This will help our technical team to fix your issue faster. To submit the app log for Bizphone Mobile/Desktop App, click HERE for details
2. Assignee
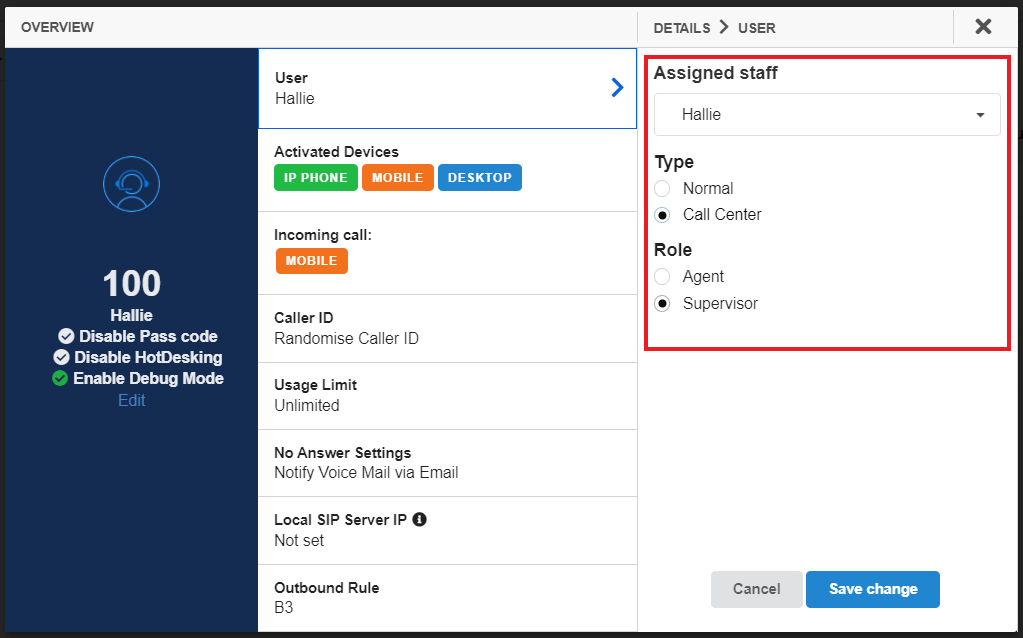
User > Settings > Choose a member to assign > Assign the type and role > Save
Note
Click HERE for Types and Roles of Bizphone Extension.
3. Activated Devices
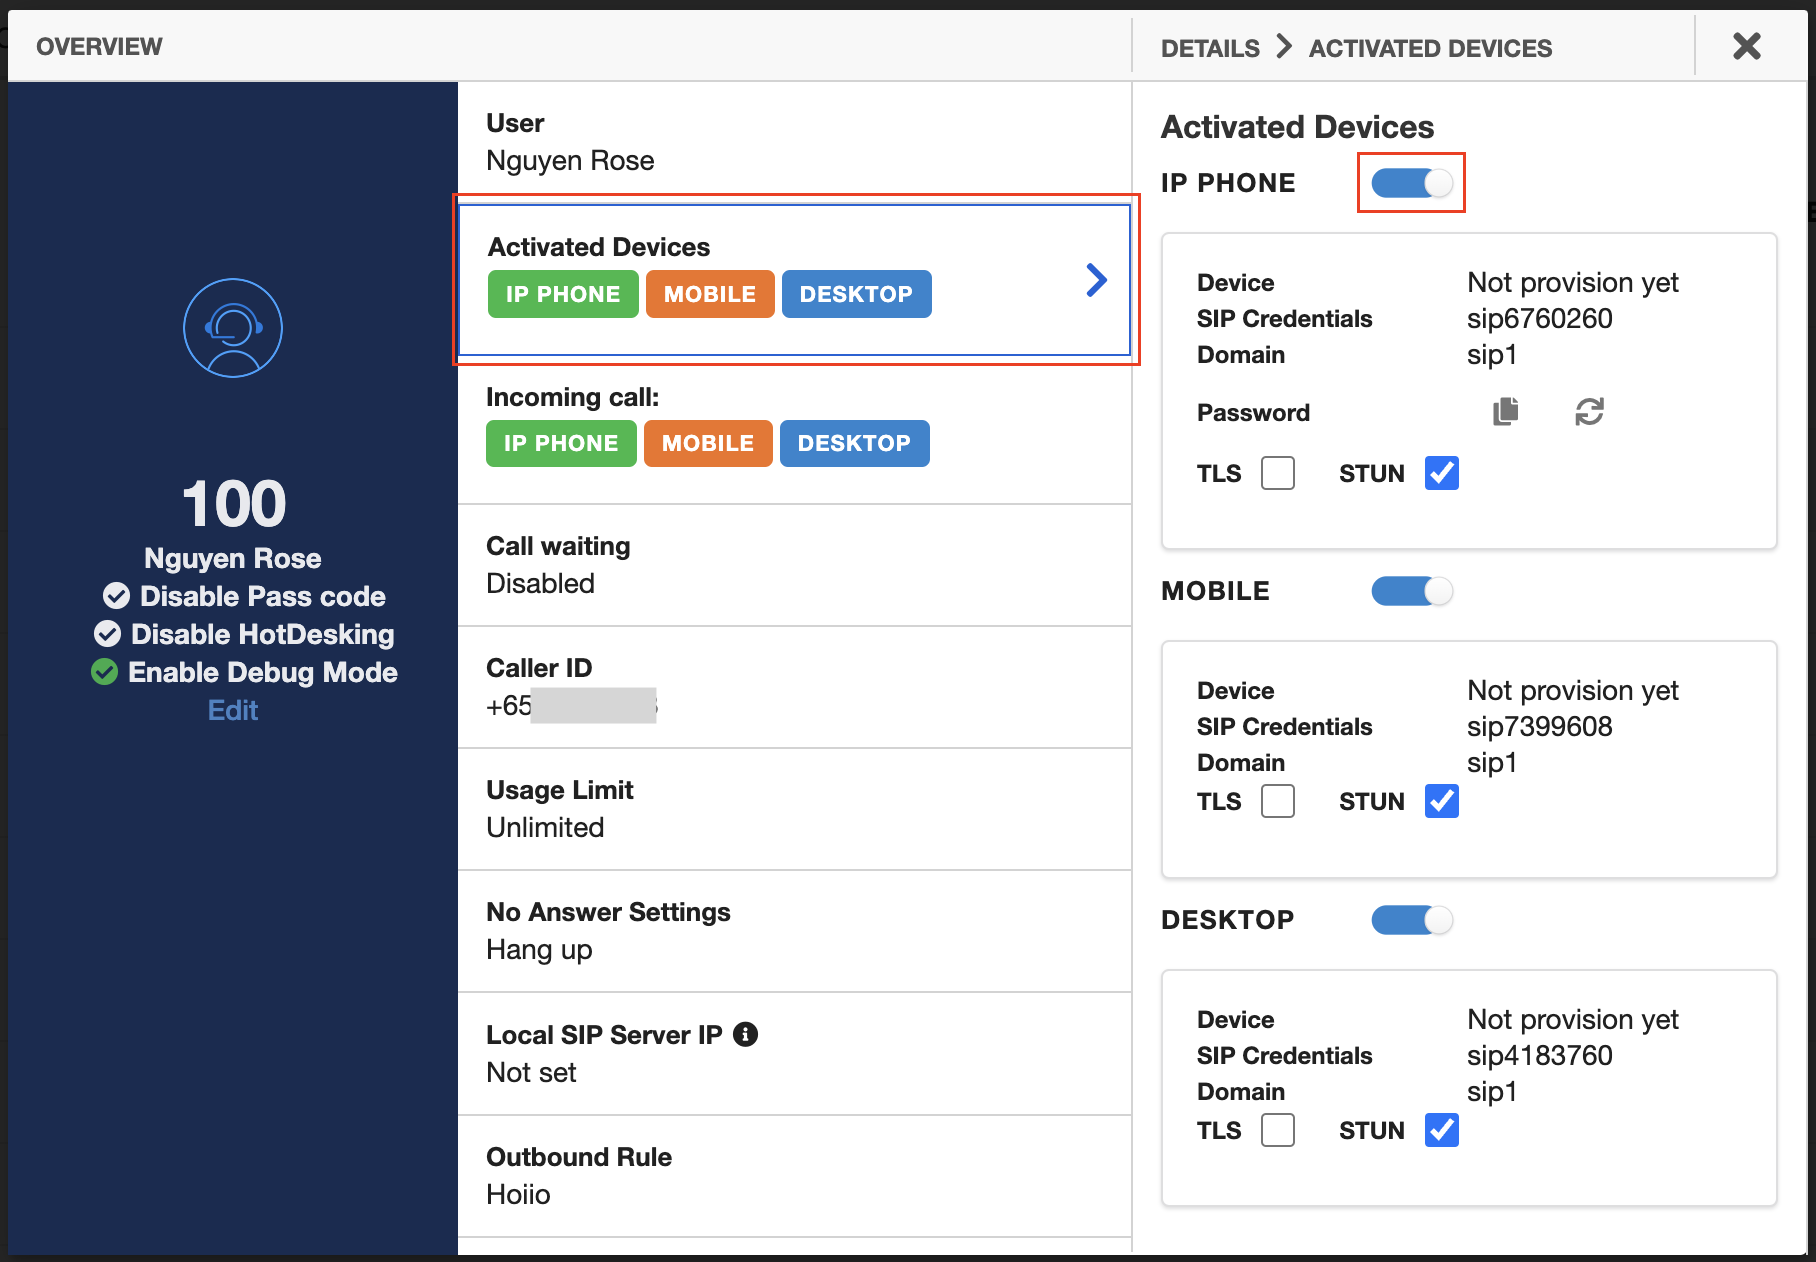
One user can activate the Bizphone service on up to 3 different devices: IP Phone, Mobile Phone, and Desktop.
User > Activated Devices > Select device > Activate
Tip:
To sign in to your Desktop/Mobile App, please use the same ID of your account (your email address and your configured password).
Device
Used for Auto-provision feature. This status will only be changed to <Device Name - Mac Address> if the IP Phone License is registered by the auto-provision function.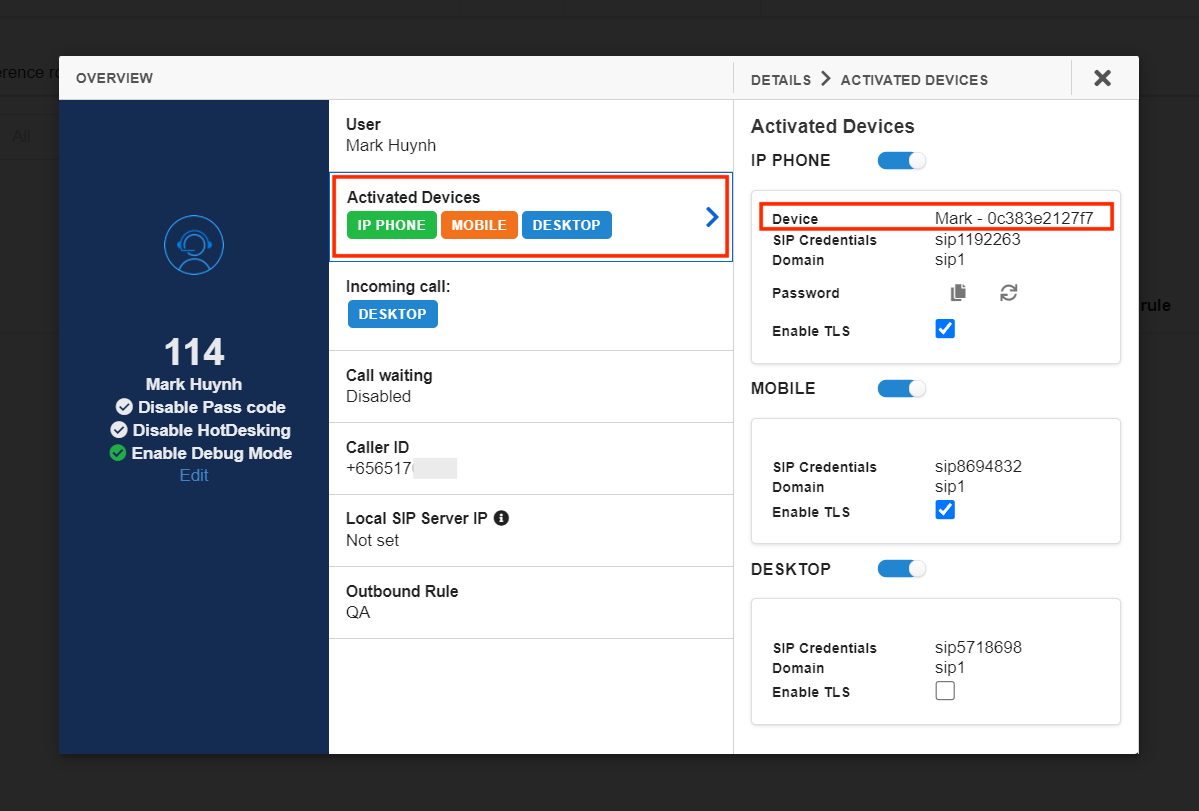
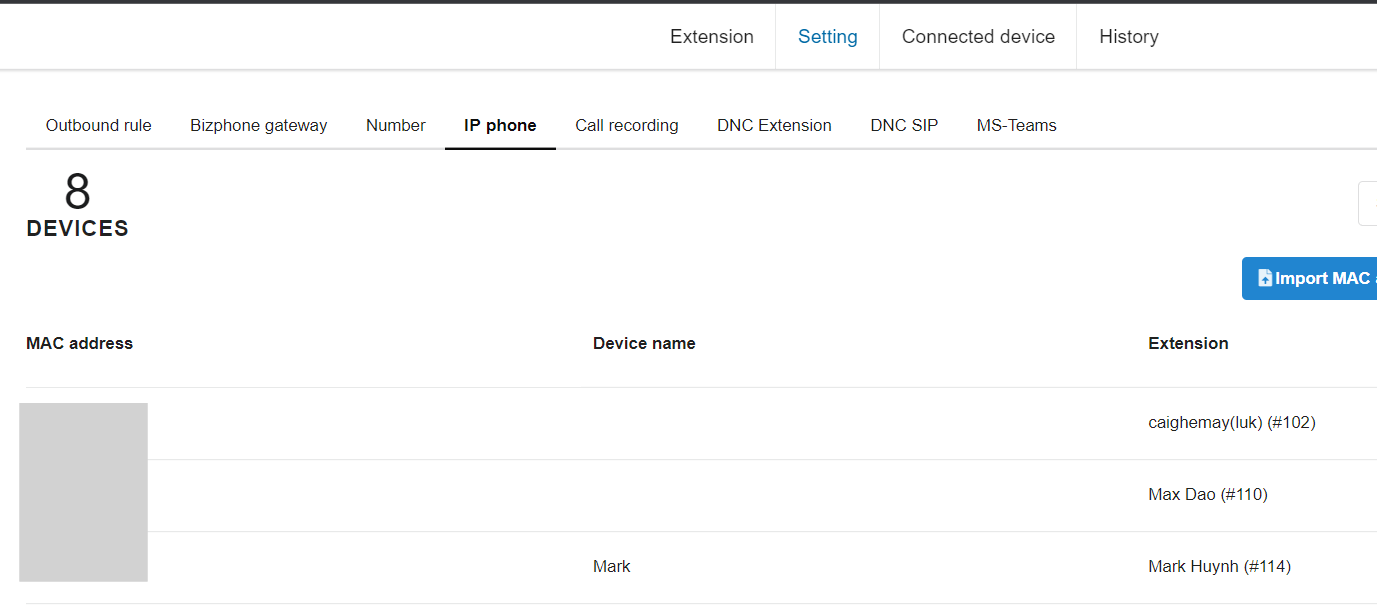
Enable TLS & STUN
-
TLS is Transport Layer Security - a security function.
- By default, our system will use UDP & TCP (TCP and UDP are the most commonly used connection protocols for data travel on the Internet).
- However, if your device supports TLS to enable e-commerce transaction security on the Web, which requires encryption to protect customers’ personal data, as well as authentication and integrity guarantees to ensure a safe transaction, you can enable TLS function on the Bizphone portal so that whenever you make/receive calls, TLS will encrypt them to secure the connection. The call will not be captured by anybody in the system environment.
- STUN:
- A STUN (Session Traversal of User Datagram Protocol [UDP] through Network Address Translators [NATs]) server allows NAT clients (i.e. IP Phones behind a firewall) to set up phone calls to a VoIP provider hosted outside of the local network.
- The STUN server allows clients to find out their public address, the type of NAT they are behind, and the Internet side port associated by the NAT with a particular local port. This information is used to set up UDP communication between the client and the VoIP provider to establish a call.
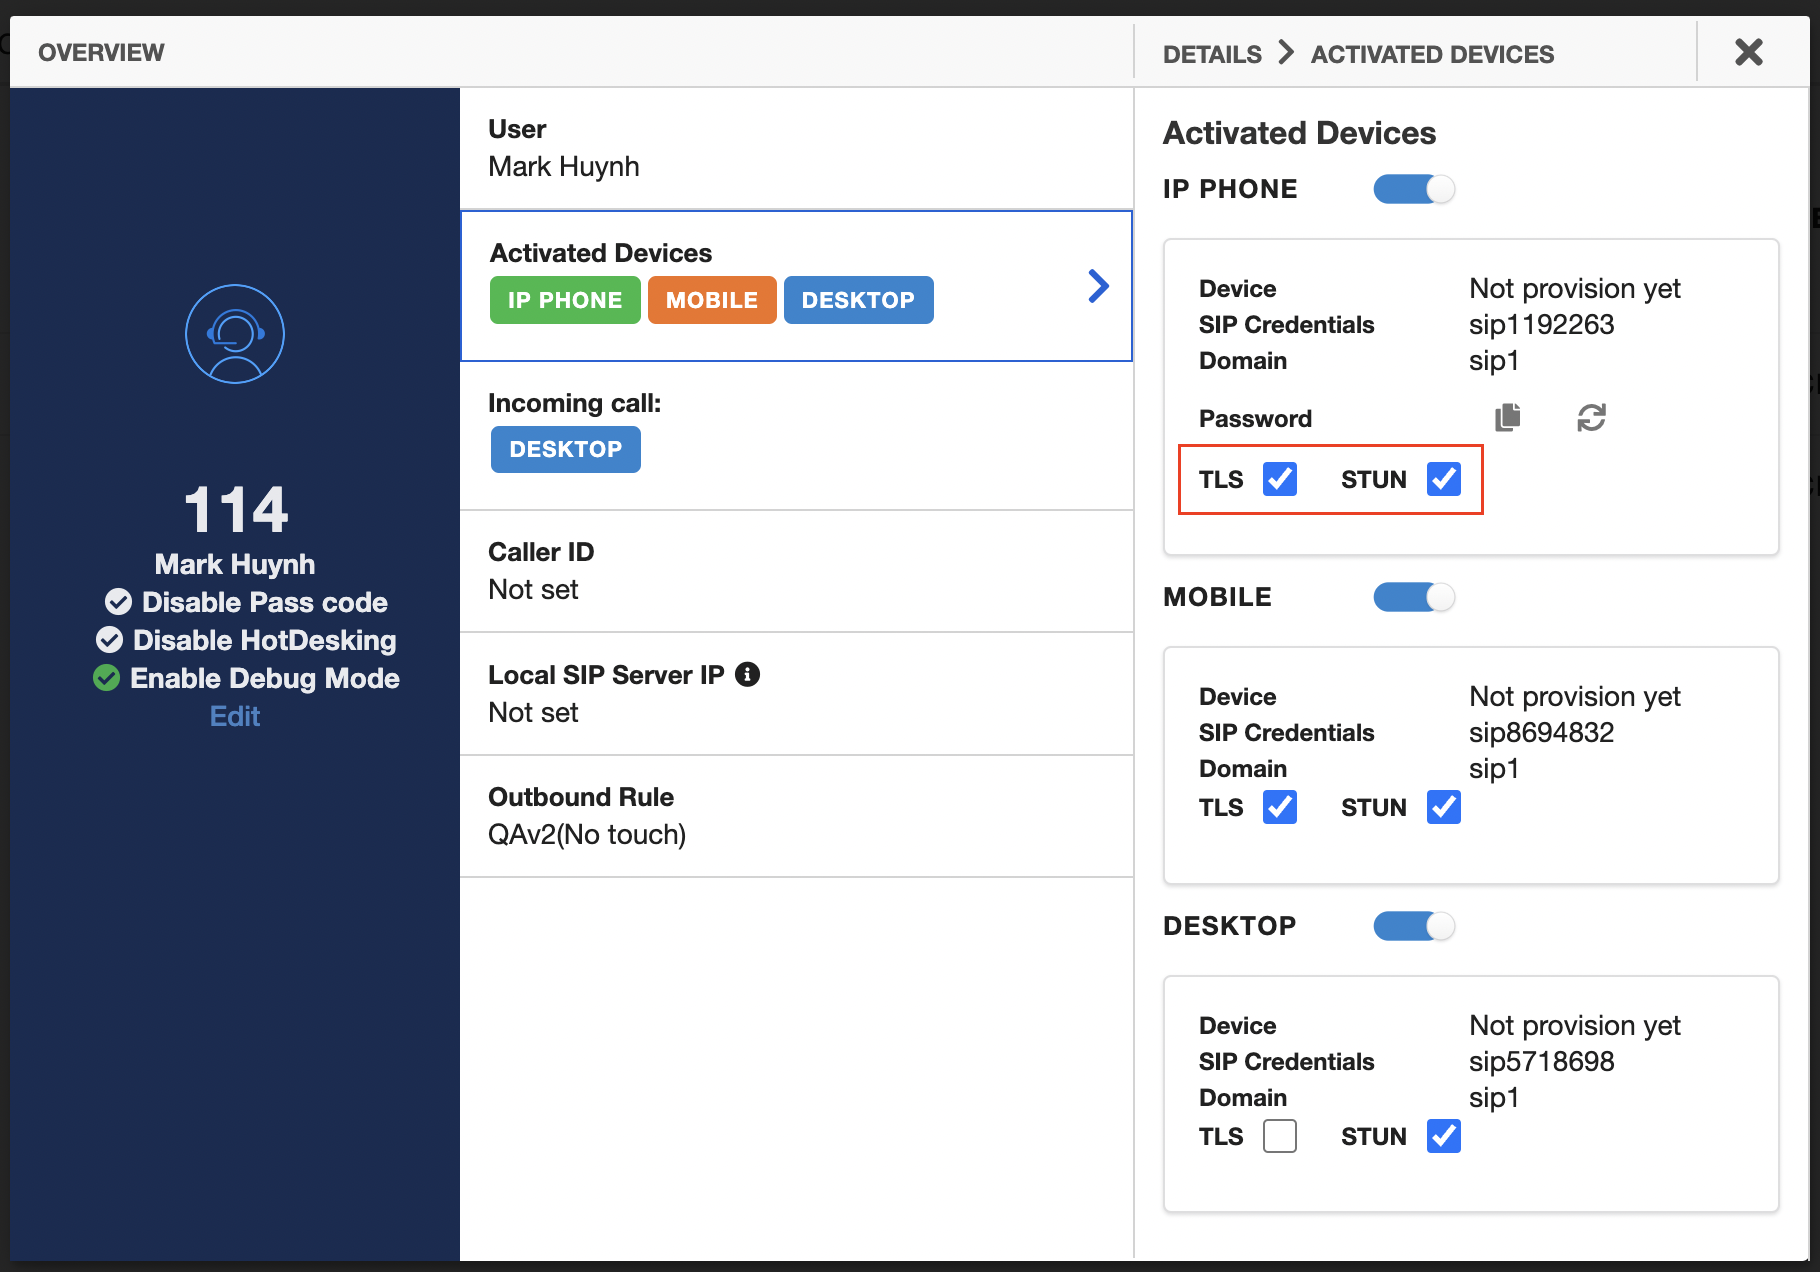
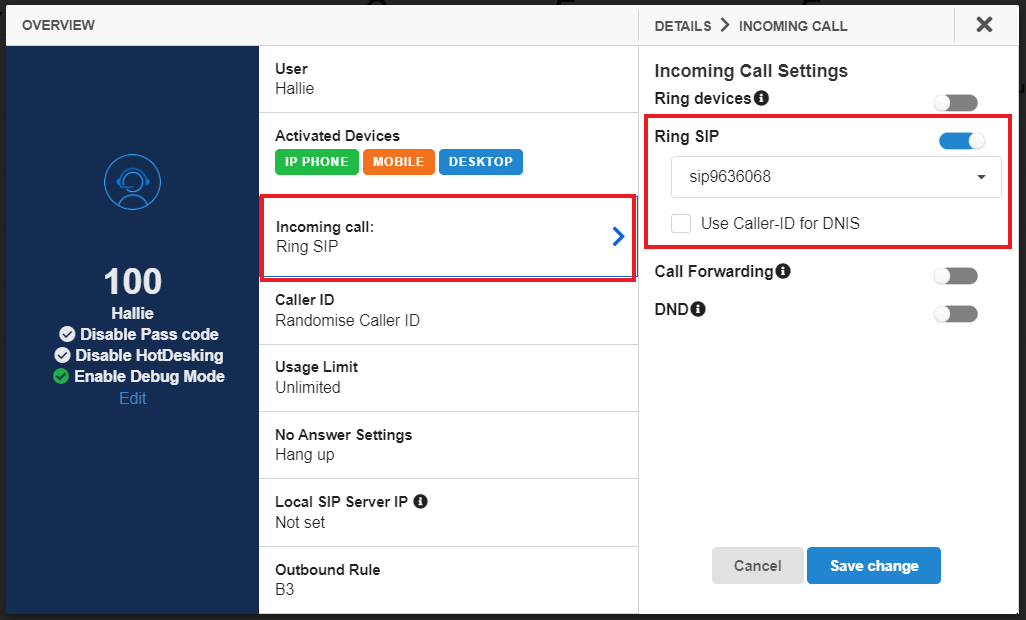
4. Incoming call device
Note:
Users must have the appropriate License to set up Activated devices in order to receive incoming calls.
- User can receive incoming calls through:
- IP Phone
- Bizphone Mobile App
- Bizphone Desktop App
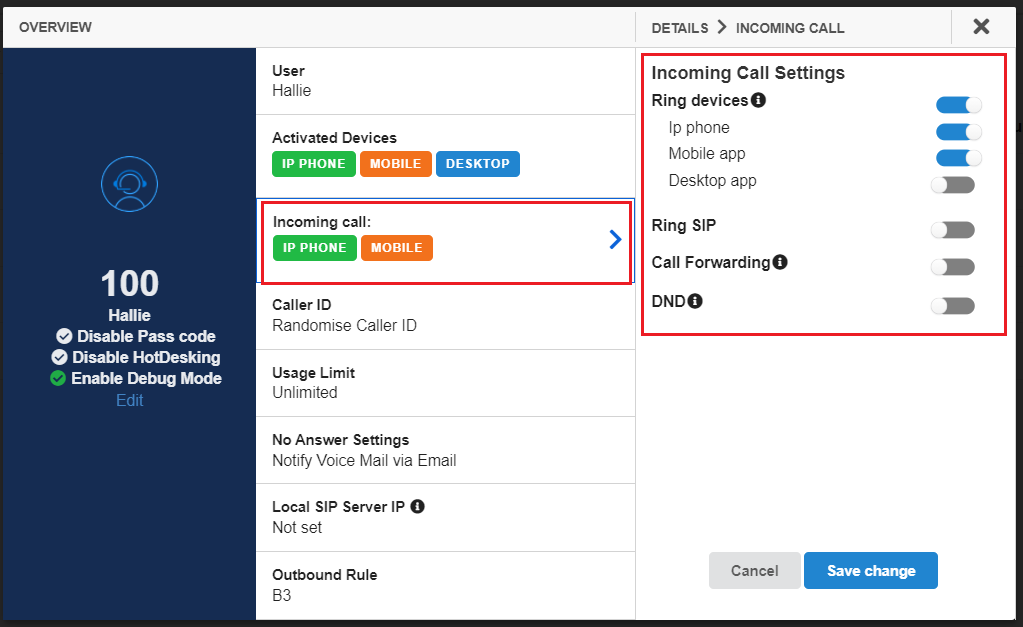
- Calls can also be forwarded to:
- To a Number or Extension
- *VIP list: The incoming calls from this list will not be forwarded.
- In case, the extension is mapped to a Bizphone Gateway, all incoming calls will be directed to the SIP account.
Note:
- If the number is assigned to a Call Group, only one number can be added when configuring call forwarding.
- If an Extension forwards to a Call Group by Group Key, only one Extension Group Key can be added.
- These restrictions only apply to newly created extensions.
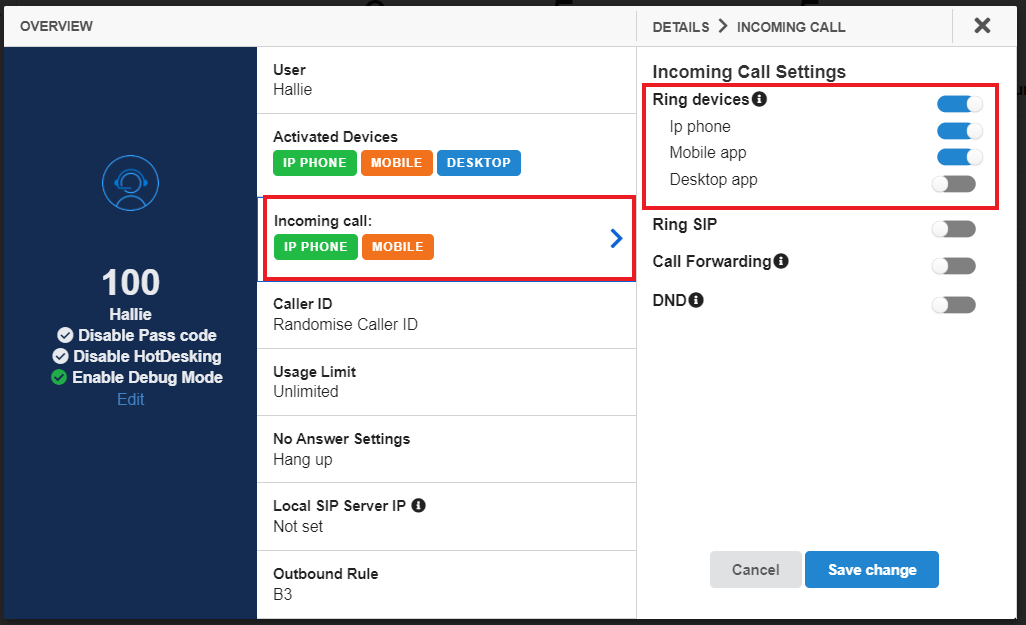
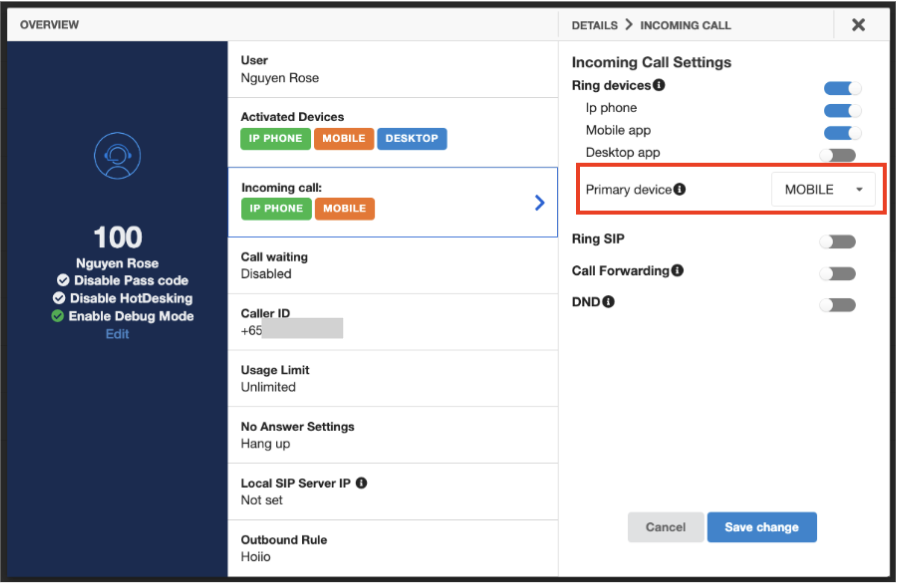
Ring Devices
User can receive incoming calls through:
- IP Phone
- Bizphone Mobile App
- Bizphone Desktop App
-
Note:
- For Normal extension, users can simultaneously set incoming calls to ring up to 3 devices.
- If the User is added to a Call Group, you can only set incoming calls to ring 1 device.
- If the User is a Contact Center Extension, you can only set incoming calls to ring 1 device.
- If the user only has one activated device then by default only that device will be rung.
- If the user has more than one activated device, then the default device will be the last answered incoming and outgoing device.
- If the user is a Contact Center Extension, then the default Primary Device will be as configured.
- If the user only has one activated device then by default only that device will be rung.
- If the user has more than one activated device, then by default the incoming calls will follow this priority IP Phone > Mobile > Desktop (unless configured otherwise)
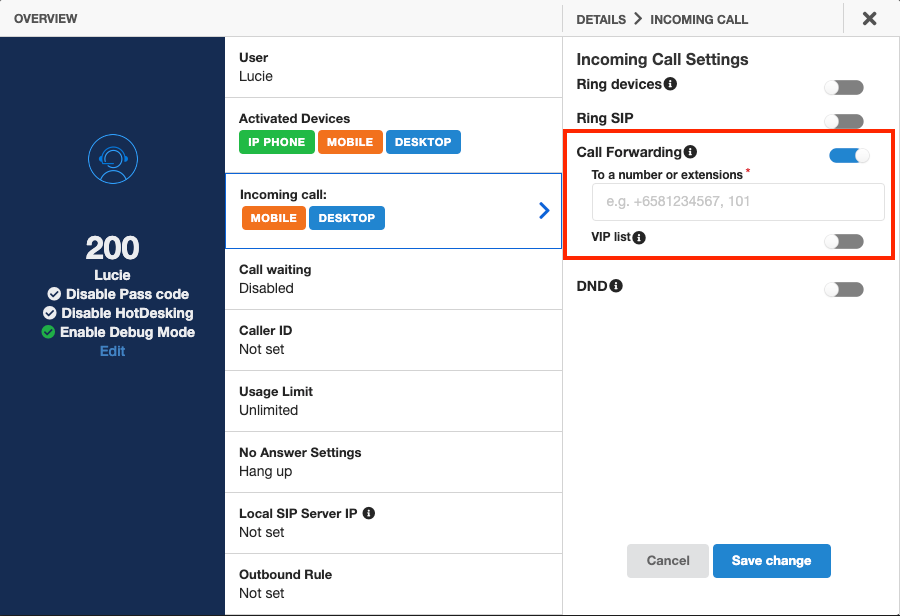
Call Forwarding
- All of the incoming calls will be forwarded to 1 phone number and/or multiple extensions.
- When the user keys in more than 1 Number, display a message: "Maximum 1 Phone Number."
- When call forwarding is enabled, you won't receive calls on any of your activated devices.
-
VIP list: the incoming calls from phone numbers and/or extensions in this list won't be forwarded. Those devices enabled before this Call Forwarding function was activated will receive those calls.
- Use case: Calls are currently received via IP Phone and Mobile App on Ext 100. Now she only wants to receive calls from +6531234567 & +6569876543. All other incoming calls will be directed to extensions 101, 102 and 103.
- Setup Guide:
- Turn on Call Forwarding
- Turn on To extensions: add ext 101, 102, 103 to forward all the calls to them.
- Turn on VIP list: add +6531234567 & +6569876543
- Save change
- Now calls from +6531234567 & +6569876543 will go directly to ext 100's IP Phone & Mobile App. All other incoming calls will be forwarded to ext 101, 102 and 103.
-
VIP list: the incoming calls from phone numbers and/or extensions in this list won't be forwarded. Those devices enabled before this Call Forwarding function was activated will receive those calls.
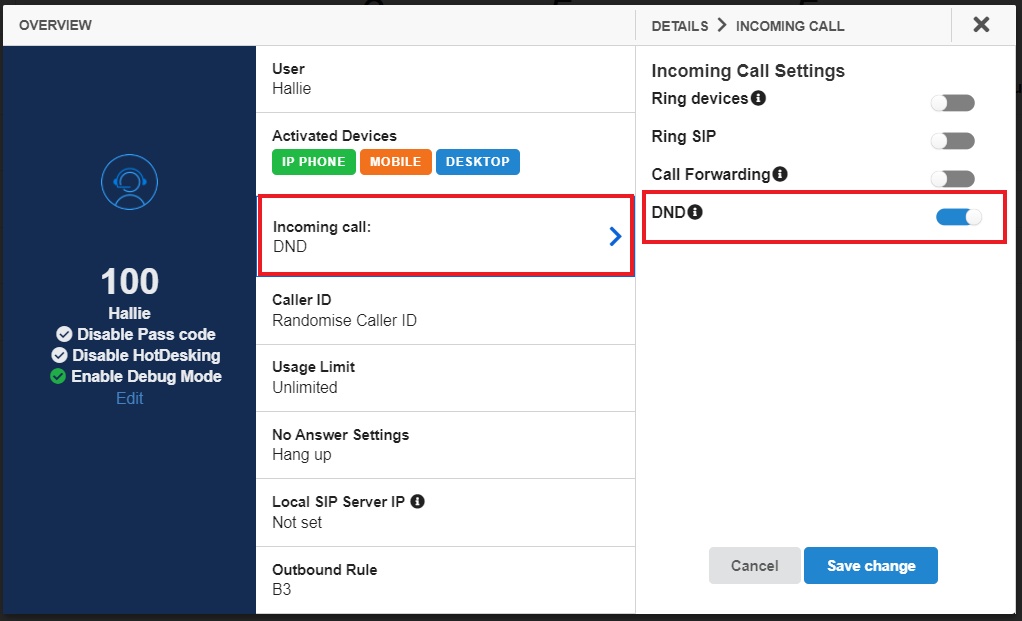
DND - Do not disturb
- When this feature is enabled, the user won't be able to receive or forward any calls.
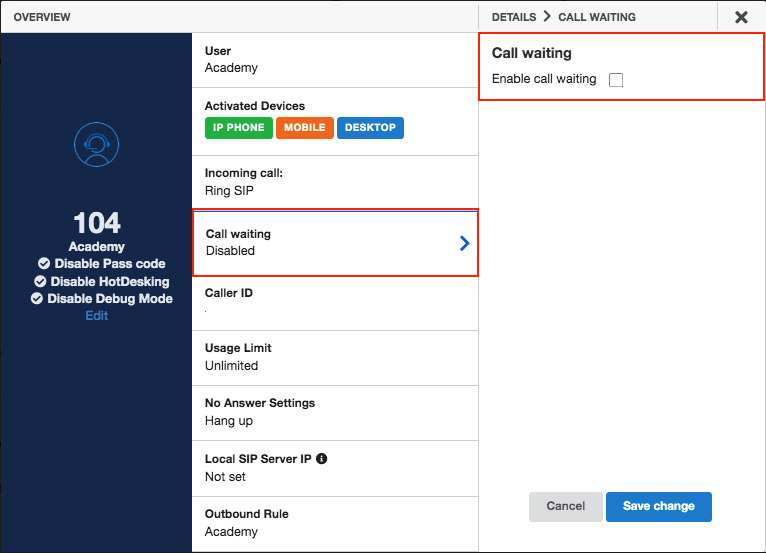
5. Call Waiting
Call Waiting is a feature that allows the system to notify you when there is a second incoming call while you are on phone with another caller.
Note:
This feature is only applicable for Normal Type.
To enable/disable this function, please tick on the box to activate it.
6. Caller ID
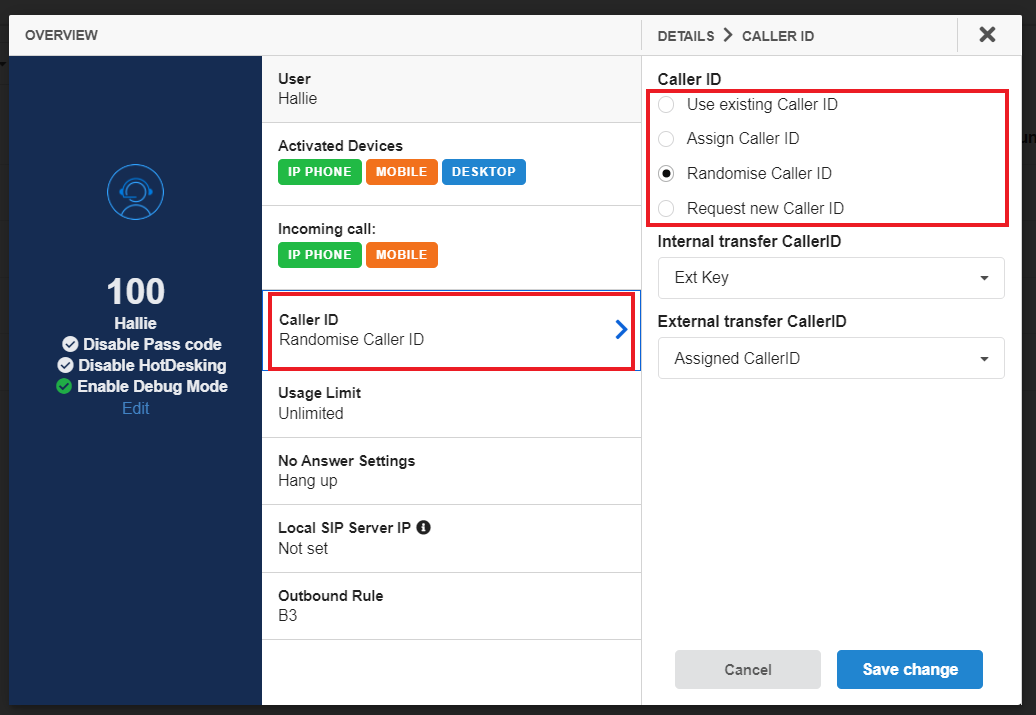
Caller Identification (Caller ID) is the number displayed on recipient's phone.
Caller ID options
- User existing caller ID: choose one caller ID among the purchased DIDs (from subscriptions) and registered mobile number. The callerID is fixed.
- Assign Caller ID: Admins can assign a list of caller IDs to the user. Users can only choose one number from the assigned caller ID list as his/her caller ID.
- Randomize caller ID: CallerID is randomized every time you make a call.
- Request new caller ID: if you want to rebrand your own numbers, key in a number and save changes. We'll be notified and support you.
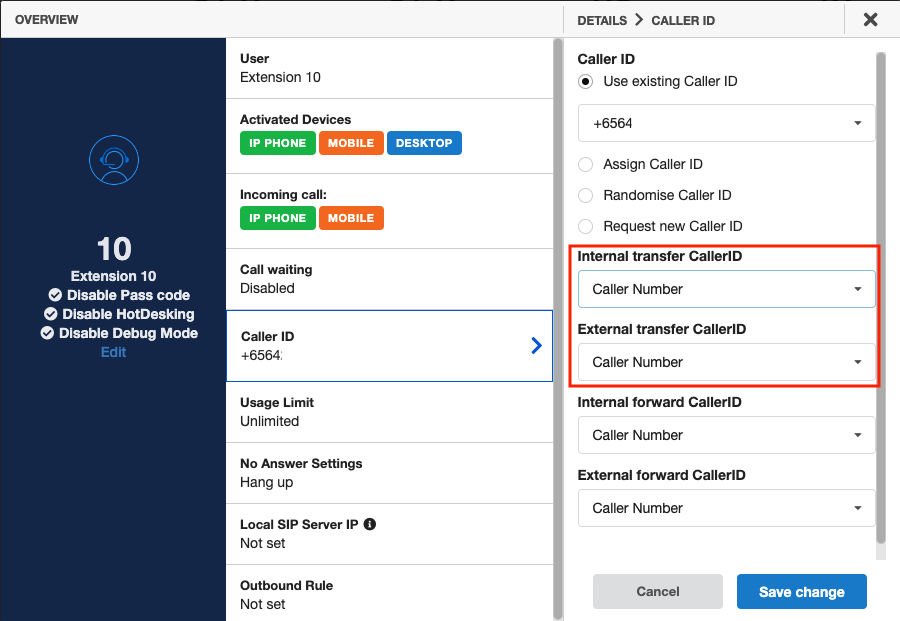
Internal/External transfer CallerID
Users can determine which caller ID will be displayed on the transferred destination.
There are 2 options:
- For Internal: Extention Key / Caller Number (the original caller number)
- For External: Assigned CallerID / Caller Number (the original caller number)
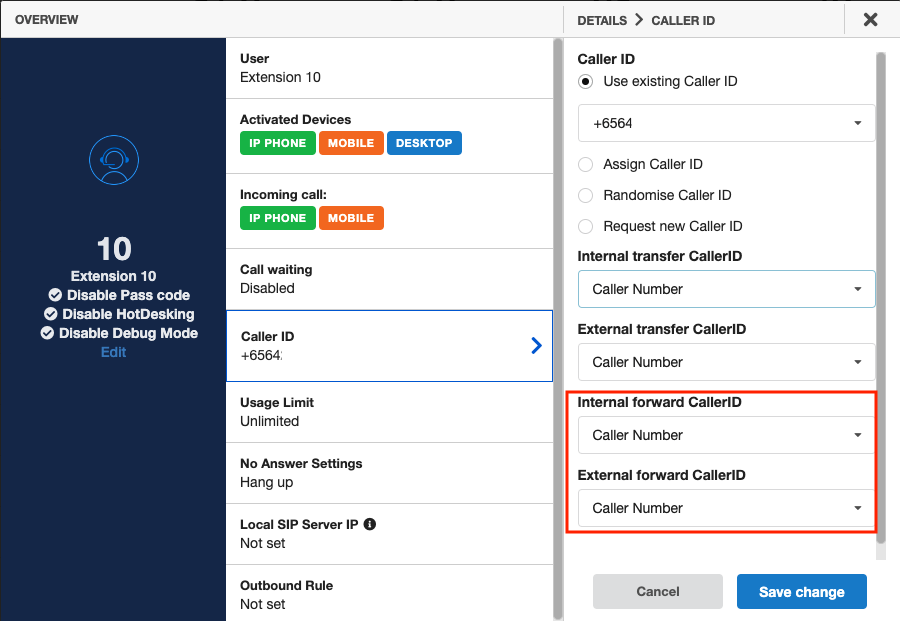
Internal/ External forward CallerID
Users can determine which caller ID will be displayed on the forwarded destination.
There are 2 options:
- For Internal: Extention Key / Caller Number (the original caller number)
- For External: Assigned CallerID / Caller Number (the original caller number)
7. Usage Limit
Note:
This option is only available for Normal Extension.
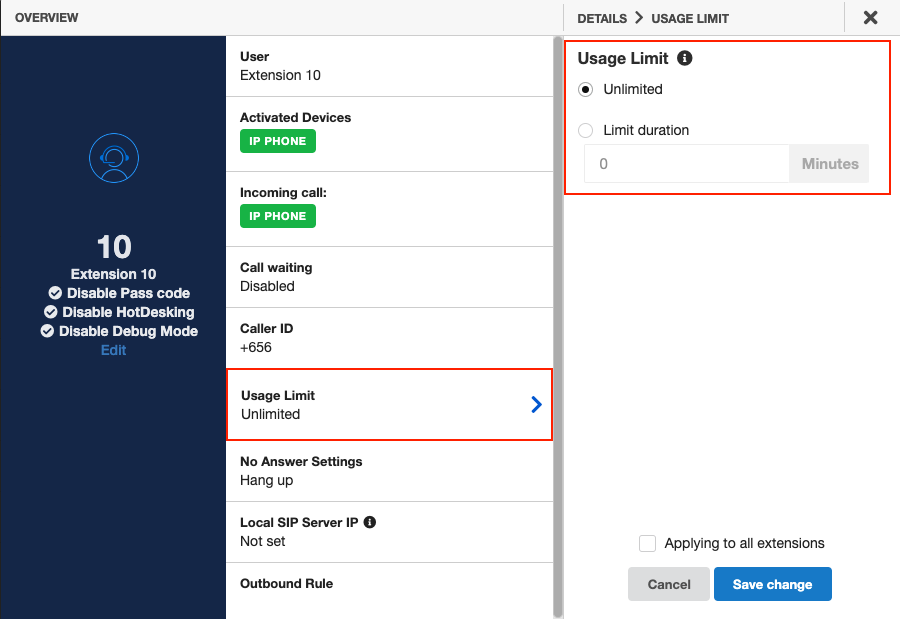
Owner/Admins can control their members' usage by setting a usage limit for each extension.
Unlimited
- No limitation in the using amount.
Limit duration
- Each month, the user is only allowed to call within the set amount of time.
- This amount will reset on the first day of the month.
8. No Answer Settings
Note:
This option is only available for Normal Extension.
In the case the extension is a block in Virtual Line, the no-answering rules only work when this extension is the last step of the flow. If it has any next step, these No Answer Settings will be ignored.
To set up, please follow the instructions below:
Choose an Action:
- Forward call to a number
- Simply hang up the incoming call
- Record the number and notify via email
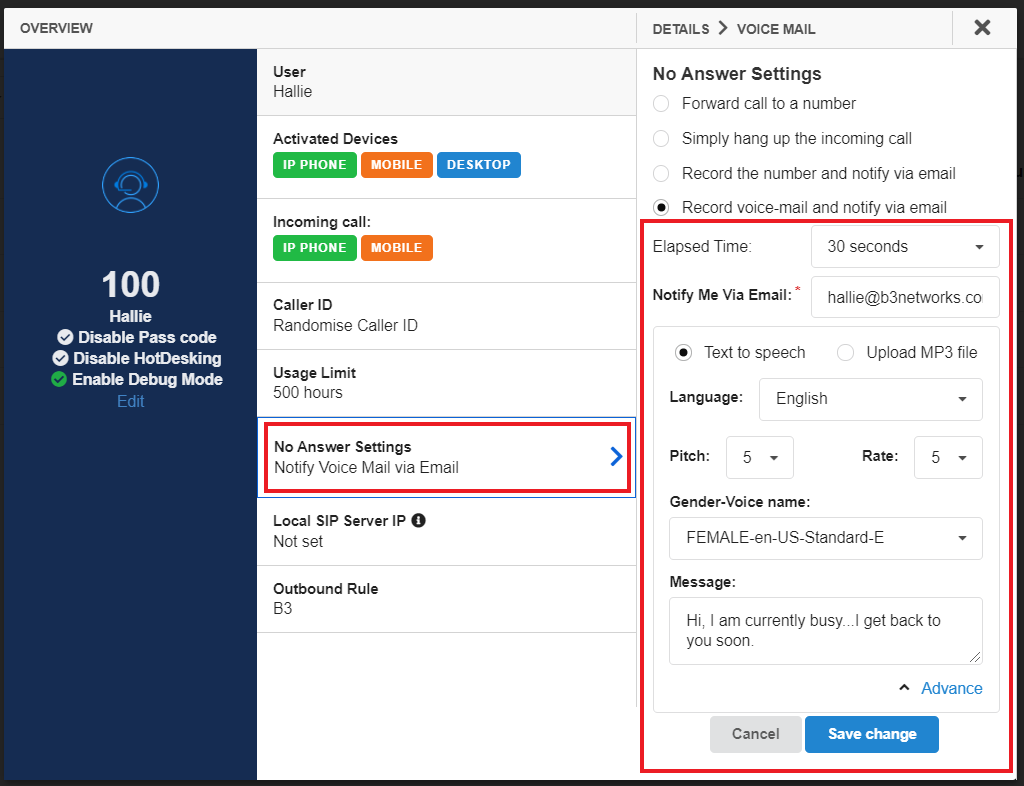
- Record voice-mail and notify via email
- Limitation: 1 minute/voicemail
For 1, Input a forwarded number
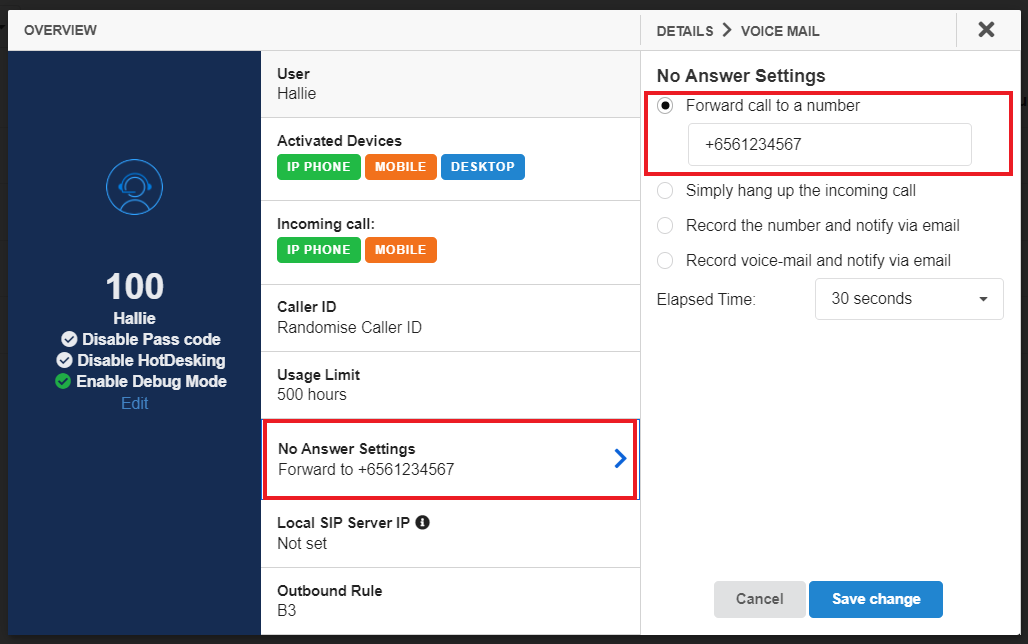
For 2, 3, 4, Select Elapsed Time
- The amount of time that passes from the Incoming call starts to the Voice mail plays.
- It means after an amount of time, if the Bizphone user does not pick up the call, the Voice mail action will begin.
- From 5 seconds up to 60 seconds.
Notify via Email
Fill in the emails that you would like to receive Missed call notification.
Set-up Message to play
There are 2 options:
- Upload MP3 file
- Text to Speech
- Choose Language.
- Choose Pitch: the degree of highness or lowness of a tone; from 0 (lowest) to 9 (highest).
- Choose Rate: the speed; from 0 (slowest) to 9 (fastest).
- Choose the Gender of the voice.
- Type in the Message.
9. Local SIP Server IP
This function works in the case an organization sets up a firewall to limit internet connections.
Select Local SIP Server IP > Key in the server IP > Save change
Note:
Only applicable for Desktop app.
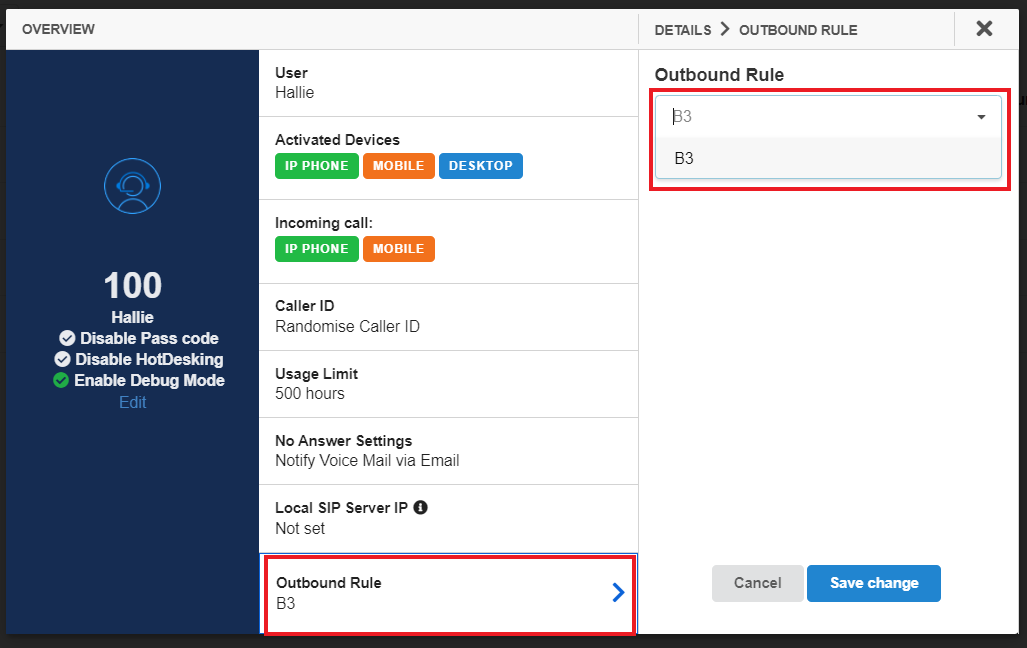
10. Outbound Rule
Click HERE for more information about Outbound Rule.
Select a created Outbound Rule > Save change
